
In this post, we will describe the setup of our Lab environment and install the basic infrastructure services that OpenStack uses.
Environment setup
In a real world setup, OpenStack runs on a collection of physical servers on which the virtual machines provided by the cloud run. Now most of us will probably not have a rack in their basement, so that using four or five physical servers for our labs is not a realistic option. Instead, we will use virtual machines for that purpose.
To avoid confusion, let us first fix some terms. First, there is the actual physical machine on which the labs will run, most likely a desktop PC or a laptop, and most likely the PC you are using to read this post. Let us call this machine the lab host.
On this host, we will run Virtualbox to create virtual machines. These virtual machines will be called the nodes, and they will play the role that in a real world setup, the physical servers would play. We will be using one controller node on which most of the OpenStack components will run, and two compute nodes.
Inside the compute nodes, the Nova compute service will then provision virtual machines which we call VMs. So effectively, we use nested virtualization – the VM is itself running inside a virtual machine (the node).
To run the labs, your host will need to have a certain minimum amount of RAM. When I tested the setup, I found that the controller node and the compute nodes in total consume at least 7-8 GB of RAM, which will increase depending on the number of VMs you run. To still be able to work on the machine, you will therefore need at least 16 GB of RAM. If you have more – even better. If you have less, you might also want to use a cloud based setup. In this case, the host could itself be a virtual machine in the cloud, or you could use a bare-metal provider like Packet to get access to a physical host with the necessary memory.
Not every cloud will work, though, as it needs to support nested virtualization. I have tested the setup on DigitalOcean and found that it works, but other cloud providers might yield different results.
Networking
Let us now take a look at the network configuration that we will use for our hosts. If you run OpenStack, there will be different categories of traffic between the nodes. First, there is management traffic, i.e. communication between the different components of the platform, like messages exchanged via RabbitMQ or API calls. For security and availability reasons, this traffic is typically handled via a dedicated management network. The management network is configured by the administrator and used by the OpenStack components.
Then, there is traffic between the VMs, or, more precisely, between the guests running inside the VMs. The network which is supporting this traffic is called the guest network. Note that we are not yet talking about a virtual network here, but about the network connecting the various nodes which eventually will be used for this traffic.
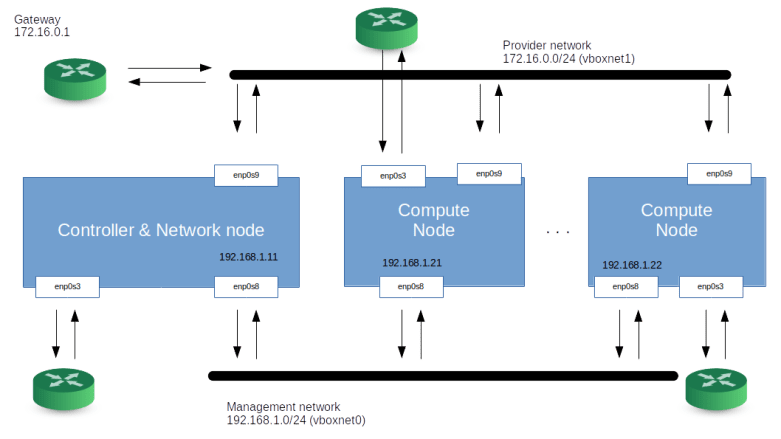
Sometimes, additional network types need to be considered, there could for instance be a dedicated API network to allow end users and administrators access to the API without depending on any of the other networks, or a dedicated external network that connects the network node to a physical route to provide internet access for guests, but for this setup, we will only use a two networks – a management network and a guest network. Note that the guest network needs to be provided by an adminstrator, but is controlled by Openstack (which, for instance, will add the interfaces that make up the network to virtual bridges so that they can no longer be used for other traffic).
In our case, both networks, the management network and the guest network, will be set up as Virtualbox host-only networks, connecting our nodes. Here is a diagram that summarizes the network topology we will use.
Setting up your host and first steps
Let us now roll up our sleeves and dive right into the first lab. Today, we will bring up our environment, and, on each node, install the required infrastructure like MySQL, RabbitMQ and so forth.
First, however, we need to prepare our host. Obviously, we need some tools installed – Vagrant, Virtualbox and Ansible. We will also use pwgen to create credentials. How exactly these tool need to be installed depends on your Linux distribution, on Ubuntu, you would run
sudo apt-get install python3-pip
pip3 install 'ansible==v2.8.6'
sudo apt-get install pwgen
sudo apt-get install virtualbox
sudo apt-get install vagrant
The Ansible version is important. I found that there is at least oneissue which breaks network creation in OpenStack with Ansible with some 2.9.x versions of Ansible.
When we set up our labs, we will sometimes have to throw away our environment and rebuild it. This will be fully automated, but it implies that we need to download packages into the nodes over and over again. To speed up this process, we install a local APT cache. I use APT-Cacher-NG for that purpose. Installing it is very easy, simply run
sudo apt-get install apt-cacher-ng
This will install a proxy, listening on port 3142, which will create local copies of packages that you install. Later, we will instruct the apt processes running in our virtual machines to use this cache.
Now we are ready to start. First, you will have to clone my repository to get a copy of the scripts that we will use.
git clone https://github.com/christianb93/openstack-labs
cd openstack-labs/Lab1
Next, we will bring up our virtual machines. There is, however, a little twist when it comes to networking. As mentioned above, we will use Virtualbox host networking. As you might know when you have read my previous post on this topic, Virtualbox will create two virtual devices to support this, one for each network. These devices will be called vboxnet0 and vboxnet1. However, if these devices already exist, Virtualbox will use them and take over parts of the existing network configuration. This can lead to problems later, if, for instance, Virtualbox runs a DHCP server on this device, this will conflict with the OpenStack DHCP agent and your VMs will get incorrect IP addresses and will not be reachable. To avoid this, we will delete any existing interfaces (which of course requires that you stop all other virtual machines) and recreate them before we bring up our machines. The repository contains a shells script to do this. To run it and start the machines, enter
../scripts/createVBoxNetworks.sh
vagrant up
We are now ready to run our playbook. Before doing this, let us first discuss what the scripts will actually do.
First, we need a set of credentials. These credentials consist of a set of randomly generated passwords that we use to set up the various users that the installation needs (database users, RabbitMQ users, Keystone users and so forth) and an SSH key pair that we will use later to access our virtual machines. These credentials will be created automatically and stored in ~/.os_credentials.
Next, we need a basic setup within each of the nodes – we will need the Python OpenStack modules, we will need to bring up all network interfaces, and we will update the /etc/hosts configuration files in each of the nodes to be able to resolve all other nodes.
We will also change the configuration of the APT package manager. We will point APT to the APT cache running on the host and we will add the Ubuntu OpenStack Cloud Archive repository to the repository list from which we will pull the OpenStack packages.
Next, we need to make sure that the time on all nodes is synchronized. To achieve this, we install a network of NTP daemons. We use Chrony and set up the controller as Chrony server and the compute nodes as clients. We then install MySQL, Memcached and RabbitMQ on the controller node and create the required users.
All this is done by the playbook site.yaml, and you can simply run it by typing
ansible-playbook -i hosts.ini site.yaml
Once the script completes, we can run a few checks to see that everything worked. First, log into the controller node using vagrant ssh controller and verify that Chrony is running and that we have network connectivity to the other nodes.
sudo systemctl | grep "chrony"
ping compute1
ping compute2
Then, verify that you can log into MySQL locally and that the root user has a non-empty password (we can still log in locally as root without a password) by running sudo mysql and then, on the SQL prompt, typing
select * from mysql.user;
Finally, let us verify that RabbitMQ is running and has a new user openstack.
sudo rabbitmqctl list_users
sudo rabbitmqctl node_health_check
sudo rabbitmqctl status
A final note on versions. This post and most upcoming posts in this series have been created with a lab PC running Python 3.6 and Ansible 2.8.9. After upgrading my lab PC to Ubuntu 20.04 today, I continued to use Ansible 2.8.9 because I had experienced problems with newer versions earlier on, but upgraded to Python 3.8. After doing this, I hit upon this bug that requires this fix which I reconciled manually into my local Ansible version.
We are now ready to install our first OpenStack services. In the next post, we will install Keystone and learn more about domains, users, projects and services in OpenStack.

7 Comments