Basis structure of a token and the ERC20 standard

What is a token? The short answer is that a token is a smart contract that records and manages ownership in a digital currency. The long answer is in this post.

Building a digital currency – our first attempt

Suppose for a moment you wanted to issue a digital currency and were thinking about the design of the required software package. Let us suppose further that you have never heard of a blockchain before. What would you probably come up with?

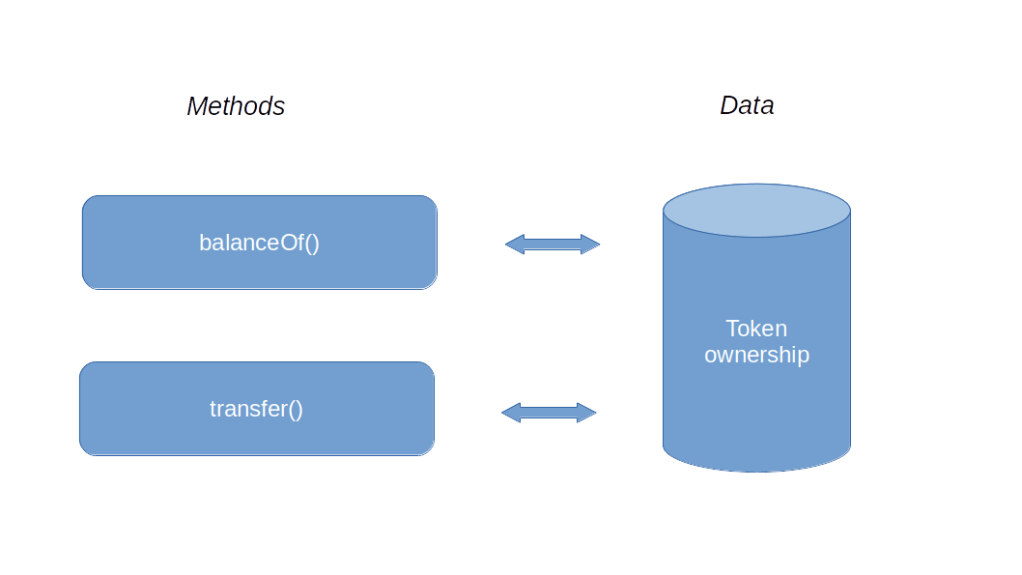
First, you would somehow need to record ownerhip. In other words, you will have to store balances somewhere, and associate a balance to every participant or client in the system, represented by an account. In a traditional IT, this would imply that somewhere, you fire up a database, maybe a relational database, that has a table with one row per account holding the current balance of this account.

Next, you would need a function that allows you to query the balance, something like balanceOf, to which you pass an account and with returns the balance of this account, looking up the value in the database. And finally, you would want to make a transfer. So you would have a method transfer which the owner of an account can use to transfer a certain amount to another account. This method would of course have to verify that whoever calls it (say you expose it as an API) is the holder of the account from which the transfer is made, which could be done using certificates or digital signatures and is well possible with traditional technology. So your first design would be rather minimalistic.

This would probably work, but is not yet very powerful. Let us add a direct debit functionality, i.e. let us allow users to withdraw a pre-approved amount of money from an account. To realize this, you could come up with a couple of additional functions.

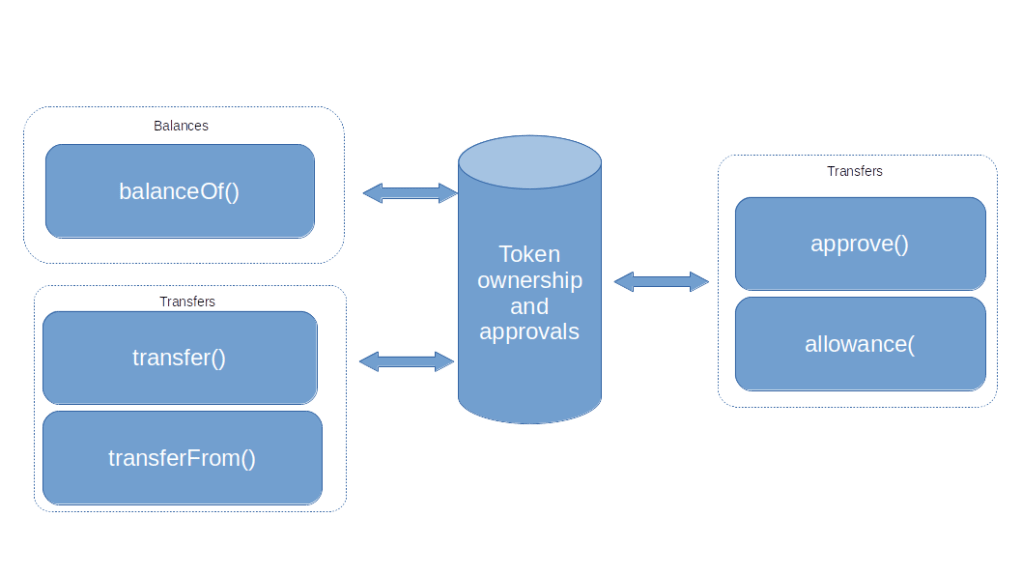
  • First, you would add a function approve() that the owner of an account can invoke to grant permission to someone else (identified again by an account) to withdraw a certain amount of currency
  • You would probably also want to store these approvals in the database and add a function approval() to read them out
  • Finally, you would add a second function – say transferFrom – to allow withdrawals

Updating your diagram, you would thus arrive at the following design for your digital currency.

This is nice, but it still has a major drawback – someone will eventually need to operate the database and the application, and could theoretically manipulate balances and allowances directly in the database, bypassing all authorizations. The same person could also try to manipulate the code, building in backdoors or hidden transfers. So this system only qualifies as an acceptable digital currency if it is embedded into a system of regulations and audits that tries to avoid these sort of manipulations.

The ERC20 token standard

Now suppose further that you are still sitting in at your desk and scratching your head, thinking about this challenge when someone walks into your office and tells you that a smart person has just invented a technology called blockchain that allows you to store data in way that makes it extremely hard to manipulate it and also allows you to store and run immutable programs called smart contracts. Chances are that this would sound like the perfect solution to you. You would dig into this new thing, write a smart contract that stores balances and approvals in its storage on the blockchain and whose methods implement the functions that appear in your design, and voila – you have implemented your first token.

Essentially, this is how a token works. A token is a smart contract that, in its storage, maintains a data structure mapping accounts to balances, and offers methods to transfer digital currency between accounts, thus realizing a digital currency on top of Ethereum. These “sub-currencies” were among the first applications of smart contracts, and attempts to standardize these contracts have already been started in 2015, shortly after the Ethereum blockchain was launched (see for instance this paper cited by the later standard). The final standard is now known as ERC20.

I strongly advise you to take a look at the standard itself, which is actually quite readable. In addition to the functions that we have already discussed, it defines a few optional methods to read token metadata (like its name, a symbol and how to display decimals), a totalSupply method that returns the total number of token emitted and events that fire when approvals are made or token are transferred. Here is an overview of the components of the standard.

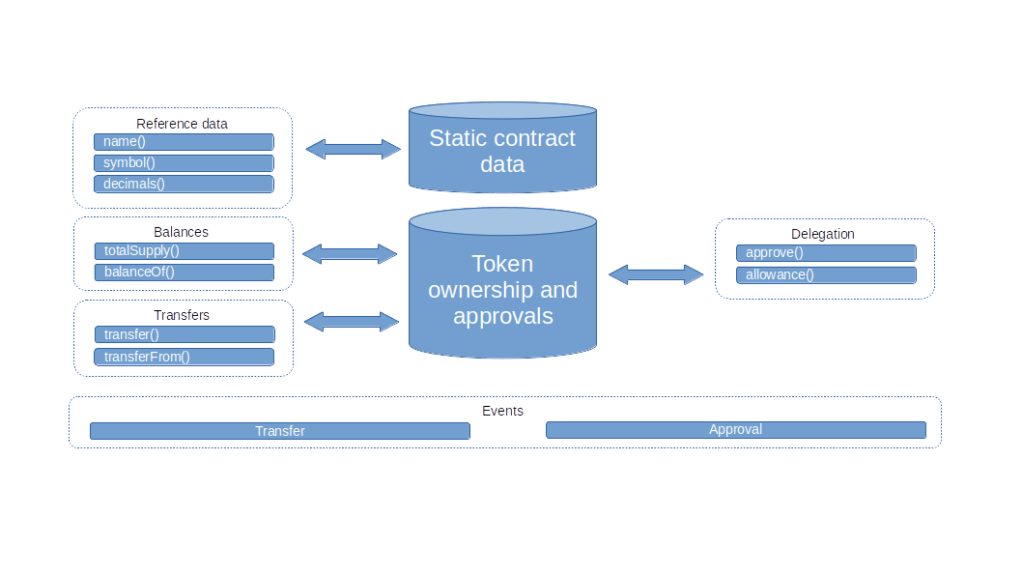
Note that it is up to the implementation whether the supply of token is fixed or token can be created (“minted”) or burnt. The standard does, however, specify that an implementation should emit an event if this happens.

Coding a token in Solidity

Let us now discuss how to implement a token according to the ERC20 standard in Solidity. The code for our token can be found here. Most of it is straightforward, but there is a couple of features of the Solidity language that we have not yet come across and that require explanation.

First, let us think about the data structures that we will need. Obviously, we somehow need to store balances per account. This calls for a mapping, i.e. a set of key-value pairs, where the keys are addresses and the value for a given address is the balance of this address, i.e. the number of token owned by this address. The value can be described by an integer, say a uint256. The address is not simply a string, as Solidity has a special data type called address. So the data structure to hold the balances is declared as follows.

mapping(address => uint256) private _balances;

Mappings in Solidity are a bit special. First, there is no way to visit all elements of a map like this, i.e. there nothing like x.keys() to get a list of all keys that appear in the mapping. Solidity will also allow you to access an element of a mapping that has not been initialized, this will return the default value for the respective data type, i.e. zero in our case. Thus, logically, our mapping covers all possible addresses and assigns an initial balance zero to them.

A similar mapping can be used to track allowances. This is a mapping whose values are again mappings. The first key (the key of the top-level mapping) is the owner of the account, the second key is the address authorized to perform a transfer (called the spender) , and the value is the allowance.

mapping (address => mapping (address => uint256)) private _allowance;

The next mechanism that we have not yet seen is the constructor which will be called when the contract is deployed. We use it to initialize some variables that we will need later. First, we store the msg.sender which is one of the pre-defined variables in Solidity and is the address of the account that invoked the constructor, i.e. in our case the account that deployed the contract. Note that msg.sender refers to the address of the EOA or contract that is the immediate predecessor of the contract in the call chain. In contrast to this, tx.origin is the EOA that signed the transaction. In the constructor, we also set up the initial balance of the token owner.

The remaining methods are straightforward, with one exception – validations. Of course, we need to validate a couple of things, for instance that the balance is sufficient to make a transfer. Thus we would check a condition, and, depending on the boolean value of that condition, revert the transaction. This combination is so common that Solidity has a dedicated instruction to do this – require. This accepts a boolean expression and a string, and, if the expression evaluates to false, reverts using the string as return value. Unfortunately, it is currently not possible for an EOA to get access to the return value of a reverted transaction, as this data is not part of the transaction receipt (see EIP-658 and EIP-758 for some background on this), but this is possible if you make a call to the contract.

This raises an interesting question. In some unit tests, for instance in this one that I have written to test my token implementation, we test whether a transaction reverts by assuming that submitting a transaction raises a Python exception. For instance, the following lines

with brownie.reverts("Insufficient balance"):
    token.transfer(alice.address, value, {"from": me.address});

verify that the transfer method of our token contract actually reverts with an expected message. Now we have just seen that the message is not part of the transaction receipt – how does Brownie know? It turns out that the handling of reverted transactions in the various frameworks is a bit tricky, in this case this works because we do not provide a gas limit – I will dive a bit deeper into the mechanics of revert in a later post.

Testing the token using MetaMask

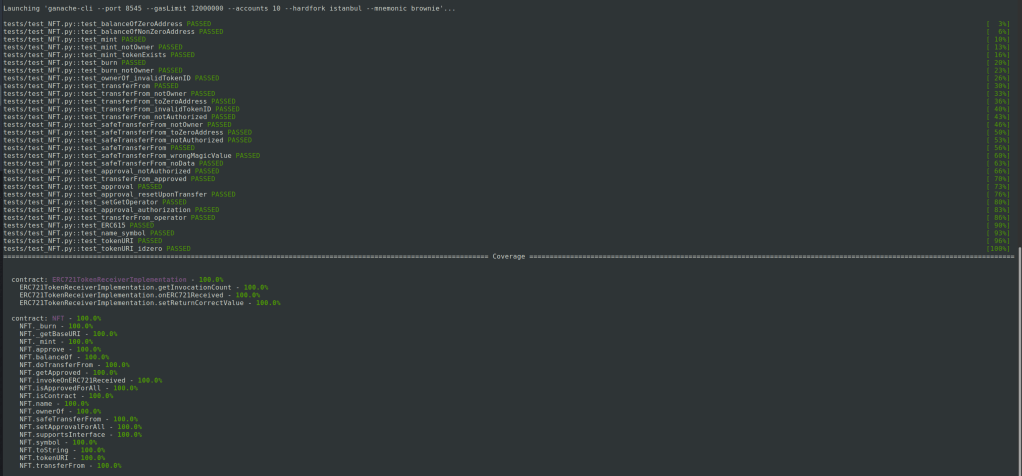
Let us now deploy and test our token. If you have not done so, clone my repository, set up a Brownie project directory, add symbolic links to the contracts and test cases and run the tests.

git clone https://github.com/christianb93/nft-bootcamp
cd nft-bootcamp
mkdir tmp
cd tmp
brownie init
cd contracts
ln ../../contracts/Token.sol .
cd ../tests
ln ../../tests/test_Token.py
cd ..
brownie test 

Assuming that the unit tests complete successfully, we can use Brownie to deploy a copy of the token as usual (or any of the alternative methods discussed in previous posts)

brownie console
me = accounts[0]
token = Token.deploy({"from": me})
token.balanceOf(me)

At this point, the entire supply of token is allocated to the contract owner. To play with MetaMask, we need two additional accounts of which we know the private keys. Let us call them Alice and Bob. Enter the following commands to create these accounts and make sure to write down their addresses and private keys. We also transfer an initial supply of 1000 token to Alice and equip Alice with some Ether to be able to make transactions.

alice = accounts.add()
alice.private_key
alice.address
bob = accounts.add()
bob.private_key
bob.address
token.transfer(alice, 1000, {"from": me})
me.transfer(alice, web3.toWei(1, "ether"))
alice.balance()

Next, we will import or keys and token into MetaMask. If you have not done this yet, go ahead and install the MetaMask extension for your browser. You will be directed to the extension store for your browser (I have been using Chrome, but Firefox should work as well). Add the extension (you might want to use a separate profile for this). Then follow the instructions to create a new wallet. Set a password to protect your wallet and save the seed phrase somewhere.

You should now see the MetaMask main screen in front of you. At the right hand side at the top of the screen, you should see a switch to select a network. Click on it and select “Localhost 8545” to connect to the – still running – instance of Ganache. Then, click on the icon next to the network selector and import the account of Alice by entering the private key. You should now see a new account (for me, this was “Account 2”) with the balance of 1 ETH.

Next, we will add the token. Click on “Add Token”, collect the contract address from brownie (token.address) and enter it. You should now see a balance of “10 MTK”. Note how MetaMask uses the decimals – Alice owns 1000 token, and we have set the decimals (the return value of token.decimals()) to two, so that MetaMask interprets the last two zeros as decimals and displays ten.

Now let us use MetaMask to make a transfer – we will send 100 token to Bob. Click on “Send” and enter the address of Bob. Now select 1 MTK (remember the decimals again). Confirm the transaction. After a few seconds, MetaMask should inform you that the transaction has been mined. You will also see that the balance of Alice in ETH has decreased slightly, as she needed to pay for the gas, and her MTK balance has been decreased. Finally, switch back to Brownie and run

token.balanceOf(bob)

to confirm that Bob is now proud owner of 100 token.

Today, we have discussed the structure of a token contract, introduced you to the ERC20 standard, presented an implementation in Solidity and verified that this contract is able to interact with the MetaMask wallet as expected. In the next post, we will discuss a few of the things that can go terribly wrong if you implement smart contracts without thinking about the potential security implications of your design decisions.

Compiling and deploying a smart contract with geth and Python

In our last post, we have been cheating a bit – I have shown you how to use the web3 Python library to access an existing smart contract, but in order to compile and deploy, we have still been relying on Brownie. Time to learn how this can be done with web3 and the Python-Solidity compiler interface as well. Today, we will also use the Go-Ethereum client for the first time. This will be a short post and the last one about development tools before we then turn our attention to token standards.

Preparations

To follow this post, there is again a couple of preparational steps. If you have read my previous posts, you might already have completed some of them, but I have decided to list them here once more, in case you are just joining us or start over with a fresh setup. First, you will have to install the web3 library (unless, of course, you have already done this before).

sudo apt-get install python3-pip python3-dev gcc
pip3 install web3

The next step is to install the Go-Ethereum (geth) client. As the client is written in Go, it comes as a single binary file, which you can simply extract from the distribution archive (which also contains the license) and copy to a location on your path. As we have already put the Brownie binary into .local/bin, I have decided to go with this as well.

cd /tmp
wget https://gethstore.blob.core.windows.net/builds/geth-linux-amd64-1.10.6-576681f2.tar.gz
gzip -d geth-linux-amd64-1.10.6-576681f2.tar.gz
tar -xvf  geth-linux-amd64-1.10.6-576681f2.tar
cp geth-linux-amd64-1.10.6-576681f2/geth ~/.local/bin/
chmod 700 ~/.local/bin/geth
export PATH=$PATH:$HOME/.local/bin

Once this has been done, it is time to start the client. We will talk more about the various options and switches in a later post, when we will actually use the client to connect to the Rinkeby testnet. For today, you can use the following command to start geth in development mode.

geth --dev --datadir=~/.ethereum --http

In this mode, geth will be listening on port 8545 of your local PC and bring up local, single-node blockchain, quite similar to Ganache. New blocks will automatically be mined as needed, regardless of the gas price of your transactions, and one account will be created which is unlocked and at the same time the beneficiary of newly mined blocks (so do not worry, you have plenty of Ether at your disposal).

Compiling the contract

Next, we need to compile the contract. Of course, this comes down to running the Solidity compiler, so we could go ahead, download the compiler and run it. To do this with Python, we could of course invoke the compiler as a subprocess and collect its output, thus effectively wrapping the compiler into a Python class. Fortunately, someone else has already done all of the hard work and created such a wrapper – the py-solc-x library (a fork of a previous library called py-solc). To install it and to instruct it to download a specific version of the compiler, run the following commands (this will install the compiler in ~/.solcx)

pip3 install py-solc-x
python3 -m solcx.install v0.8.6
~/.solcx/solc-v0.8.6 --version

If the last command spits out the correct version, the binary is installed and we are ready to use it. Let us try this out. Of course, we need a contract – we will use the Counter contract from the previous posts again. So go ahead, grab a copy of my repository and bring up an interactive Python session.

git clone https://github.com/christianb93/nft-bootcamp
cd nft-bootcamp
ipython3

How do we actually use solcx? The wrapper offers a few functions to invoke the Solidity compiler. We will use the so-called JSON input-output interface. With this approach, we need to feed a JSON structure into the compiler, which contains information like the code we want to compile and the output we want the compiler to produce, and the compiler will spit out a similar structure containing the results. The solcx package offers a function compile_standard which wraps this interface. So we need to prepare the input (consult the Solidity documentation to better understand what the individual fields mean), call the wrapper and collect the output.

import solcx
source = "contracts/Counter.sol"
file = "Counter.sol"
spec = {
        "language": "Solidity",
        "sources": {
            file: {
                "urls": [
                    source
                ]
            }
        },
        "settings": {
            "optimizer": {
               "enabled": True
            },
            "outputSelection": {
                "*": {
                    "*": [
                        "metadata", "evm.bytecode", "abi"
                    ]
                }
            }
        }
    };
out = solcx.compile_standard(spec, allow_paths=".");

The output is actually a rather complex data structures. It is a dictionary that contains the contracts created as result of the compilation as well as a reference to the source code. The contracts are again structured by source file and contract name. For each contract, we have the ABI, a structure called evm that contains the bytecode as well as the corresponding opcodes, and some metadata like the details of the used compiler version. Let us grab the ABI and the bytecode that we will need.

abi = out['contracts']['Counter.sol']['Counter']['abi']
bytecode = out['contracts']['Counter.sol']['Counter']['evm']['bytecode']['object']

Deploying the contract

Let us now deploy the contract. First, we will have to import web3 and establish a connection to our geth instance. We have done this before for Ganache, but there is a subtlety explained here – the PoA implementation that geth uses has extended the length of the extra data field of a block. Fortunately, web3 ships with a middleware that we can use to perform a mapping between this block layout and the standard.

import web3
w3 = web3.Web3(web3.HTTPProvider("http://127.0.0.1:8545"))
from web3.middleware import geth_poa_middleware
w3.middleware_onion.inject(geth_poa_middleware, layer=0)

Once the middleware is installed, we first get an account that we will use – this is the first and only account managed by geth in our setup, and is the coinbase account with plenty of Ether in it. Now, we want to create a transaction that deploys the smart contract. Theoretically, we know how to do this. We need a transaction that has the bytecode as data and the zero address as to address. We could probably prepare this manually, but things are a bit more tricky if the contract has a constructor which takes arguments (we will need this later when implementing our NFT). Instead of going through the process of encoding the arguments manually, there is a trick – we first build a local copy of the contract which is not yet deployed (and therefore has no address so that calls to it will fail – try it) then call its constructor() method to obtain a ContractConstructor (this is were the arguments would go) and then invoke its method buildTransaction to get a transaction that we can use. We can then send this transaction (if, as in our case, the account we want to use is managed by the node) or sign and send it as demonstrated in the last post.

me = w3.eth.get_accounts()[0];
temp = w3.eth.contract(bytecode=bytecode, abi=abi)
txn = temp.constructor().buildTransaction({"from": me}); 
txn_hash = w3.eth.send_transaction(txn)
txn_receipt = w3.eth.wait_for_transaction_receipt(txn_hash)
address = txn_receipt['contractAddress']

Now we can interact with our contract. As the temp contract is of course not the deployed contract, we first need to get a reference to the actual contract as demonstrated in the previous post – which we can do, as we have the ABI and the address in our hands – and can then invoke its methods as usual. Here is an example.

counter = w3.eth.contract(address=address, abi=abi)
counter.functions.read().call()
txn_hash = counter.functions.increment().transact({"from": me});
w3.eth.wait_for_transaction_receipt(txn_hash)
counter.functions.read().call()

This completes our post for today. Looking back at what we have achieved in the last few posts, we are now proud owner of an entire arsenal of tools and methods to compile and deploy smart contracts and to interact with them. Time to turn our attention away from the simple counter that we used so far to demonstrate this and to more complex contracts. With the next post, we will actually get into one the most exciting use cases of smart contracts – token. Hope to see you soon.

Using web3.py to interact with an Ethereum smart contract

In the previous post, we have seen how we can compile and deploy a smart contract using Brownie. Today, we will learn how to interact with our smart contract using Python and the Web3 framework which will also be essential for developing a frontend for our dApp.

Getting started with web3.py

In this section, we will learn how to install web3 and how to use it to talk to an existing smart contract. For that purpose, we will once more use Brownie to run a test client and to deploy an instance of our Counter contract to it. So please go ahead and repeat the steps from the previous post to make sure that an instance of Ganache is running (so do not close the Brownie console) and that there is a copy of the Counter smart contract deployed to it. Also write down the contract address which we will need later.

Of course, the first thing will again be to install the Python package web3, which is as simple as running pip3 install web3. Make sure, however, that you have GCC and the Python development package (python3-dev on Ubuntu) on your machine, otherwise the install will fail. Once this completes, type ipython3 to start an interactive Python session.

Before we can do anything with web3, we of course need to import the library. We can then make a connection to our Ganache server and verify that the connection is established by asking the server for its version string.

import web3
w3 = web3.Web3(web3.HTTPProvider('http://127.0.0.1:8545'))
w3.clientVersion

This is a bit confusing, with the word web3 occurring at no less than three points in one line of code, so let us dig a bit deeper. First, there is the module web3 that we have imported. Within that module, there is a class HTTPProvider. We create an instance of this class that connects to our Ganache server running on port 8545 of localhost. With this instance, we then call the constructor of another class, called Web3, which is again defined inside of the web3 module. This class is dynamically enriched at runtime, so that all namespaces of the API can be accessed via the resulting object w3. You can verify this by running dir(w3) – you should see attributes like net, eth or ens that represent the various namespaces of the JSON RPC API.

Next, let us look at accounts. We know from our previous post that Ganache has ten test accounts under its control. Let us grab one of them and check its balance. We can do this by using the w3 object that we have just created to invoke methods of the eth API, which then translate more or less directly into the corresponding RPC calls.

me = w3.eth.get_accounts()[0]
w3.eth.get_balance(me)

What about transactions? To see how transactions work, let us send 10 Ether to another address. As we plan to re-use this address later, it is a good idea to use an address with a known private key. In the last post, we have seen how Brownie can be used to create an account. There are other tools that do the same thing like clef that comes with geth. For the purpose of this post, I have created the following account.

Address:  0x7D72Df7F4C7072235523A8FEdcE9FF6D236595F3
Key:      0x5777ee3ba27ad814f984a36542d9862f652084e7ce366e2738ceaa0fb0fff350

Let us transfer Ether to this address. To create and send a transaction with web3, you first build a dictionary that contains the basic attributes of the transaction. You then invoke the API method send_transaction. As the key of the sender is controlled by the node, the node will then automatically sign the transaction. The return value is the hash of the transaction that has been generated. Having the hash, you can now wait for the transaction receipt, which is issued once the transaction has been included in a block and mined. In our test setup, this will happen immediately, but in reality, it could take some time. Finally, you can check the balance of the involved accounts to see that this worked.

alice = "0x7D72Df7F4C7072235523A8FEdcE9FF6D236595F3"
value = w3.toWei(10, "ether")
txn = {
  "from": me,
  "to": alice,
  "value": value,
  "gas": 21000,
  "gasPrice": 0
}
txn_hash = w3.eth.send_transaction(txn)
w3.eth.wait_for_transaction_receipt(txn_hash)
w3.eth.get_balance(me)
w3.eth.get_balance(alice)

Again, a few remarks are in order. First, we do not specify the nonce, this will be added automatically by the library. Second, this transaction, using a gas price, is a “pre-EIP-1559” or “pre-London” transaction. With the London hardfork, you would instead rather specify a maximum fee per gas and a priority fee per gas. As I started to work on this series before London became effective, I will stick to the legacy transactions throughout this series. Of course, in a real network, you would also not use a gas price of zero.

A second important point to be aware of is timing. When we call send_transaction, we hand the transaction over to the node which signs it and publishes it on the network. At some point, the transaction is included in a block by a miner, and only then, a transaction receipt becomes available. This is why we call wait_for_transaction_receipt which actively polls the node (at least when we are using a HTTP connection) until the receipt is available. There is also a method get_transaction_receipt that will return a transaction receipt directly, without waiting for it, and it is a common mistake to call this too early.

Also, note the conversion of the value. Within a transaction, values are always specified in Wei, and the library contains a few helper functions to easily convert from Wei into other units and back. Finally, note that the gas limit that we use is the standard gas usage of a simple transaction. If the target account is a smart contract and additional code is executed, this will not be sufficient.

Now let us try to get some Ether back from Alice. As the account is not managed by the node, we will now have to sign the transaction ourselves. The flow is very similar. We first build the transaction dictionary. We then use the helper class Account to sign the transaction. This will return a tuple consisting of the hash that was signed, the raw transaction itself, and the r, s and v values from the ECDSA signature algorithm. We can then pass the raw transaction to the eth.send_raw_transaction call.

nonce = w3.eth.get_transaction_count(alice)
refund = {
  "from": alice,
  "to": me,
  "value": value, 
  "gas": 21000,
  "gasPrice": 0,
  "nonce": nonce
}
key = "0x5777ee3ba27ad814f984a36542d9862f652084e7ce366e2738ceaa0fb0fff350"
signed_txn = w3.eth.account.sign_transaction(refund, key)
txn_hash = w3.eth.send_raw_transaction(signed_txn.rawTransaction)
w3.eth.wait_for_transaction_receipt(txn_hash)
w3.eth.get_balance(me)
w3.eth.get_balance(alice)

Note that this time, we need to include the nonce (as it is part of the data which is signed). We use the current nonce of the address of Alice, of course.

Interacting with a smart contract

So far, we have covered the basic functionality of the library – creating, signing and submitting transactions. Let us now turn to smart contracts. As stated above, I assume that you have fired up Brownie and deployed a version of our smart contract. The contract address that Brownie gave me is 0x3194cBDC3dbcd3E11a07892e7bA5c3394048Cc87, which should be identical to your result as it only depends on the nonce and the account, so it should be the same as long as the deployment is the first transaction that you have done after restarting Ganache.

To access a contract from web3, the library needs to know how the arguments and return values need to be encoded and decoded. For that purpose, you will have to specify the contract ABI. The ABI – in a JSON format – is generated by the compiler. When we deploy using Brownie, we can access it using the abi attribute of the resulting object. Here is the ABI in our case.

abi = [
    {
        'anonymous': False,
        'inputs': [
            {
                'indexed': True,
                'internalType': "address",
                'name': "sender",
                'type': "address"
            },
            {
                'indexed': False,
                'internalType': "uint256",
                'name': "oldValue",
                'type': "uint256"
            },
            {
                'indexed': False,
                'internalType': "uint256",
                'name': "newValue",
                'type': "uint256"
            }
        ],
        'name': "Increment",
        'type': "event"
    },
    {
        'inputs': [],
        'name': "increment",
        'outputs': [],
        'stateMutability': "nonpayable",
        'type': "function"
    },
    {
        'inputs': [],
        'name': "read",
        'outputs': [
            {
                'internalType': "uint256",
                'name': "",
                'type': "uint256"
            }
        ],
        'stateMutability': "view",
        'type': "function"
    }
]

This looks a bit intimidating, but is actually not so hard to read. The ABI is a list, and each entry either describes an event or a function. For both, events and functions, the inputs are specified, i.e. the parameters., and similarly the outputs are described. Every parameter has types (Solidity distinguishes between internal types and the type used for encoding), and a name. For events, the parameters can be indexed. In addition, there are some specifiers for functions like the information whether it is a view or not.

Let us start to work with the ABI. Run the command above to import the ABI into a variable abi in your ipython session. Having this, we can now instantiate an object that represents the contract within web3. To talk to a contract, the library needs to know the contract address and its ABI, and these are the parameters that we need to specify.

address = "0x3194cBDC3dbcd3E11a07892e7bA5c3394048Cc87"
counter = w3.eth.contract(address=address, abi=abi)

It is instructive to user dir and help to better understand the object that this call returns. It has an attribute called functions that is a container class for the functions of the contract. Each contract function shows up as a method of this object. Calling this method, however, does not invoke the contract yet, but instead returns an object of type ContractFunction. Once we have this object, we can either use it to make a call or a transaction (this two-step approach reminds me a bit of a prepared statement when using embedded SQL).

Let us see how this works – we will first read out the counter value, then increment by one and then read the value again.

counter.functions.read().call()
txn_hash = counter.functions.increment().transact({"from": me})
w3.eth.wait_for_transaction_receipt(txn_hash)
counter.functions.read().call()

Note how we pass the sender of the transaction to the transact method – we could as well include other parameters like the gas price, the gas limit or the nonce at this point. You can, however, not pass the data field, as the data will be set during the encoding.

Another important point is how parameters to the contract method need to be handled. Suppose we had a method add(uint256) which would allow us to increase the counter not by one, but by some provided value. To increase the counter by x, we would then have to run

counter.functions.add(x).transact({"from": me})

Thus the parameters of the contract method need to be part of the call that creates the ContractFunction, and not be included in the transaction.

So far we have seen how we can connect to an RPC server, submit transactions, get access to already deployed smart contracts and invoke their functions. The web3 API has a bit more to offer, and I urge you to read the documentation and, in ipython, play around with the built-in help function to browse through the various objects that make up the library. In the next post, we will learn how to use web3 to not only talk to an existing smart contract, but also to compile and deploy a contract.

Fun with Solidity and Brownie

For me, choosing the featured image for a post is often the hardest part of writing it, but today, the choice was clear and I could not resist. But back to business – today we will learn how Brownie can be used to compile smart contracts, deploy them to a test chain, interact with the contract and test it.

Installing Brownie

As Brownie comes as a Python3 package (eth-brownie), installing it is rather straightforward. The only dependency that you have to observe which is not handled by the packet manager is that to Ganache, which Brownie uses as built-in node. On Ubuntu 20.04, for instance, you would run

sudo apt-get update
sudo apt-get install python3-pip python3-dev npm
pip3 install eth-brownie
sudo npm install -g ganache-cli@6.12.1

Note that by default, Brownie will install itself in .local/bin in your home directory, so you will probably want to add this to your path.

export PATH=$PATH:$HOME/.local/bin

Setting up a Brownie project

To work correctly, Brownie expects to be executed at the root node of a directory tree that has a certain standard layout. To start from scratch, you can use the command brownie init to create such a tree (do not do this yet but read on) . Brownie will create the following directories.

  • contracts – this is where Brownie expects you to store all your smart contracts as Solidity source files
  • build – Brownie uses this directory to store the results of a compile
  • interfaces – this is similar to contracts, place any interface files that you want to use here (it will become clearer a bit later what an interface is)
  • reports – this directory is used by Brownie to store reports, for instance code coverage reports
  • scripts – used to store Python scripts, for instance for deployments
  • tests – this is where all the unit tests should go

As some of the items that Brownie maintains should not end up in my GitHub repository, I typically create a subdirectory in the repository that I add to the gitignore file, set up a project inside this subdirectory and then create symlinks to the contracts and tests that I actually want to use. If you want to follow this strategy, use the following commands to clone the repository for this series and set up the Brownie project.

git clone https://github.com/christianb93/nft-bootcamp
cd nft-bootcamp
mkdir tmp
cd tmp
brownie init
cd contracts
ln -s ../../contracts/* .
cd ../tests
ln -s ../../tests/* .
cd ..

Note that all further commands should be executed from the tmp directory, which is now the project root directory from Brownies point of view.

Compiling and deploying a contract

As our first step, let us try to compile our counter. Brownie will happily compile all contracts that are stored in the project when you run

brownie compile

The first time when you execute this command, you will find that Brownie actually downloads a copy of the Solidity compiler that it then invokes behind the scenes. By default, Brownie will not recompile contracts that have not changed, but you can force a recompile via the --all flag.

Once the compile has been done, let us enter the Brownie console. This is actually the tool which you mostly use to interact with Brownie. Essentially, the console is an interactive Python console with the additional functionality of Brownie built into it.

brownie console

The first thing that Brownie will do when you start the console is to look for a running Ethereum client on your machine. Brownie expects this client to sit at port 8545 on localhost (we will learn later how this can be changed). If no such client is found, it will automatically start Ganache and, once the client is up and running, you will see a prompt. Let us now deploy our contract. At the prompt, simply enter

counter = Counter.deploy({"from": accounts[0]});

There is a couple of comments that are in order. First, to make a deployment, we need to provide an account by which the deployment transaction that Brownie will create will be signed. As we will see in the next section, Ganache provides a set of standard accounts that we can uses for that purpose. Brownie stores those in the accounts array, and we simply select the first one.

Second, the Counter object that we reference here is an object that Brownie creates on the fly. In fact, Brownie will create such an object for every contract that it finds in the project directory, using the same name as that of the contract. This is a container and does not yet reference a deployed contract, but if offers a method to deploy a contract, and this method returns another object which is now instantiated and points to the newly deployed contract. Brownie will also add methods to a contract that correspond to the methods of the smart contract that it represents, so that we can simply invoke these methods to talk to the contract. In our case, running

dir(counter)

will show you that the newly created object has methods read and increment, corresponding to those of our contract. So to get the counter value, increment it by one and get the new value, we could simply do something like

# This should return zero
counter.read()
txn = counter.increment()
# This should now return one
counter.read()

Note that by default, Brownie uses the account that deployed the contract as the “from ” account of the resulting transaction. This – and other attributes of the transaction – can be modified by including a dictionary with the transaction attributes to be used as last parameter to the method, i.e. increment in our case.

It is also instructive to look at the transaction object that the second statement has created. To read the logs, for instance, you can use

txn.logs

This will again show you the typical fields of a log entry – the address, the data and the topics. To read the interpreted version of the logs, i.e. the events, use

txn.events

The transaction (which is actually the transaction receipt) has many more interesting fields, like the gas limit, the gas used, the gas price, the block number and even a full trace of the execution on the level of single instructions (which seems to be what Geth calls a basic trace). To get a nicely formatted and comprehensive overview over some of these fields, run

txn.info()

Accounts in Brownie

Accounts can be very confusing when working with Ethereum clients, and this is a good point in time to shed some light on this. Obviously, when you want to submit a transaction, you will have to get access to the private key of the sender at some point to be able to sign it. There are essentially three different approaches how this can be done. How exactly these approaches are called is not standardized, here is the terminoloy that I prefer to use.

First, an account can be node-managed. This simply means that the node (i.e. the Ethereum client running on the node) maintains a secret store somewhere, typically on disk, and stores the private keys in this secret store. Obviously, clients will usually encrypt the private key and use a password or passphrase for that purpose. How exactly this is done is not formally standardized, but both Geth and Ganache implement an additional API with the personal namespace (see here for the documentation), and also OpenEthereum offers such an API, albeit with slightly different methods. Using this API, a user can

  • create a new account which will then be added to the key store by the client
  • get a list of managed accounts
  • sign a transaction with a given account
  • import an account, for instance by specifying its private key
  • lock an account, which stops the client from using it
  • unlock an account, which allows the client to use it again for a certain period of time

When you submit a transaction to a client using the eth_sendTransaction API method, the client will scan the key store to see whether is has the private key for the requested sender on file. If yes, it is able to sign the transaction and submit it (see for instance the source code here).

Be very careful when using this mechanism. Even though this is great for development and testing environments, it implies that while the account is unlocked, everybody with access to the API can submit transactions on your behalf! In fact, there are systematic scans going on (see for instance this article) to detect unlocked accounts and exploit them, so do not say I have not warned you….

In Brownie, we can inspect the list of node-managed accounts (i.e. accounts managed by Ganache in our case) using either the accounts array or the corresponding API call.

web3.eth.get_accounts()
accounts

You will see the same list of ten accounts using both methods, with the difference that the accounts array contains objects that Brownie has built for you, while the first method only returns an array of strings.

Let us now turn to the second method – application-managed accounts. Here, the application that you use to access the blockchain (a program, a frontend or a tool like Brownie) is in charge of managing the accounts. It can do so by storing the accounts locally, protected again by some password, or in memory. When an application wants to send a transaction, it now has to sign the transaction using the private key, and would then use the eth_sendRawTransaction method to submit the signed transaction to the network.

Brownie supports this method as well. To illustrate this, enter the following sequence of commands in the Brownie console to create two new accounts, transfer 1000 Ether from one of the test accounts to the first of the newly created accounts and then prepare and sign a transaction that is transferring some Ether to the second account.

# Will spit out a mnemonic
me = accounts.add()
alice = accounts.add()
# Give me some Ether
accounts[0].transfer(to=me.address, amount=1000);
txn = {
  "from": me.address,
  "to": alice.address,
  "value": 10,
  "gas": 21000,
  "gasPrice": 0,
  "nonce": me.nonce
}
txn_signed = web3.eth.account.signTransaction(txn, me.private_key)
web3.eth.send_raw_transaction(txn_signed.rawTransaction)
alice.balance()

When you now run the accounts command again, you will find two new entries representing the two accounts that we have added. However, these entries are now of type LocalAccount, and web3.eth.get_accounts() will show that they have not been added to the node, but are managed by Brownie.

Note that Brownie will not store the accounts on disk if not being told to do so, but you can do this. By default, Brownie keeps each local account in a separate file. To save your account, enter

me.save("myAccount")

which will prompt you for a password and then store the account in a file called myAccount. When you now exit Brownie and start it again, you can load the account by running

me = accounts.load("myAccount")

You will then be prompted once more for the password, and assuming that you supply the correct password, the account will again be available.

More or less the same code would apply if you had chosen to go for the third method – user-managed accounts. In this approach, the private key is never stored by the application. The user is responsible for managing accounts, and only if a transaction is to be made, the private key is presented to the application, using a parameter or an input field. The application will never store the account or the private key (of course, it will have to reside in memory for some time), and the user has to enter the private key for every single transaction. We will see an example for this when we deploy a contract using Python and web3 in a later post.

Writing and running unit tests

Before closing this post, let us take a look at another nice feature of Brownie – unit testing. Brownie expects test to be located in the corresponding subdirectory and to start with the prefix “test_”. Within the file, Brownie will then look for functions prefixed with “test_” as well and run them as unit tests, using pytest.

Let us look at an example. In my repository, you will find a file test_Counter.py (which should already be symlinked into the tests directory of the Brownie project tree if you have followed the instructions above to initialize the directory tree). If you have ever used pytest before, this file contains a few things that will look familiar to you – there are test methods, and there some fixtures. Let us focus on those parts which are specific to the usage in combination with Brownie. First, there is the line

from brownie import Counter, accounts, exceptions;

This imports a few objects and makes them available, similar to the Brownie console. The most important one is the Counter object itself, which will allow us to deploy instances of the counter and test them. Next, we need access to a deployed version of the contract. This is handled by a fixture which uses the Counter object that we have just imported.

@pytest.fixture
def counter():
    return accounts[0].deploy(Counter);

Here, we use the deploy method of an Account in Brownie to deploy, which is an alternative way to specify the account from which the deployment will be done. We can now use this counter object as if we would be working in the console, i.e. we can invoke its methods to communicate with the underlying smart contract and check whether they behave as expected. We also have access to other features of Brownie, we can, for instance, inspect the transaction receipt that is returned by a method invocation that results in a transaction, and use it to get and verify events and logs.

Once you have written your unit tests, you want to run them. Again, this is easy – leave the console using Ctrl-D, make sure you are still in the root directory of the project tree (i.e. the tmp directory) and run

brownie test tests/test_Counter.py

As you will see, this brings up a local Ganache server and executes your tests using pytest, with the usual pytest output. But you can generate much more information – run

brownie test tests/test_Counter.py --coverage --gas

to receive the output below.

In addition to the test results, you see a gas report, detailing the gas usage of every invoked method, and a coverage report. To get more details on the code, you can use the Brownie GUI as described here. Note, however, that this requires the tkinter package to be installed (on Ubuntu, you will have to use sudo apt-get install python3-tk).

You can also simply run brownie test to execute all tests, but the repository does already contain tests for future blog entries, so this might be a bit confusing (but should hopefully work).

This completes our short introduction. You should now be able to deploy smart contracts and to interact with them. In the next post, we will do the same thing using plain Python and the web3 framework, which will also prepare us for the usage of the web3.js framework that we will need when building our frontend.

Writing a smart contract in Solidity using the Remix IDE

Today, we will actually write our first smart contract, compile and deploy it and discuss some of the features of the Solidity programming language. To be able to start without any installation, we will use the Remix IDE, which is a fully browser-based development environment for Ethereum smart contracts.

Getting started with the Remix IDE

Without further ado, let us go ahead and work on our first contract. Open your browser and point it to http://remix.ethereum.org. The initial load might take a few seconds, but once the load is complete, you should see a screen with the layout of a typical IDE. On the left hand side of the screen, there is navigation bar, with the items (from top to the bottom)

  • Home
  • Explorer
  • Compile
  • Deploy
  • Debug

Between that screen and the main screen, there is – initially, as we start in the explorer view – a directory tree. Remix will pre-populate this tree with some sample contracts and save them in your browser storage, so if you add, change or remove a file, close the browser and reopen it, your changes will still be visible. It is also possible to synchronize with a GitHub account or with the local machine. Finally, the bottom area of the screen is the terminal that provides some additional output and also allows you to interact directly with Remix using the JS API.

Initially, the contracts directory already contains three smart contracts, called 1_Storage.sol, 2_Owner.sol and 3_Ballot.sol. Delete all those files, and create a new file Counter.sol with the same content as this contract in my GitHub repository. Open the contract in the explorer.

Next, click on the “Compile” icon on the navigation bar (you will have to select the contract in the explorer first). Hit the button “Compile Counter.sol”. After some seconds, the compile should complete. Next, select the “Deploy” icon in the navigation bar. Stick to the standard selection of the environment (this is the built-in virtual machine that is running in your browser) and click “Deploy”. When the deployment succeeds, you should see an entry in the section “Deployed contracts”.

Expanding this entry should reveal two buttons called “increment” and “read”. These buttons allow you to invoke the methods of the contract that we have defined. First, click on “read” once to get the current value of the contract, which should be zero. Then, hit “increment” once and click “read” again.

If everything worked, reading after incrementiing should show that the value has increased by one. In the screenshot above, I have hit “increment” three times, so the return value of the read method is three (this is a bit confusing – the zero in front of the variable type is the index of the return value, in our case this is the first return value). Congratulations, we have just tested our first smart contract!

Structure of a smart contract

This is fun, but let us now go back and try to understand what we have actually done. For that purpose, let us go once through the source code. This is not meant to be a systematic introduction to Solidity, and you might want to consult the actually quite readable documentation in parallel, but should give you a first idea of how a contract looks like (we will in fact need and study a few more advanced features of the language as we progress). The first two lines are actually not executed, but more or less metadata.

// SPDX-License-Identifier: GPL-3.0

pragma solidity >=0.8.0 <0.9.0;

The first line is a comment. By convention, a Solidity contract contains a license identifier, I have chosen the GPL license for this example. The second line is a pragma. Like in C or C++, a pragma is an additional instruction for the compiler. In this case, we restrict the Solidity version to somewhere between 0.8 and 0.9 (there is a reason why I have chosen 0.8 as minimum version – this is the version of Solidity which introduced overflow checks, and our counter can of course overflow – at least theoretically, as you will probably not find the time to hit the increment button 2256 times…), and the compile will fail if its own version does not match.

The next block declares our actual contract. In Solidity, a contract is a bit similar to a class in other object-oriented languages. We give our contract a name (Counter) and, inside the curly braces, define its events, methods and attributes.

contract Counter {

    event Increment (
        address indexed sender,
        uint256 oldValue,
        uint256 newValue
    );

    uint256 private counter;

    function increment() public {
        emit Increment(msg.sender,counter,counter + 1);
        counter++;
    }

    function read() public view returns (uint256) {
        return counter;
    }
  
}

Let us ignore the event that we define for a second, we will discuss this in the next section. After the event declaration, we first declare an attribute counter. This will be a 256-bit integer, which is the native datatype of Solidity, i.e. a 32 byte number. We also declare the attribute as private, i.e. not visible for other contracts, but of course it is not really private – after all, everybody with access to a blockchain explorer can inspect the storage and look at its value.

Speaking of storage, Solidity distinguishes different types of storage. For some data types, like integers, there is a default storage type, for some other data types, you will have to add the storage type explicitly as an additional qualifier called the data location. The three storage types are

  • Memory – this is linear storage that is cleaned up and reinitialized with every new transaction. Thus you can use memory inside an invocation of your contract, but as soon as the invocation finishes, the data is lost
  • Storage – this instructs Solidity to place the variable in the storage part of the blockchain state of the contract address. Thus, variables which are located in storage are actually persisted in the blockchain. This is expensive, but the only way to store information across invocations
  • Calldata – this refers to read-only memory which is used to store parameters for invocations of your contract from an EOA or other contracts and can also be used for function parameters and return values

In our case, we do not have to explicitly define a data location, as our counter is a state variable (i.e. defined on the contract level) and, being an integer, it will automatically be stored in the contract storage. Next, we define two functions, i.e. methods of the contract. We first define the increment function, which does not accept any argument and does not return anything. Note the additional public keyword which declares that our method can be called from outside the contract. Inside the function, we first emit an event (more on this later), and then simply increment the counter by one.

The next function is the function to read out the counter value. This function does not have an argument either, but a return value of type uint256. The interesting part of this function is the additional keyword view. A function can be declared as a view if it does not alter the state (which, in our case, means that the function does not alter the counter value).

What is the point of this? Recall that a change of state can only happen as part of a transaction. Thus a Solidity function can usually only be called as part of a transaction that has an associated gas cost and is executed by all nodes while validating the corresponding transaction. For many cases, this is an enormous overhead. Suppose, for instance, that you build a contract that manages a coin or a token. You would probably not want to burn gas every time you simply want to read out a balance. Here, a view function comes to the rescue. As such a function does not alter the state, but essentially only reads and processes state, it can be executed locally, outside of a transaction, and the execution will not cost you any gas at all.

Invoking a smart contract

To better understand how a function marked as view differs from an ordinary function, it is helpful to understand how a smart contract is actually invoked by an application. There are actually two different ways how this can be done.

First, you can send a transaction to the contract address, using the method eth_sendTransaction or eth_sendRawTransaction of the JSON RPC API. To pass parameters to the contract, include them in the transaction data field. This field is also used to select the method of the smart contract you want to invoke. By convention, the first four bytes of the data field are filled with the hash value of the signature of the method that you want to invoke. Recall that the EVM bytecode does not know anything about methods or arguments, contract execution will always start at address zero. Therefore, the compiler will generate code that reads the data field to first determine the method that needs to invoked, then gets the parameters from the data field, copies them to memory and finally jumps to the code representing the correct method (we will dive deeper into this in a later post).

The transaction is then executed, thereby running the bytecode, incluced in a block and persisted. This is an asynchronous process, and therefore, a contract invocation done via a transaction cannot return a value to the caller. In addition, it consumes gas. These are two good reasons why an alternative is helpful.

This alternative is the eth_call method of the API. This method also executes the bytecode at the target address, but differs in an important point – it is only executed in the local node (i.e. the node to which you direct the API call). No transaction is generated, which implies that no state update can be done, but also that no gas is consumed. The execution is synchronous and can return a value.

Theoretically, you can also make a call to a method that modifies the state. This will again run locally and can be thought of as a simulation, without making any permanent changes to the state. Similary, you could use a transaction to read the counter value, but this would cost you gas and therefore Ether and not even allow you to consume the returned value, as a transaction produces a receipt which does not contain something like a return value. IDEs like Remix or tools like Brownie or Truffle use a description of the methods of a contract which is emitted by a compiler and known as the ABI to determine whether it makes sense to invoke something via a call or a transaction (we will see how this works a bit later when we use Python to compile and deploy a smart contract).

It is instructive to run the increment method in Remix and inspect the resulting transaction. You might already have noted that every time you hit the “increment” button, a new transaction is indicated in the terminal (the tab at the bottom of the screen). At the right hand side of a transaction, you should see a blue “Debug button” (this is also fun, but we resist the temptation for a moment) and a little arrow. Click on the arrow to expand the transaction.

What Remix shows you is actually a mix of data contained in the transaction and the transaction receipt. You see a few fields that we have already discussed in one of the previous posts like the “to” field, the gas limit and the value. You also see a field called “input” which is actually the transaction data and should be

0xd09de08a

This is a four-byte value, and using an online hash calculator (just google for “keccak online”), you can easily verify that these are the first four bytes of the keccak hash of the string “increment()”, i.e. the signature of the method that you invoke.

Logs, transaction receipts and events

It should now be rather obvious what our contract is doing, but we have skipped a point that is a bit more complex – events and logs. If you look at the transaction that we have generated using the increment method, you will see that it also contains a field called logs. The idea of logs is to provide a facility that allows a smart contract to log some data without having to write it into the expensive storage. For that purpose, the EVM offers a set of instructions called LOG0 to LOG4.

The logs of a transaction are part of the transaction receipt that is created by a client when a transaction is processed. As the transaction receipts can be derived from the history of all transactions, they are not actually stored on the blockchain itself (i.e. they are not part of a block), but are maintained by each node individually. A block header does, however, contain a hash of the transaction receipts, so that transaction receipts and therefore logs can be validated.

To structure logs, a log can be assigned to one or more topics. More precisely, to produce a log entry with no topic, you would use the LOG0 instruction, to produce a log entry with one topic, you would use LOG1 and so forth. Consequently, there can only be up to four topics for each log entry. In addition to the topics, a log entry contains a data field of arbitrary length, and the address of the contract that emitted the log. So a full entry consists of

  • the sender, i.e. the contract creating the log
  • between zero and four topics
  • a data field

In Solidity, logs show up as events. Events are defined as part of a contract, as it is the case in our example contract above. By convention, Solidity will always use the first topic to hold the signature of the event. The parameters of the event can be indexed (then Solidity stores them in the remaining topics), or non-indexed (then Solidity uses the data field to store them). Thus, in our example, the events would correspond to log entries where the sender is the contract, the first topic is the signature of the event, i.e. the keccak hash of the string “Increment(address,uint256,uint256)” (note that all white spaces and all parameter names have been removed), which is 0x64f50d594c2a739c7088f9fc6785e1934030e17b52f1a894baec61b98633a59f, the second topic is the sender and the data will contain the old and new value of the counter. You can inspect the transaction receipt and with it the log entries of the transaction that we have created by typing

web3.eth.getTransactionReceipt("0x35325d4aac18a862380ee6dc4a6b7ed1e8eb9c4035dc7d24b35ad847b19deadf")

into the console, where you have to replace the argument with the hash value of the generated transaction. The logs will appear as an array, and each entry consists of the address of the creating contract, the data, and the list of topics.

Why do we need topics? The idea of logs and events is that an application can register for certain events and take action if an event is observed. To make this work, we need an efficient way to scan the chain for specific events. Now going through all transactions and looking at all log entries is of course not an efficient approach, and we need a way to quickly determine whether a certain block has produced log entries which are of interest for us. For that purpose, Ethereum employs a structure known as Bloom filter, which is a data structure designed to quickly figure out whether a data set holds a specific entry. Each block contains the Bloom filter of the addresses and topics of the log entries produced by the transactions in the block, and thus a client can quickly scan all blocks for log entries that are associated with specific topics. The JSON RPC API allows you to define filters for new log entries, specifying the contract address, the block range and the topics, so that you can retrieve only those logs which are of interest for your application.

Today, we have actually written, compiled and executed our first smart contract, and we have managed to understood a bit how this works and what happens during contract execution. In the next post, I will show you how to do the same thing with an editor of your choice and the Brownie development environment.

The Ethereum ecosystem

So far we have mainly discussed what a node needs to do – processing and validating blocks and transactions and maintaining state. This by itself is not particularly useful – we need components to access nodes, manage accounts and balances and to develop, test and deploy smart contracts. There is an abundance of different tools and solutions around the Ethereum blockchain that do exactly this, and we will spend some time exploring this ecosystem today.

Clients

From a technical point of view, the Ethereum network is a peer-to-peer network, formed by individual nodes each of which runs a client software. This software will typically

  • discover peers, i.e. other nodes in the network
  • notify peers of new blocks that appear in the network, typically because a miner has generated them
  • maintain the state of the blockchain
  • process blocks and make updates to the state

In addition, clients will most likely offer an API which other applications can use to get information on the blockchain, to query balances, inspect blocks, send transactions and so forth. There are a couple of clients that do all this, here is a short list which is probably far from being complete.

  • The Go-Ethereum (geth) client is the client maintained by the Ethereum foundation, and, as the name suggests, written in Go. This is the client that we will use for the later posts in this series, when we discuss how to start and run a client in a private development network or one of the official test networks. According to the Etherscan node tracker, more than 60% of the nodes in the Ethereum production network are running geth.
  • Ganache is a client mostly intended for development and testing purposes. It is part of the Truffle framework for Ethereum development and written in JavaScript / Node.js. Ganache is also the development server running as part of the Brownie framework that we will discuss and use in a future post
  • OpenEthereum, formerly known as Parity, is an Ethereum client written in Rust. It was started by Parity Technologies and later transitioned to the newly founded OpenEthereum project. It is the second-most popular client in the production network, accounting for roughly every fourth node
  • Hyperledger Besu is an Ethereum client written in Java, which is developed by the Hyperledger project hosted by the Linux foundation and mainly targeting permissioned corporate networks

dApps and gateways

To build something useful, we need to allow applications to interact with the blockchain. As nodes offer an API, we can do this – our application can try to identify a node, connect to this node and use the API to talk to the blockchain.

In practice, this poses two problems. First, to connect to a node, you need to know its URL. Thus your application would somehow need access to a list of available nodes. If, however, you do not control the nodes, this list will be volatile, and it can be a considerable effort to keep this list up to date. If you do not want to run your own node, you can use one of the organisations that offer nodes as a service. I think of these services as gateways into the Ethereum network – they basically provide access to a node that your application can use and make sure that the node is stable and up and running. Examples for node providers are

  • Infura which we will use in a later post in this series to access the test network
  • Alchemy is another provider that also offers a free tier for developers
  • Cloudflare also offers an Ethereum gateway

Be careful, not all providers offers all API requests, if in doubt consult the documentation on the respective web page.

The second problem that we have is to actually prepare and submit the API requests. Of course this can be done with custom built code that directly assembles the JSON RPC requests, but over time, libraries that encapsulate access to the API have been developed. One very popular libraries is web3.js which is a JavaScript library to access an Ethereum node. In addition to methods that correspond to methods of the JSON RPC API, it also contains a few helper functions for account and wallet management or the handling of smart contracts. We will use web3.js for our sample frontend in a later post in this series.

Being a huge fan of Python, I was of course looking for a Python library doing approximately the same thing, and in fact there is one, which, not really surprisingly, is called web3.py. We will use this as well throughout this series to demonstrate how we can interact with a smart contract from within a Python application or even deploy a smart contract.

We are now ready to discuss a vision called Web3 by its proponents (thus explaining the name of the libraries). The idea of Web3 is that instead of having centralized applications, running on servers controlled by single organisations, applications are fully distributed. Application logic is residing mostly in browsers (i.e. JavaScript applications) and smart contracts, and the frontend applications interact with the blockchain and smart contracts via nodes. In this model, code is executed either in your frontend or within the EVM, i.e. fully decentrally, and data is stored mainly in the blockchain (and in file storage services that we will discuss below). Therefore these applications are called dApps (decentralized applications). I will not discuss the pros and cons of this architecture, but simply wanted to make sure that you have heard the term. What we will develop throughout this series is, in fact, a dApp, consisting of a smart contract and a React frontend running in your browser.

Development environments

The diagram above displays a more or less complete runtime architecture. To develop frontends and smart contracts efficiently, however, you will typically want to leverage additional tools that allow you to write your contracts in a high-level language, compile them to bytecode, quickly spin up a test environment which a defined state and run tests of your smart contracts and your frontend. Over time, a large variety of development environments and frameworks have appeared to support this.

First, you will of course need to decide for a high-level language for your smart contracts. Essentially, there are two choices. The most common one is Solidity, which is a mixture of languages like Java, JavaScript or C++ with some object-oriented features like overloading, inheritance and interfaces. We will use Solidity throughout this series. A second choice is Vyper which is a bit more “Pythonic” and replaces the older Serpent, but even though I am a huge fan of Python, I have not really looked at it yet. Finally, there is LLL which uses a Lisp-like syntax and was one of the first languages for smart contract development, but does not seem to be used very often in practice any more.

Once you have decided which language and compiler to use, you will have to pick the actual development environment. Especially for first steps, the Remix IDE is an excellent choice. Remix is an full-fledged development environment running entirely in your browser. With Remix, you can edit source code, compile, deploy into a private development blockchain running in a JavaScript sandbox in your browser (or to a network of your choice) and test and debug your contracts. We will use Remix for our first smart contract to get things going quickly.

If you prefer to work locally and feel at home in the JavaScript ecosystem, you might want to take a look at the Truffle suite. Truffle allows you to compile and deploy your smart contracts using JS as a a scripting language or using a JS based interactive console. Truffle spins up its own integrated local development node and allows you to easily run unit tests. As I prefer Python over JavaScript for this sort of tasks, I will instead use Brownie which (apparently being heavily inspired by Truffle) offers a similar functionality for Python. Using Brownie, you can compile your contracts, start a console which will also bring up a local Ganache node automatically (or connect to an existing node), deploy your contracts and interact with them. Brownie can also be imported and used as a library which allows you to script things, and integrates nicely with pytest, so that you can use pytest and Brownie to easily write unit tests for your smart contracts and even create coverage reports.

Storage, data and analytics

Let us now look at a few services that are available in the Ethereum universe that more advanced applications might need. The first type of service that you will sooner or later need is a storage service. Storing data in the blockchain is expensive, and most data related to the blockchain, like a piece of digital art minted as a token, is not actually stored in the blockchain itself. Instead, the blockchain holds a reference to the image (and maybe a cryptographic hash) and the image itself is stored somewhere else.

Of course you could use any type of storage solution, maybe even your favorite cloud service provider. This, however, would mean to again rely on a centralized infrastructure. If you do not want this, you will have to go for a decentralized file storage platform. A popular choice is IPFS, which is a peer-to-peer network technology for storing files. If you store a file on IPFS, it is essentially cut into chunks, and each peer will store one or more of these chunks, a bit similar to BitTorrent. In addition, the location of the file in IPFS is referenced by the hash of the files content (the so-called CID). This implies that when the content changes, the hash changes, so that once stored, the file is effectively immutable, which is one of the reasons why this file storage solution is often used as part of blockchain-based applications. Note, however, that a node is free to drop your file at any time, so you might want to find a node which is ready to pin your content. Providers like filecoin.io offer similar decentralized file storage solutions.

In addition to storing data, the Ethereum network produces a huge amount of data every second – blocks, transaction, state updates, log and so forth. Several services exist that allow you to easily scan and explore that data. One of the best known services of this type is Etherscan. Using Etherscan, you can retrieve and analyze individual blocks and transactions, list all transactions related to a specific account, track token and retrieve various types of statistics. Etherscan also offers an API and other development services, like a registry for smart contracts. OpenSea, which is a market place for NFTs, also offers services to discover and display token. Here is how the NFT that we will actually build and deploy in the course of this series looks like in OpenSea.

Wallets

When you want to interact with the Ethereum blockchain, you will need an account and some piece of software that assembles and submits transactions. Wallets combine these two functionalities. They manage your accounts, allow you to inquire your balance and to submit transactions and can often also manage token.

Some wallets run in your browser, others are mobile apps or desktop applications. A very popular wallet that is available as a browser plugin is MetaMask. Be aware, however, that if you use MetaMask, your private keys will be stored in the browser storage and are therefore theoretically accessible by malicious JavaScript code. In addition, if you reset your profile, the data is lost, so be careful when using such a solution, think about security and have a solid backup strategy. MyEtherWallet is another popular choice.

Frameworks like web3.js also have some limited wallet functionality built into them, and the React frontend that we will build does actually use this library to offer some rudimentary functionalities that a wallet typically has.

This completes our short journey through the Ethereum ecosystem. Of course, this list is far from complete and constantly evolving, we have, for instance not talked about oracles like ChainLink, framework providers like OpenZeppelin or market places. The tools and services that we have covered are, however, sufficient to get us started, and in the next post, we will actually get our hands dirty for the first time and build our first smart contract in Solidity, switching from the slightly more theoretical discussion so far to a more hands-on style. See you!

Smart contracts and the Ethereum virtual machine

In my last post, I have taken you through the foundations of the Ethereum blockchain, namely state, transactions and blocks and how they are related. We have seen that nodes update their local state by executing transactions contained in blocks. Today, we will take a closer look at how the transactions are actually executed and discuss the killer feature of the Ethereum blockchain – the Ethereum virtual machine and smart contracts.

Transaction execution

The Ethereum blockchain can be described as a state machine. At a given point in time, a node holds a certain state. Then a block is processed, i.e. inserted into the copy of the blockchain that the node holds, and the transactions contained in the block (and actually, as we will see, the block itself) make changes to the state. After the block has been processed, the node holds a new state. Formally (and this is what the yellow paper does) the new state is therefore a function of the previous state and the block. As all nodes agree on the protocol how the state is updated, and all nodes agree on the blocks and transactions, all nodes will eventually hold the same state.

To understand the changes to the state that are made during the processing of a block, there are two sources that we can consult. First, there is the yellow paper itself, which is a bit hard to read as one needs to get used to the notation, but is the authoritative source which serves as the official specification. Second, we can look at the code of known implementations, like that of the geth client. It is actually quite instructive to compare the yellow paper and the structure of the code and compare them, so let us do this.

We start our journey with the code. One of the central objects in the code base is the BlockChain class, defined in core/blockchain.go. This class represents the copy of the blockchain held by the node, along with the up-to-date state. It has a method InsertChain that first validates block headers and then uses a StateProcessor to perform the updates to the state caused by a block or collection of blocks. Its Process method is called with a block and a current state, and applies the changes represented by the transactions in this block to the state.

Time to switch to the yellow paper for a moment. In section two, the paper defines three state transition methods.

  • First, there is a state transition method denoted by a capital pi, that accepts a state and a block and returns the resulting new state – this state transition function could be called the state transition function on the block level
  • Then, it does the same on the transaction level – this state transition function, denoted by a capital upsilon, therefore accepts a state and a transaction and returns the updated state
  • Finally, it defines a finalization function denoted by a capital Omega and declares that the block level state transition function is obtained by first applying all state transitions and then applying the finalization function to the resulting state

This gives us a first idea how the state update works, and is actually reflected nicely in the structure of the source code.

  • Given a new block, loop through all transactions in the block
  • For each transaction, invoke the function applyTransaction to process this transaction – so this function corresponds to the state transition function on block level
  • Once this has been done, finalize the block, corresponding to the block finalization function, this involves mainly the calculation and transfer of the block reward
  • all this happens in the method Process which thus corresponds to the block level transition function

Looking at this function, there is an interesting point – right at the start of the function, a modification to the state is hardcoded if the block being processed is equal to the block number of the famous DAO fork. So if you ever wanted to know how this fork really works, here is the answer – all clients that accepted the fork simply agree on a modification of the state transition function which transfers all funds in the DAO contract to a new contract from which the legitimate owner could withdraw it. In other words, the fork has modified the state transition function (this is sometimes called an irregular state change).

Let us now dive a little deeper into what processing a transaction actually means. Again, we can look at the source code (with the main part of the processing being done here) or at the yellow paper, specifically at sections six to nine. To simplify things a bit, let us assume for the time being that our transaction is an ordinary transaction, i.e. that we simply transfer Ether to some other account and no smart contract is involved (i.e. that the recipient is an EOA). In this case, the processing is actually not overly complicated.

First, a few checks are executed so see whether the transaction is valid – this includes checking that the nonce of the transaction is equal to the current nonce of the sender (before applying the state changes). As part of these checks, the upfront cost is deducted from the balance of the sender, which is defined as the gas limit in the transaction times the gas price (if the gas limit is not exhausted, the remaining gas will be refunded at the end of the transaction). Then the nonce of the sender is incremented by one, and the actual transaction processing starts here by invoking the Ethereum virtual machine. We will discuss what it does in the next section, but for the moment, be assured that if the recipient account contains no code, it simply transfers the Ether represented by the value field of the transaction from the sender to the recipient.

Once this is done, the remaining gas is refunded, and the gas used is credited to the miner (more precisely the beneficiary or coinbase of the block being processed). With this, the processing is complete and the next transaction starts.

The Ethereum virtual machine

We have now achieved a good overview of what happens during transaction processing, but we have glossed over an important point – the invocation of the Ethereum virtual machine (EVM) which happens here. So what is the EVM?

Technically, the EVM is a virtual machine, very similar to the Java virtual machine (JVM) that knows a certain set of instructions and a certain state – a stack, a memory and a program counter. When this machine executes a series of instructions known as bytecode, every instruction manipulates the state of the machine. The set of instructions (opcodes) is rich enough to make the EVM Turing complete and described in appendix H of the yellow paper. Just to give you an idea, here are some examples for the available instructions.

  • arithmetic instructions like ADD, SUB or MULT
  • comparisons and boolean logic (AND, OR, LT, GT, ..)
  • operations to access the execution context, like the balance of an account (BALANCE), the sender of the transaction (ORIGIN), or the GASPRICE
  • Flow control operation, like CALL (to call another smart contract) or REVERT (abort execution of a contract)
  • operations to access the storage of the account under which the contract is executing, like SSTORE and SLOAD

Each of these operations has an associated gas value that is consumed when the EVM executes this operation.

Now, whenever a transaction is processed, the node will check whether the recipient address has a non-zero code. If no, the processing is as described above. If yes, the address which is the target of the transaction is interpreted as a smart contract, and its associated code will be interpreted as bytecode and will be executed by the EVM (note that this happens after the contracts balance has been increased by the value of the transaction, so you can already spend this amount in the contract). Thus a smart contract is stored in the blockchain (as part of the state of its address) and its execution is triggered by making a transaction to the contract address, which might or might not involve a transfer or Ether.

During this execution, the code can make changes to the state, as it can write to the storage, and it can use the CALL operation to initiate a message call to another account which works very similar to a transaction and also has a parameter value to transfer Ether. All these changes will be incorporated into the final state, and thus the EVM execution becomes part of the state transition function.

Physically, the EVM is running on each node, but as the definition of the EVM is part of the consensus mechanism of the blockchain and the execution is fully deterministic, all nodes will arrive at the same updated state. We can therefore think of the EVM as a distributed virtual machine running synchronously on each node of the blockchain and updated “the” shared state of the blockchain.

As the EVM is Turing complete, this is a very powerful mechanism. Theoretically, a smart contract can perform any operation on the state that you can imagine. Of course, complex smart contracts consume a lot of gas and therefore their execution drives up transaction fees. This is actually a built-in security mechanism to avoid that someone deploys a smart contract that never completes (for instance by implementing an infinite loop) and blocks all nodes. In fact, as every instruction consumes gas, the gas limit is reached at some point (or the balance of the senders account is exceeded), and the execution stops as the transaction is running out of gas. Even worse (for the attacker), the consumed gas is lost, so there is actually a strong incentive to keep the complexity of smart contracts low.

We now understand what a smart contract really is – it is a sequence of instructions (bytecode) stored in an account and executed by each node whenever a transaction is directed to this account. As a smart contract can again invoke other smart contracts, you should think of the transaction execution as a chain – there is an initial transaction, which is always coming from an EOA and signed using a private key, this transaction can invoke a smart contract which in turn can invoke another smart contract and so forth. The terminology is a bit confusing at this point because different sources use slightly different definitions of what a transaction and a message call is, but I tend to think of each step in the chain as a message call and a transaction as the first step, which is distinguished from the other steps by being created and signed by an EOA, i.e. typically a human or a programm outside of the chain operated by a human.

Let us summarize what we have learned today.

  • When a node processes a block, it updates the copy of the blockchain state that it holds. The consensus mechanism makes sure that the updates done by all nodes agree
  • As part of these updates, the node processes all transactions included in the block
  • When a transaction has a non-zero value, this includes the transfer of the corresponding amount of Ether from the sender to the recipient
  • If the recipient account of a transaction has a non-zero code, i.e. is a smart contract, then the EVM built into the node will interpret this smart contract as bytecode that will be executed
  • All changes to the state made by the contract are incorporated into the state update and therefore become part of “the” global blockchain state
  • Thus we can think of a smart contract as a sequence of instructions that are stored in the blockchain and executed by the blockchain network when being triggered by a transaction

How are smart contracts created? Technically, everybody can assemble a smart contract and deploy it into the blockchain. To do this, you will have to submit a transaction containing your code (or, more precisely, code that when being executed returns your code) which has the zero address as recipient address. If during transaction execution, the node hits upon such a transaction, it will determine a contract address – this is the address to which we have to send a transaction to trigger the smart contract – from the address of the sender and the nonce of the sender, and store the contract in the code field of the state of this address.

Now to develop a smart contract, you will typically not write bytecode yourself, similar to JVM bytecode that is typically created by a Java compiler. Several high-level programming languages have been proposed over time to ease the creation of smart contracts, the most popular one being Solidity. In addition, a huge number of development tools, frameworks and platforms have been created that make the creation of a smart contract very easy. In the next post, we will go through some of these tools which will put us in a position to eventually write, compile, deploy and run our first smart contract.

Basics of the Ethereum blockchain

Today we will take a closer look at the Ethereum blockchain and discuss its most important structures, namely transactions, blocks and state. I assume that you are familiar with the basics of the blockchain technology, if not, I suggest that you read a few of my earlier posts on blocks, transactions and mining. This will be a long post, we will go a bit deeper than the usual introductions that you might have seen. As a consequence, this post is a bit more theoretical, we will get to more practical exercises soon once we have mastered the basics.

A short history of the Ethereum blockchain

As of today, the real identity of Satoshi Nakamoto, the author of the bitcoin white paper, is unknown, even though different people have claimed to be Satoshi over time. The origin of the Ethereum blockchain is far less mysterious. In fact, the Ethereum white paper that defines the basic structures and ideas of the Ethereum blockchain, was published in 2013 by Vitalik Buterin. Subsequently, its formal specification, known as yellow paper and working out the ideas presented in the white paper, was developed in 2014 (the initial commit on GitHub by Gavin Wood is from April 2014). The Ethereum foundation was established in the same year, and in 2015, the Ethereum network was launched with the creation of the first block, known as the genesis block.

Since then, Ethereum has been under constant development. Changes to the protocol are controlled by a formal process, based on EIPs (Ethereum improvement proposals). Several clients have been developed over time, like Geth in Go, OpenEthereum in Rust or the Hyperledger Besu client in Java.

At the time of writing, Ethereum is transitioning from a Proof-of-work consensus mechanism to a Proof-of-Stake (PoS) mechanism as part of the next major version of the protocol commonly referred to as Ethereum 2.0. With PoS, special nodes called validators are taking over the process of reaching consensus on the order of transactions by creating and validating new blocks. To become a validator, you have to invest a certain stake of digital currency that you lose if you misbehave. The intention of this change is to reduce the environmental footprint of the mining process, reduce transaction fees and – by supporting sharding – increase scalability. Even though the Beacon chain, which is the foundation for the new PoS approach, is already operational as of August 2021, the final transition will still take some time and is expected to happen at some point late in 2021 or early in 2022. As of today, the Rinkeby test network is already running a proof-of-authority (PoA) consensus algorithm known as clique, see EIP-255, but the final Ethereum 2.0 chain will be based on a protocol known as Casper (see for instance this paper or this paper on the Arxiv for more details on this)

Addresses and accounts

On a certain level, the Ethereum blockchain is conceptually very simple – there is, at any point in time, a state, describing among other things the balances of the participants in the network, there are transactions changing the state and there are blocks that group transactions for the purpose of achieving consensus on the order of transactions. And, of course, there are addresses and accounts that represent the participants in the network.

An account represents a (typically human) participant in the Ethereum network. Accounts are not stored in a central place, there is no such thing as “signing up” for an account. Instead, an account is simply a randomly generated public and private key pair, more precisely an ECDSA key pair with a 32 byte private key and a 64 byte public key (which, as always with ECDSA, can be derived from the private key). Everyone can create an account by simply creating such a key pair and use that account to build and submit transactions to the network. There is no central mechanism that makes sure that the same account is not used by two different actors, but given the length of the key (32 bytes, i.e. 256 bit) this is highly unlikely.

Associated with every account is the address, which is defined as the rightmost 160 bit (i.e. 20 bytes) of the hash value of the public key. Ethereum uses the Keccak hashing algorithm (which is not exactly what NIST has standardized as SHA3-256, but close to it). Again, theoretically two different public keys could produce the same address due to a collision, but in practice this possibility is mostly ignored, and the address is considered to be in a one-to-one relation to the key pair.

Actually, we have been cheating a bit at this point. The relation between accounts and addresses described above is only valid for accounts that are owned by (typically) human actors external to the blockchain. However, we have already learned that Ethereum offers the possibility to store and run smart contracts, i.e. pieces of code that execute on the blockchain. These contracts are represented by addresses as well, but there is no private key behind these addresses (and consequently, a smart contract can, by itself, not create and sign a transaction). To distinguish these two types of accounts, accounts that hold a key pair are sometimes called externally owned account (EOA), while addresses occupied by a smart contract are called contract accounts.

State

The Ethereum state is organized as key-value pairs, where the key is the address and the value is again a complex data structure which consists of the following fields.

  • First, there is the nonce. The nonce is a counter that is increased with every transaction that originates from this address (i.e. account), and we get back to its role when discussing transactions below
  • Then, there is a balance, which reflects the current amount of Ether (the native currency of the Ethereum blockchain) owned by the account
  • Next, there is a field called code, which, if the account is a contract account, holds the bytecode of the smart contract
  • Finally, there is a field called storage. This is again a set of key-value pairs that a smart contract can use as persistent storage – we will get to this when we learn more about smart contracts.

Technically, the state is not really stored in the blockchain. Instead, the blockchain contains the initial state (in block zero of the chain, i.e. the genesis block), and all transactions. As the state can only be changed as part of a transaction, this is sufficient to reconstruct the state from the blockchain data. This is in fact what a full Ethereum client (the piece of software making up a node – some people including myself find the term client for this a bit confusing, given that we will learn later that most of these clients actually act as a server) does when it is initially started – it gets all blocks from the current blockchain, replays the transactions which are part of the blocks and uses this to reconstruct the state, which is then stored in a database on disk.

Note that there are some clients, the so-called light clients, which do not actually go through this process, but only download block headers and access full clients to be able to read the state if needed. Even though the state is not stored as part of the blocks, each block contains a hash value built from the state. This (and the fact that the state is organized in a data structure called a Merkle Patricia trie) allows even a light clients to access and validate the state for a given address.

Ether and gas

Before proceeding to discuss transactions, it is helpful to understand what Ether and gas are. Ether is nothing but the native digital currency of the Ethereum blockchain, similar to what bitcoin is to the bitcoin blockchain. The smallest amount of Ether that can be transferred is one Wei, and 1018 Wei is equivalent to one Ether. The balance, for instance, that is stored as part of the state of an account, is the balance in Wei. Another unit that is frequently used is the GWei, which is 109 Wei, so that 109 GWei is again one Ether.

Ether is the currency used to make payments in the Ethereum blockchain. One of the things you pay for is the processing, i.e. validation and inclusion in a block, of transactions. Similar to the bitcoin network, miners (or, after transitioning to the proof-of-stake algorithm, validators) are rewarded in Ether. The way how the fees are calculated, however, is a bit more subtle than with the bitcoin network. The reason behind this is that as part of a transaction, a smart contract might have to be executed, and to avoid DoS attacks, we want the fees to depend on the complexity of that smart contract.

To achieve this, the Ethereum blockchain uses a measurement for the complexity of a transaction called gas. Every transaction consumes a certain amount of gas. A simple transfer, for instance, requires 21000 units of gas. When a smart contract is executed as part of a transaction, every instruction consumes a certain amount of gas as well.

To price gas and to therefore price transactions, every transaction contains a gas price. This is the amount of Ether (or Wei) that the participant posting the transaction is willing to pay per unit of gas consumed by the transaction. Miners can use the gas price to select the transactions that are most beneficial for them, so that transactions with a high gas price tend to be mined faster, while transactions with a low gas price can stay pending for a long time – potentially forever. Thus choosing a reasonable gas price is essential for the successful processing of a transaction, and clients typically use a heuristic to propose a gas price for a given transaction.

In addition to the amount of gas consumed by a transaction and the gas price, there is also a gas limit that the originator of a transaction can define. Especially when executing an unknown smart contract, the amount of gas needed can be hard to predict, and therefore the gas limit serves as a safeguard to make sure that a malicious contract cannot consume an unlimited amount of gas. If during the execution of a transaction, the gas limit is exceeded, the transaction is reverted – note, however, that the gas used up to this point is lost. Therefore choosing the gas limit is also vital to ensure proper processing of a transaction.

Let us go through an example to see how this works. Suppose that you run a comparatively complex transaction, like the deployment of a smart contract, that consumes 2,409,371 units of gas. Suppose further that the current gas price is 1 GWei. Then the amount of Ether you would have to pay for this transaction is

1 GWei = 1000000000 Wei x 2409371 = 2.409371 x 10¹⁵ Wei = 0.002409371 Ether

Assuming a price of 2.600 USD per Ether, this would cost you roughly 6.26 USD. In reality, however, the real gas price is even higher (today it was 25 GWei), so this would be more than 150 USD. This is an expensive transaction, and most transactions are cheaper. Still, transaction costs can be significant on the Ethereum mainnet (the example is actually taken from the Rinkeby test network, where of course Ether costs nothing, but just to give you an idea).

If, however, you submit the transaction with a gas limit below 2,409,371, the transaction would not complete and would be reverted, resulting in a loss of the gas consumed so far.

To make things a bit more complicated, there is actually a second gas limit – the gas limit per block. This limit is set by the miners and determines an upper limit for the amount of gas that all transactions included in a block can consume. The block gas limit is a field in the block header, and, according to the yellow paper, section 4.3.4 and section 6.2, a node will verify that for each block:

  • the block gas limit of the current block differs from the block limit of the parent block by at most roughly 0,1% (1/1024), so that miners can only change the block gas limit within this range with every new block
  • when a transaction is added to a block, the sum of the gas limit of this transaction and the gas used by the transactions already part of the block must not exceed the block gas limit

At the time of writing, the gas limit of a block on the mainnet is roughly 15 Mio. units of gas, and the utilisation is pretty efficient, meaning that most blocks seem to spend an amount of gas which is only barely below the block gas limit.

Transactions

Let us now take a closer look at an Ethereum transaction. Here is a diagram that shows the fields that make up a transaction.

Most of these fields should be clear by now. We have already discussed the gas price and the gas limit. The signature actually consists of three values, conventionally called v, r and s. Here, r and s are the components of the signature as in the usual ECDSA algorithm, and v is an additional value called the parity that can be used to unambiguously recover the public key from the signature – this explains why the public key is not part of the transaction. Note that therefore, the signature also implicitly contains the address of the sender of the transaction.

The value is the amount of Ether (in Wei) that is to be transferred from the sender to the recipient of the transaction, which can of course be zero. Finally, there is the nonce, which is a counter that needs to be incremented by one for each transaction that is generated for a given sender. This value is needed at different points during the execution of a transaction (see again the yellow paper, sections 6 and 7)

  • When a transaction is validated, the nonce of the transaction needs to be equal to the nonce stored in the state of the senders address. When a transaction is executed, the nonce in the senders state is incremented by one
  • When a smart contract is deployed as part of a transaction, the nonce determines, together with the sender address, the address of the smart contract

A miner will actually queue a transaction if it detects a gap in the nonce. Thus if you submit a transaction with nonce one and a transaction with nonce three, the miner will process transaction one, but will put the transaction with nonce three into a queue, assuming that a transaction with nonce two is still on its way through the network.

Also note that miners typically allow you to replace a transaction that is still pending by sending a new transaction with the same nonce. This is useful if your transaction is stuck because the gas price is too low – you can then send the transaction again, using a higher gas price and the same nonce, and the miner will replace the transaction in its pool of pending transactions with the new version. Of course, this is only possible as long as the transaction has not yet been included in a block. Some wallets also allow you to do the same to cancel a pending transaction – simply send a transaction with the same nonce and value zero. Note, however, that miners will only accept the replacement if the gas price of the new transaction is at most equal to that of the pending transaction, and to cancel a transaction, you will actually want to increase the gas price to make sure that the replacement is mined, not the original transaction.

Why is the nonce needed? One answer to this is that it avoids a form of malicious behavior known as replay attack. Suppose you create, sign and submit a transaction that transfers 100 ETH to Eve. The transaction is mined, included in a block and added to the chain, and Eve happily receives the 100 ETH. Now Eve is greedy – she takes the transaction from the block (which she can easily do, as the data is public) and submits exactly the same transaction once more – and again, and again – you see where this is going. The nonce avoids this – when Eve tries to submit the transaction again, the nonce of the state will already have increased as a consequence of the first transaction, and miners and validators will reject the second copy of the transaction.

We have not yet touched upon the two extra fields on the right hand side of the diagram. The first field, the data, is relevant for transactions that are ordinary transactions, i.e. transactions targeting an existing smart contract or a EOA. The field can be used to include arbitrary data in the transaction, for instance arguments for the invocation of a smart contract. The second field, called init, is only relevant if a transaction is used to deploy a smart contract. A transaction will serve as deployment when its to field is the zero address. In this case, the init field is supposed to contain byte code that will be executed, and the result of this byte code will be stored as new smart contract at the contract address determined by sender and nonce.

Blocks

After all these preparations, we are now ready to finally discuss blocks. In Ethereum, a block consists of three pieces – the block header, the list of transactions included in the block and a list of headers of other blocks, the so-called ommers (which is a gender-neutral term, sometimes these blocks are called uncle blocks). These components are displayed in the diagram below

The block header contains the following information (note that the order in the list and the diagram is not exactly the order in which the fields actually appear in the block, see the source code or the yellow paper for a full and more formal description)

  • First, there is a reference to the parent of the block, given by the hash value of the parent block. So the parent cannot be changed without breaking the chain, which is, after all, a characteristic property that you would expect from any blockchain. Formally, this is the Keccak hash of the RLP encoded parent block
  • Next, there is a hash value of the list of ommers that can be used to validate this data
  • The third field is the beneficiary, which is the address to which the mining reward for this block belongs
  • The next field is the hash value root of the Merkle-Patricia trie built from the state of all addresses. The presence of this field allows a light client to validate state information without having to download the entire chain
  • Similar to the hash value of the ommers list, the block header also contains a hash value of the tree of transactions included in this block
  • The next field is again the hash value of the root of a trie, this time the tree built from all transaction receipts. A transaction receipt is a data structure that describes the outcome of the process of validating a transaction. Similar to the state, it is not stored in the blockchain, but needs to be calculated by a client by replaying the transactions, and the presence of the root in the block header allows a client to validate that a receipt is not manipulated
  • A special part of a transaction receipt is the set of logs generated by the transaction. We will look at logs and events in a bit more detail when we talk about the Solidity programming language. To make it easier to scan the blockchain for specific log entries, the block header contains a Bloom filter of the log entries which is a special data structure that supports fast searching
  • The block header also contains the block number, i.e. the number of ancestors (the genesis block therefore has block number zero) and a creation timestamp
  • As discussed before, the block header contains the block gas limit along with the total gas used for this block, i.e. by all transactions in the block
  • A miner can use the extra data field to add at most 32 bytes of data to a block
  • Finally, there are the nonce, the mixed hash and the difficulty, which are used for the PoW algorithm (Ethereum uses an algorithm called ethash which aims at making the use of ASICS for mining more difficult by using large data structures that need to be manipulated in memory, see also appendix J of the yellow paper for a formal definition)

As you would expect, a miner that mines a new block is rewarded for this work. The reward consists of two components. First, the miner receives a base reward of currently 2 ETH for each newly mined block, regardless of the transactions contained in the block. Second, the miner receives transaction fees. The mechanism by which this happens is currently being changed by EIP-1599. Previously, a miner received the full transaction fees for all transactions in the block being mined. After implementation of the EIP, the fees will consist of a base fee that is allowed to vary slowly over time, and a priority fee that is the difference of the total transaction fees and the base fee. The miner will only receive the priority fee, and the base fee will be burned. The EIP also adds the base fee as an additional field to the block header.

Most of the above should sound familiar – but there is one detail that struck me on first reading, namely the role of the ommers. Why are they needed? The reason for including ommers is that in addition to the block reward that a miner receives for a new block, the miners (i.e. beneficiaries) of an ommer block referenced in a new block will also receive a reward, called the uncle reward.

The motivation behind this (you might want to read this paper for all the glorious details and how this impacts the rewards of miners) is as follows. Suppose you are a miner that is mining a new block, say A. At the same time, a second miner is mining another valid block, called B. Both blocks have the same parent P (the current tip of the canonical chain). Now, as the block mining rate on the Ethereum block chain is rather high, it can happen and will happen that A and B are found and distributed at roughly the same point in time. This will lead to a short fork, but after some time, the chain stabilizes and only A or B will become part of the canonical chain (the longest chain). Suppose that block B ends up being on the canonical chain – then your mining reward for block A is not part of “the” state any more, and your reward is lost.

However, suppose that you now mine a new block C, with parent B. Then, the stale block A will be an ommer of block C. If you manage to include A in the ommer list of block C, and block C makes it to the chain, you (being the beneficiary of block A) will still receive the uncle reward. The uncle reward is lower than the standard block reward, but at least the reward is not zero. In this sense, the uncle reward is a mechanism that fosters fast mining and rewards miners for producing blocks, even if this block does not make it to the canonical chain. In addition, a miner who includes ommers in a block also receives a small reward as an incentive to also include ommers created by other miners.

This closes todays post. Yes, this was a long post, but if you have followed me so far, you should have gained a solid understanding of the basic building blocks of the Ethereum block chain. Armed with this understanding, we will – in the next post – go ahead and learn more about the mysterious smart contracts that we have already touched upon several times.

The Ethereum blockchain, smart contracts and token

If you have followed my blog for some time, you might know that it started with a few posts on the bitcoin blockchain – about its foundations in elliptic curve cryptography, blocks, mining and transactions. The bitcoin blockchain has been established in 2009, and since then, a lot has happened in the blockchain world.

Maybe the most exciting new development are token – tradable coins that actually live on top of an existing blockchain. In particular non-fungible token are all the rage these days, and allow you to document ownership in a particular, uniquely identifiable asset like a piece of classical or digital art in the blockchain. Everybody who has access to a blockchain can create a token, and, according to Investopedia, more than 200.000 of these token did already exist by the end of 2019.

Technically, a token is nothing else but an application that uses persistent storage to store the information who owns which token respectively how many token. The point of a token is that this is not simply an ordinary application running in some data center, which might raise the usual concerns about whether you can trust the programmer and the operator, but is a so-called smart contract – an application whose code is stored in the blockchain and which is in a certain sense running on top of the blockchain and uses the blockchain as storage.

Thus, token ownership is stored in the blockchain, and as such, is subject to the usual guarantees in terms of integrity and durability that a blockchain has to offer. As the program code itself is also stored in the blockchain, you can also trust that it is not manipulated after initial deployment, and, as every node can run the code independently, the consensus mechanism of the blockchain also makes a manipulation during program execution at least extremely difficult.

Token are an important, but by far not the only application of smart contracts. You could, for instance, implement a smart contract that allows you to cast votes based on blockchain technology – the technology will make sure that every participant can only vote once, that votes are correctly accounted for and cannot be manipulated, and that the entire voting process is documented transparently in the blockchain. Or you can build a smart contract that acts as a deposit for collateral, where the logic implemented in the contract makes sure that the collateral is only released if a certain condition is met. There are broker applications that allow you to trade digital currency without the need for a trusted third party, fully decentralized organisations (DAO), whose members would, for instance, jointly invest into startups and vote transparently on the usage of funds, and many more applications of smart contracts. There are even games – check out Crypto Kitties, one of the first NFTs that was implemented.

Not every blockchain supports smart contracts. The bitcoin blockchain, for instance, does not (even though there is some scripting built into the validation process). The most popular (and, to my understanding, the first) blockchain that introduced smart contracts is the Ethereum blockchain, which was initially designed in 2013 and launched as a project in 2015. The Hyperledger Fabric blockchain has a similar concept (although smart contracts are technically quite different from what Ethereum does), and the same is true for Corda or EOS.

A couple of weeks back I became curious and wanted to understand how exactly a token works. I started to dive a bit into the Ethereum blockchain, smart contracts, token standards, dApps and Solidity, and, as always, decided to document my findings in a short series on this blog. If you follow along, here is what you will learn.

At the end, we will put everything together, mint our own NFT and build a frontend that will act as a wallet, allow you to list the token that you and others own and to trade token. As always, I will make the corresponding code available in my GitHub account so that you can get your hands dirty and directly jump into coding.

So let us get started and dive into the Ethereum blockchain – what it is, why it is different from the bitcoin blockchain and how it serves as basis for smart contracts and token. Watch out for my next post to appear which will talk about this.