
When you want to build a volume service for a cloud platform, you need to find a way to quickly create and remove block devices on your compute nodes. We could of course use loopback devices for this, but this is slow, as every operation goes through the file system. A logical volume manager might be a better alternative. Today, we will investigate the logical volume manager that Cinder actually uses – Linux LVM2.
The Linux logical volume manager – some basic terms
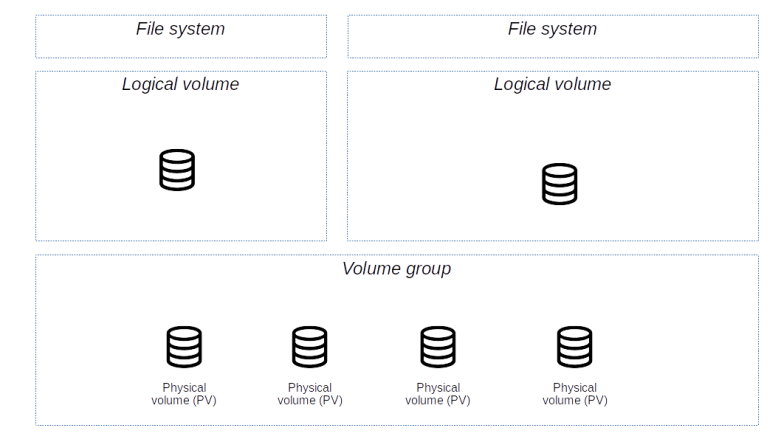
In this section, we will briefly explain some of the key concepts of the Linux logical volume manager (LVM2). First, there are of course physical devices. These are ordinary block devices that the LVM will completely manage, or partitions on block devices. Technically, even though these devices are called physical devices in this context, these devices can themselves be virtual devices, which happens for instance if you run LVM on top of a software RAID. Logically,
the physical devices are divided further into physical extents. An extent the smallest unit of storage that LVM manages.
On the second layer, LVM now bundles one or several physical devices into a volume group. On top of that volume group, you can now create logical devices. These logical devices can be thought of as being divided into logical extents. LVM maps these logical extents to physical extents of the underlying volume group. Thus, a logical device is essentially a collection of physical extents of the underlying volume group which are presented to a user as a logical block device. On top of these logical volumes, you can then create file systems as usual.
Why would you want to do this? One obvious advantage is again based on the idea of pooling. A logical volume essentially pools the storage capacity of the underlying physical devices and LVM can dynamically assign space to logical devices. If a logical device starts to fill up while other logical devices are still mostly empty, an administrator can simply reallocate capacity between the logical devices without having to change the physical configuration of the system.
Another use case is virtualization. Given that there is sufficiently storage in your logical volume group, you can dynamically create new logical devices with a simple command, which can for instance be used to automatically provision volumes for cloud instances – this is how Cinder leverages the LVM as we will see later on.
Looking at this, you might be reminded of a RAID controller which also manages physical devices and presents their capacity as virtual RAID volumes. It is important to understand that LVM is not (primarily) a RAID manager. In fact, newer versions of LVM also offer RAID functionality (more on this below), but this it not its primary purpose.
Another useful functionality that LVM offers is a snapshot. When you create a snapshot, LVM will not simply create a physical copy. Instead, it will start to mark blocks which are changed after the snapshot has been taken as changed and only copy those blocks to a different location. This makes using the snapshot functionality very efficient.
Lab12: installing and using LVM
Let us now try to see how LVM works in practice. First, we need a machine with a couple of unused block devices. As it is unlikely that you have some spare disks lying around under your desk, we will again use a virtual machine for that purpose. So bring up our test machine and log into it using the following commands (assuming that you have gone through the basic setup steps in the the first post in this series).
git clone https://github.com/christianb93/openstack-labs
cd openstack-labs/Lab12
vagrant up
vagrant ssh box
When you now run lsblk inside the machine, you should see two additional devices /dev/sdc and /dev/sdd which are both unmounted and have a capacity of 5 GB each.
As a first step, let us now prepare these physical volumes for use with LVM. This is done using the pvcreate utility. WARNING: if you accidentally run this outside of the VM, it will render the device unusable!
sudo pvcreate /dev/sdc
sudo pvcreate /dev/sdd
What is this command actually doing? To understand this, let us first use pvscan to print a list of all physical volumes on the system which LVM knows.
sudo pvscan -u
You will see a list of two volumes, and after each volume, LVM will print a UUID for this volume. Now let us see what LVM has actually written on the volume.
sudo dd if=/dev/sdc \
  bs=1024 \
  count=10 \
  | hexdump -C
In the output, you will see that LVM has written some sort of signature onto the device, containing some binary information and the UUID of the device. In fact, this is how LVM stores state and is able to recognize a volume even if it has been moved to a different point in /dev.
Now we can build our first volume group. For that purpose, we use the command vgcreate and specify the name of the volume group and a list of physical devices that the volume group should contain.
sudo vgcreate test_vg /dev/sdc /dev/sdd
If you now repeat the dump above, you will see that LVM has again written some additional data on the device, we find the name of the newly created volume group and even a JSON representation of the physical volumes in the volume group.
Let us now print out a bit more information on the system using the lvm shell. So run
sudo lvm
to start the shell and then type fullreport to get a description of the current configuration. It is instructive to play a bit with the shell, use help to get a list of available commands and exit to exit the shell when you are done.
Finally, it is now time to create a few logical volumes. Our entire volume group has 10 GB available. We will create three logical volumes which in total consume 6 GB.
for i in {1..3}; do
  sudo lvcreate \
    --size 2G \
    test_vg \
    --type linear \
   --name lv0$i
done
sudo lvscan
The last command will print a list of all logical volumes on the system and should display the three logical volumes that we have just created. If you now again create a full report using lvm, you will find these three devices and a table that indicates how the logical extends are distributed across the various physical devices.
Behind the scenes, LVM uses the Linux device mapper kernel module, and in fact, each device that we create is displayed in the /dev tree at three different points. First, LVM exposes the logical volumes at a location built according to the scheme
/dev/volume group name/logical volume name
In our example, the first volume, for instance, is located at /dev/test_vg/lv01. This, however, is only a link to the device /dev/dm-0, indicating that it is created by the device mapper. Finally, a second link is created in /dev/mapper.
The LVM metadata daemon
We have said above that LVM stores its state on the physical devices. This, however, is only a part of the story, as it would imply that whenever we use one of the tools introduced above, we have to scan all devices, which is slow and might interfere with other read or write access to the device.
For that reason, LVM comes with a metadata daemon, running as lvmetad in the background as a systemctl service. This daemon maintains a cache of the LVM metadata that a command like lvscan will typically use (you can see this if you try to run such a command as non-root, which will cause an error message while the tool is trying to connect to the daemon via a Unix domain socket).
The metadata daemon is also involved when devices are added (hotplug), removed, or changed. If, for example, a physical volume comes up, a Linux kernel mechanism known as udev informs LVM about this event, and when a volume group is complete, all logical volumes based on it are automatically activated (see the comment on use_lvmetad in the configuration file /etc/lvm/lvm.conf).
It is interesting to take a look at the udev ruleset that LVM creates for this purpose (you will find these rules in the LVM-related files in /lib/udev/rules.d, in my distribution, these are the files with the numbers 56 and 69). In the rules file 69-lvm-metad.rules, for instance, you will find a rule that invokes (via systemd dependencies) a pvscan every time a physical device is added which will update the cache maintained by the metadata daemon (see also this man-page for a bit more background on the various options that you have to activate logical LVM devices at boot-time).
However, there is one problem with this type of scan that should be mentioned. Suppose, in our scenario, someone exports our logical device /dev/test_vg/lv01 using a block device level tool like iSCSI. A client then consumes the device and it appears inside the file system of the client as, say, /dev/sdc. On the client, an administrator now decides to also use LVM and sets up this device as a physical volume.
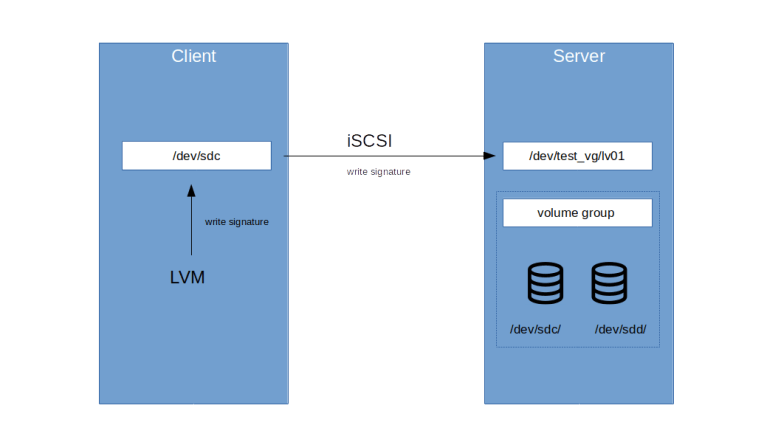
LVM on the client will now write a signature into /dev/sdc. This write will go through the iSCSI connection and the signature will be written to /dev/test_vg/lv01 on the server. If now LVM on the server scans the devices for signatures the next time, this signature will also appear on the server, and LVM will be confused and believe that a new physical device has been added.
To avoid this sort of issues, the LVM configuration file /etc/lvm/lvm.conf contains an option which allow us to add a filter to the scan, so that only devices which are matching that filter are scanned for PV signatures. We will need this when we later install Cinder which uses LVM to create logical volumes for virtual machines on the fly.
LVM snapshots
Let us now explore a very useful feature of LVM – efficiently creating COW (copy-on-write) snapshots.
The idea behind a copy-on-write snapshot is easily explained. Suppose you have a logical volume that contains, say, 100 extends. You now want to create a snapshot, i.e. a copy of that volume at a given point in time. The naive approach would be to go through all extents and to create an exact copy for each of them. This, however, has two major disadvantages – it is very time consuming and it requires a lot of additional disk space.
When using copy-on-write, you would proceed differently. First, you would create a list of all extents. Then, you would start to monitor write activities on the original volume. As soon as an extent is about to be changed, you would mark it as changed and create a copy of that extent to preserve its content. For those extents, however, that have not yet changed since the snapshot has been created, you would not create a copy, but refer to the original content when someone tries to read from the snapshot, similar to a file system link.
Thus when a read is done on the snapshot, you would first check your list whether the extent has been changed. If yes, the copied extent is used. If no, the read is redirected to the original extent. This procedure is very fast, as we do not have to copy around all the data at the time when the snapshot is created, and uses space efficiently, as the capacity needed for the snapshot does not depend on the total size of the original volume, but on the volume of change.

Let us try this out. For this exercise, we will use the logical volume /dev/test_vg/lv01 that we have created earlier. First, use fdisk to create a partition on this volume, then create a file system and a mount point and mount this volume under /mnt/lv/ . Note that – which confused me quite a bit when trying this – the device belonging to the partition will NOT show in in /dev/test_vg, but in /dev/mapper/, i.e. the path to the partition that you have to use with mkfs is /dev/mapper/test_vg-lv01p1. Then create a file in in the mounted directory.
(echo n; echo p; echo 1; echo ; echo ; echo w)\
  | sudo fdisk /dev/test_vg/lv01
sudo partprobe /dev/test_vg/lv01
sudo mkfs -t ext4 /dev/mapper/test_vg-lv01p1
sudo mkdir -p /mnt/lv
sudo mount /dev/mapper/test_vg-lv01p1 /mnt/lv
echo "1" |  sudo tee /mnt/lv/test
sudo sync
Note that we need one execution of partprobe to force the kernel to read the partition table on the logical device which will create the device node for the partition. We also sync the filesystem to make sure that the write goes through to the block device level.
Next, we will create a snapshot. This done using the lvcreate command as follows.
sudo lvcreate \
  --snapshot \
  --name snap01 \
  --size 128M \
  --permission r \
  test_vg/lv01
There are two things that should be noted here. First, we explicitly specify a size of the snapshot which is much smaller than the original volume. At a later point in time, when a lot of data has been written, we might have to extend the volume manually, or we can make use of LVMs auto-extension feature for snapshots (see the comments for the parameter snapshot_autoextend_threshold in /etc/lvm/lvm.conf and the man page of dmeventd which needs to be running to make this work for details). Second, we ask LVM to create a read-only snapshot – LVM can also create read-write snapshots, which in fact is the default, but we will not need this here.
If you now run lvs to get a list of all logical volumes, you will see that a new snapshot volume has been created which is linked (via the “origin” field) to the original volume. Let us now mount the snapshot as well, change the data in our test file and then verify that the file in the snapshot is unchanged.
sudo partprobe /dev/mapper/test_vg-snap01
sudo mkdir -p /mnt/snap
sudo mount /dev/mapper/test_vg-snap01p1 /mnt/snap
echo "2" |  sudo tee /mnt/lv/test
sudo cat /mnt/snap/test
In a real world scenario, we could now use the mounted snapshot as a backup, copy the files that we want to restore then eventually remove the snapshot volume again. Alternatively, we can restore the entire snapshot by merging it back into the original volume, which will reset the original volume to the state in which it was when the snapshot was taken. This is done using the command lvconvert.
sudo lvconvert \
  --mergesnapshot \
  test_vg/snap01
When you run this, the merge will be scheduled, but it will only be executed once the devices are re-activated. At this point, I got a bit into trouble. To understand the problem, let us first umount all mount points and then try to deactivate the original volume.
sudo umount /mnt/lv
sudo umount /mnt/snap
sudo lvchange -an test_vg/lv01
But wait, there is a problem – when you simply run this command, you will get an error message informing you that the logical volume “is in use by another device”. It took me some time and this blog post describing a similar problem to figure out what goes wrong. To diagnose the problem, we can find the links to our device in the /sys filesystem. First, find the major and minor device number of the logical volume using dmsetup info – in my example, this gave me 253:0. Then, navigate to /sys/dev/block. Here, you will find a subdirectory for each major-minor device number representing the existing devices. Navigate into the one for the combination you just noted and check the holders subdirectory to see who is holding a reference to the device. You will find that the entry in /dev/mapper representing the partition that showed up after running partprobe causes the problem! So we can use
sudo dmsetup remove test_vg-lv01p1
sudo dmsetup remove test_vg-snap01p1
to remove these links for the original volume and the snapshot. Now you should be able to de-activate and activate the volume again.
sudo lvchange -an test_vg/lv01
sudo lvchange -ay test_vg/lv01
After a few seconds, the snapshot should disappear from /dev/mapper, and sudo lvs -a should now longer show the snapshot, indicating that the merge is complete. When you now mount the original volume again and check the test file
sudo partprobe /dev/mapper/test_vg-lv01
sudo mount /dev/mapper/test_vg-lv01p1 /mnt/lv
sudo cat /mnt/lv/test
you should see the original content (1) again.
Note that it is not possible to detach a snapshot from its origin (there is a switch –splitsnapshot for lvconvert, but this does only split of the changed extents, i.e. the COW part, and is primarily intended to be able to zero out those extents before returning them into the volume group pool by removing the snapshot). A snapshot will always require a reference to the original volume.

1 Comment