
When you are playing with virtualization and cloud technology, you will sooner or later realize that the resources of an average lab PC are limited. Especially memory can easily become a bottleneck if you need to spin up more than just a few virtual machines on an average desktop computer. Public cloud platforms, however, offer a virtually unlimited scalability – so why not moving your lab into the cloud to build a cloud in the cloud? In this post, I show you how this can be done and what you need to keep in mind when selecting your platform.
The all-in-one setup on Packet.net
Over the last couple of month, I have spend time playing with OpenStack, which involves a minimal but constantly growing installation of OpenStack on a couple of virtual machines running on my PC. While this was working nicely for the first couple of weeks, I soon realized that scaling this would require more resources – especially memory – than an average PC typically has. So I started to think about moving my entire setup into the cloud.
Of course my first idea was to use a bare metal platform like Packet.net to bring up a couple of physical nodes replacing the VirtualBox instances used so far. However, there are some reasons why I dismissed this idea again soon.
First, for a reasonably realistic setup, I would need at least five nodes – a controller node, a network node, two compute nodes and a storage node. Each of these nodes would need at least two network interfaces – the network node would actually need three – and the nodes would need direct layer 2 connectivity. With the networking options offered by Packet, this is not easily possible. Yes, you can create layer two networks on Packet, but there are some limitations – you can have at most two interfaces of which one might be needed for the SSH access and therefore cannot be used for a private network. In addition, this feature requires servers of a minimum size, which makes it a bit more expensive than what I was willing to spend for a playground. Of course we could collapse all logical network interfaces into a single physical interface, but as one of my main interests is exploring different networking options this is not what I want to do.
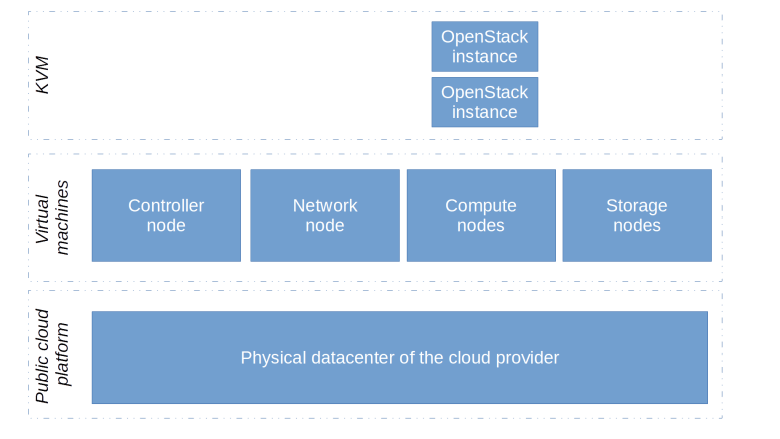
Therefore, I decided to use a slightly different approach on Packet which you might call the all-in-one approach – I simply moved my entire lab host into the cloud. Thus, I would get one sufficiently large bare metal server on Packet (with at least 32 GB of RAM, which is still quite affordable), install all the tools I would also need on my local lab host (Vagrant, VirtualBox, Ansible,..) and run the lab there as usual. Thus our OpenStack nodes are VirtualBox instances running on bare metal, and the instances that we bring up in Nova are using QEMU as nested virtualization on Intel CPUs is not supported by VirtualBox.

To automate this setup using Ansible, we can employ two stages. The first stage uses the Packet Ansible modules to create the lab host, set up the SSH configuration, install all the required software on the lab host, create a user and set up a basic firewall. We also need to install a few additional packages as the installation of VirtualBox will require some kernel modules to be built. In the second stage, we can then run the actual lab by fetching the latest version of the lab setup from the GitHub repository and invoking Vagrant and Ansible on the lab host.
If you want to try this, you will of course need a valid Packet.net account. Once you have that, head over to the Packet console and grab an API key. Put this API key into the environment variable PACKET_API_TOKEN. Next, create an SSH key pair called packet-default-key and place the private and public key in the .ssh subdirectory of your home directory. This SSH key will be added as authorized key to the lab host so that you can SSH into it. Finally, clone the GitHub repository and run the main playbook.
export PACKET_API_TOKEN=your packet.net token
ssh-keygen \
  -t rsa \
  -b 2048 \
  -f ~/.ssh/packet-default-key -P ""
git clone https://www.github.com/christianb93/openstack-labs
cd openstack-labs/Packet
ansible-playbook site.yaml
Be patient, this might take up to 30 minutes to complete, and in the last phase, when the actual lab is running on the remote host, you will not see any output from the main Ansible script. When the script completes, it will print a short message instructing you how the access the Horizon dashboard using an SSH tunnel to verify your setup.
By default, the script downloads and runs Lab6. You can change this by editing global_vars.yaml and setting the variable lab accordingly.
A distributed setup on GCP
This all-in-one setup is useful, but actually not very flexible. It limits me to essentially one machine type (8 cores, 32 GB RAM), and when I ever needed more RAM I would have to choose a machine with 64 GB, thus doubling my bill. So I decided to try out a different setup – using virtual machines in a public cloud environment instead of having one large lab host, a setup which you might want to call a distributed setup.
Of course this comes at a price – we put a virtualized environment (compute and network) on top of another virtualized environment. To limit the impact of this, I was looking for a platform that supports nested virtualization with KVM, which would allow me to run KVM instead of QEMU as OpenStack hypervisor.
So I started to look at the various cloud providers that I typically use to understand my options. DigitalOcean seems to support nested virtualization with KVM, but is limited when it comes to network interfaces, at least I am not aware of a way how to add more than one additional network interface to a DigitalOcean droplet and to add more than one private network. AWS does not seem to support nested virtualization at all. Azure does, but only for HyperV. That left me with Google’s GCP platform.
GCP does, in fact, support nested virtualization with KVM. In addition, I can add an arbitrary number of public and private network interfaces to each instance, though this requires a minimum number of vCPUs, and GCP also offers custom instances with a flexible ratio of vCPUs and RAM. So I decided to give it a try.
Next I started to design the layout of my networks. Obviously, a cloud platform implies some limitations for your networking setup. GCP, as most other public cloud platforms, does not provide layer 2 connectivity, but only layer 3 networking, so I would not be able to use flat or VLAN networks with Neutron, leaving overlay networks as the only choice. In addition, GCP does also not support IP multicast, which, however, is not a problem as the OVS based implementation of Neutron overlay networks only uses IP unicast messages. And GCP accepts VXLAN traffic (but does not support GRE encapsulation), so a Neutron overlay network using VXLAN should work.
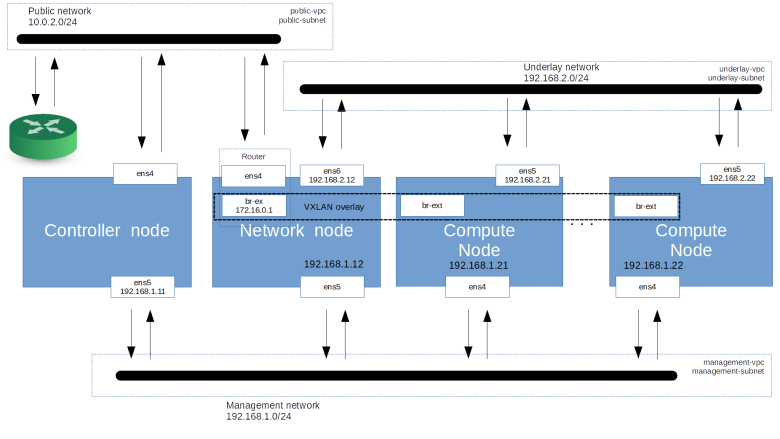
I was looking for a way to support at least three different GCP networks – a public network, which would provide access to the Internet from my nodes to download packages and to SSH into the machines, a management network to which all nodes would be attached and an underlay network that I would use to support Neutron overlay networks. As GCP only allows me to attach three network interfaces to a virtual machine with at least 4 vCPUs, I wanted to avoid a setup where each of the nodes would be attached to each network. Instead, I decided to put an APT cache on the controller node and to use the network node as SSH jump host for storage and compute nodes, so that only the network node requires four interfaces. To implement an external Neutron network, I use a OVS based VXLAN network across compute and network nodes which is presented as an external network to Neutron, as we have already done it in a previous post. Ignoring storage nodes, this leads to the following setup.
Of course, we need to be a bit careful with MTUs. As GCP does itself use an overlay network, the MTU of a standard GCP network device is 1460. When we add an additional layer of encapsulation to realize our Neutron overlay networks, we end up with an MTU of 1410 for the VNICs created inside the Nova KVM instances.
Automating the setup is rather straightforward. As demonstrated in a previous post, I use Terraform to bring up the base infrastructure and parse the Terraform output in my Ansible script to create a dynamic inventory. Then we set up the APT cache on the controller node (which, to avoid loops, implies that APT on the controller node must not use caching) and adapt the APT configuration on all other nodes to use it. We also use the network node as an SSH jump host (see this post for more on this) so that we can reach compute and storage nodes even though they do not have a public IP address.
Of course you will want to protect your machines using GCPs built-in firewalls (i.e. security groups). I have chosen to only allow incoming public traffic from the IP address of my own workstation (which also implies that you will not be able to use the GCP web based SSH console to reach your machines).
Finally, we need a way to access Horizon and the OpenStack API from our local workstation. For that purpose, I use an instance of NGINX running on the network host which proxies requests to the control node. When setting this up, there is a little twist – typically, a service like Keystone or Nova will return links in their responses, for instances to refer to entries in the service catalog or to the VNC proxy. These links will contain the IP address of our controller node, more specifically the management IP address of this node, which is not reachable from the public network. Therefore the NGINX forwarding rules need to rewrite these URLs to point to the network node – see the documentation of the Ansible role that I have written for this purpose for more details. The configuration uses SSL to secure the connection to NGINX so that the OpenStack credentials do not travel from your workstation to the network node unencrypted. Note, however, that in this setup, the traffic on the internal networks (the management network, the underlay network) is not encrypted.
To run this lab, there are of course some prerequisites. Obviously, you need a GCP account. It is also advisable to create a new project for this to be able to easily separate the automatically created resources from anything else you might have running on GCE. In the IAM console, make sure that your user has the “resourcemanager.organisationadministrator” role to be able to list and create new projects. Then navigate the to Manage Resources page, create a new project and create a service account for this new project. You will need to assign some roles to this service account so that it can create instances and networks – I use the compute instance admin role, the compute network admin role and the compute security admin role for that purpose.
To allow Terraform to create and destroy resources, we need the credentials of the service account. Use the GCP console to download a service account key in JSON format and store it on your local machine as ~/.keys/gcp_service_account.json. In addition, you will again have to create an SSH key pair and store it as ~/.ssh/gcp-default-key respectively ~/.ssh/gcp-default-key.pub, we will use this key to enable access to all GCP instances as user stack.
Once you are done with these preparations, you can now run the Terraform and Ansible scripts.
git clone https://www.github.com/christianb93/openstack-labs
cd openstack-labs/GCE
terraform init
terraform apply -auto-approve
ansible-playbook site.yaml
ansible-playbook demo.yaml
Once these scripts complete, you should be able to log into the Horizon console using the public IP of the network node, using the demo user credentials stored in ~/.os_credentials/credentials.yaml and see the instances created in demo.yaml up and running.
When you are done, you should clean up your resources again to avoid unnecessary charges. Thanks to Terraform, you can easily destroy all resources again using terraform destroy auto-approve.
