Asynchronous I/O with Python part III – native coroutines and the event loop

In the previous post, we have seen how iterators and generators can be used in Python to implement coroutines. With this approach, a coroutine is simply a function that contains a yield statement somewhere. This is nice, but makes the code hard to read, as the function signature does not immediately give you a hint whether it is a generator function or not. Newer Python releases introduce a way to natively designate functions as asynchronous functions that behave similar to coroutines and can be waited for using the new async and await syntax.

Native coroutines in Python

We have seen that coroutines can be implemented in Python based on generators. A coroutine, then, is a generator function which runs until it is suspended using yield. At a later point in time, it can be resumed using send. If you know Javascript, this will sound familiar – in fact, with ES6, Javascript has introduced a new syntax to declare generator functions. However, most programmers will probably be more acquainted with the concepts of an asynchronous functions in Javascript and the corresponding await and async keyword.

Apparently partially motivated by this example and by the increasing popularity of asynchronous programming models, Python now has a similar concept that was added to the language with PEP-492 which introduces the same keywords into Python as well (as a side note: I find it interesting to see how these two languages have influenced each other over the last couple of years).

In this approach, a coroutine is a function marked with the async keyword. Similar to a generator-based coroutine which runs up to the next yield statement and then suspends, a native coroutine will run up to the next await statement and then suspend execution.

The argument to the await statement needs to be an awaitable object, i.e. one of the following three types:

  • another native coroutine
  • a wrapped generator-based coroutine
  • an object implementing the __await__ method

Let us look at each of these three options in a bit more detail

Waiting for native coroutines

The easiest option is to use a native coroutine as target for the await statement. Similar to a yield from, this coroutine will then resume execution and run until it hits upon an await statement itself. An example for such a coroutine is asyncio.sleep(), which sleeps for the specified number of seconds. You can define your own native coroutine and await the sleep coroutine to suspend your coroutine until a certain time has passed.

async def coroutine():
    await asyncio.sleep(3)

Similar to yield from, this builds a chain of coroutines that hand over control to each other. A coroutine that has been “awaited” in this way can hand over execution to a second coroutine, which in turn waits for a third coroutine and so forth. Thus await statements in a typical asynchronous flow form a chain.

Now we have seen that a chain of yield from statements typically ends with a yield statement, returning a value or None. Based on that analogy, one might think that the end of a chain of await statements is an await statement with no argument. This, however, is not allowed and would also not appear to make sense, after all you wait “for something”. But if that does not work, where does the chain end?

Time to look at the source code of the sleep function that we have used in our example above. Here we need to distinguish two different cases. When the argument is zero, we immediately delegate to __sleep0, which is actually very short (we will look at the more general case later).

@types.coroutine
def __sleep0():
    yield

So this is a generator function as we have seen it in the last post, with an additional annotation, which turns it into a generator-based coroutine.

Generator-based coroutines

PEP-492 emphasizes that native coroutines are different from generator-based coroutines, and also enforces this separation. It is, for instance, an error to execute a yield inside a native coroutine. However, there is some interoperability between these two worlds, provided by the the decorator *types.coroutine that we have seen in action above.

When we decorate a generator-based coroutine with this decorator, it becomes a native coroutine, which can be awaited. The behaviour is very similar to yield from, i.e. if a native coroutine A awaits a generator-based coroutine B and is run via send, then

  • if B yields a value, this value is directly returned to the caller of A.send() as the result of the send invocation
  • at this point, B suspends
  • if we call A.send again, this will resume B (!), and the yield inside B will evaluate to the argument of the send call
  • if B returns or raises a StopIteration, the return value respectively the value of the StopIteration will be visible inside A as the value of the await statement

Thus in the example of asyncio.sleep(0), generator-based coroutines are the answer to our chicken-and-egg issue and provide the end point for the chain of await statements. If you go back to the code of sleep, however, and look at the more general case, you will find that this case is slightly more difficult, and we will only be able to understand it in the next post once we have discussed the event loop. What you can see, however, is that eventually, we wait for something called a future, so time to talk about this in a bit more detail.

Iterators as future-like objects

Going back to our list of things which can be waited for, we see that by now, we have touched on the first two – native coroutines and generator-based coroutines. A future (and the way it is implemented in Python) is a good example for the third case – objects that implement __await__.

Following the terminology used in PEP-492, any object that has an __await__ method is called a future-like object, and any such object can be the target of an await statement. Note that both a native coroutine as well as a generator-based coroutine have an __await__ method and are therefore future-like objects. The __await__ method is supposed to return an iterator, and when we wait for an object implementing __await__, this iterator will be run until it yields or returns.

To make this more tangible, let us see how we can use this mechanism to implement a simple future. Recall that a future is an object that is a placeholder for a value still to be determined by an asynchronous operation (if you have ever worked with Javascript, you might have heard of promises, which is a very similar concept). Suppose, for instance, we are building a HTTP library which has a method like fetch to asynchronously fetch some data from a server. This method should return immediately without blocking, even though the request is still ongoing. So it cannot yet return the result of the request. Instead, it can return a future. This future serves as a placeholder for the result which is still to come. A coroutine could use await to wait until the future is resolved, i.e. the result becomes available.

Of course we will not write a HTTP client today, but still, we can implement a simple future-like object which is initially pending and yields control if invoked. We can then set a value on this future (in reality, this would be done by a callback that triggers when the actual HTTP response arrives), and a waiting coroutine could then continue to run to retrieve the value. Here is the code

class Future:

    def __await__(self):
        if not self._done:
            yield 
        else:
            return self._result

    def __init__(self):
        self._done = False

    def done(self, result):
        self._result = result
        self._done = True

When we initially create such an object, its status will be pending, i.e. the attribute _done will be set to false. Awaiting a future in that state will run the coroutine inside the __await__ method which will immediately yield, so that the control goes back to the caller. If now some other asynchronous task or callback calls done, the result is set and the status is updated. When the coroutine is now resumed, it will return the result.

To trigger this behaviour, we need to create an instance of our Future class and call await on it. Now using await is only possible from within a native coroutine, so let us write one.

async def waiting_coroutine(future):
    data = None
    while data is None:
        data = await future
    return data

Finally, we need to run the whole thing. Similar as for generator-based coroutines, we can use send to advance the coroutine to the next suspension point. So we could something like this.

future=Future()
coro = waiting_coroutine(future)
# Trigger a first iteration - this will suspend in await
assert(None == coro.send(None))
# Mark the future as done
future.done(25)
# Now the second iteration should complete the coroutine
try:
    coro.send(None)
except StopIteration as e:
    print("Got StopIteration with value %d" % e.value)

Let us see what is happening behind the scenes when this code runs. First, we create the future which will initially be pending. We then make a call to our waiting_coroutine. This will not yet start the process, but just build and return a native coroutine, which we store as coro.

Next, we call send on this coroutine. As for a generator-based coroutine, this will run the coroutine. We reach the point where our coroutine waits for the future. Here, control will be handed over to the coroutine declared in the __await__ method of the future, i.e. this coroutine will be created and run. As _done is not yet set, it will yield control, and our send statement returns with None as result.

Next, we change the state of the future and provide a value, i.e we resolve the future. When we now call send once more, the coroutine is resumed. It picks up where it left, i.e. in the loop, and calls await again on the future. This time, this returns a value (25). This value is returned, and thus the coroutine runs to completion. We therefore get a StopIteration which we catch and from which we can retrieve the value.

The event loop

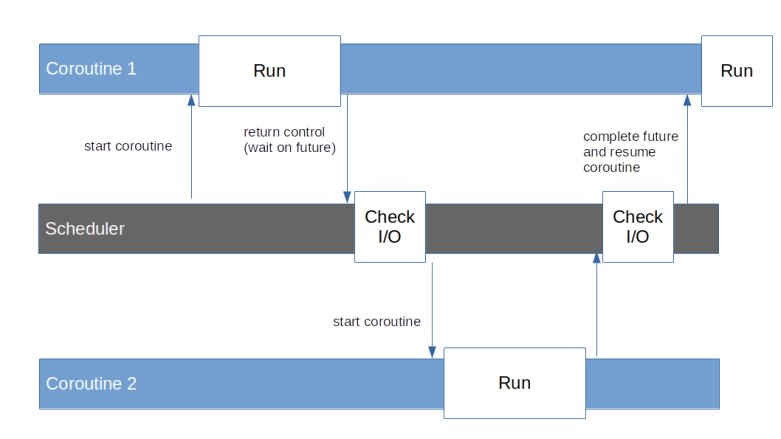
So far, we have seen a few examples of coroutines, but always needed some synchronous code that uses send to advance the coroutine to the next yield. In a real application, we would probably have an entire collection of coroutines, representing various tasks that run asynchronously. We would then need a piece of logic that acts as a scheduler and periodically goes through all coroutines, calls send on them to advance them to the point at which they return control by yielding, and look at the result of the call to determine when the next attempt to resume the coroutine should be made.

To make this useful in a scenario where we wait for other asynchronous operations, like network traffic or other types of I/O operations, this scheduler would also need to check for pending I/O and to understand which coroutine is waiting for the result of a pending I/O operation. Again, if you know Javascript, this concept will sound familiar – this is more or less what the event loop built into every browser or the JS engine running in Node.js is doing. Python, however, does not come with a built-in event loop. Instead, you have to select one of the available libraries that implement such a loop, for instance the asyncio library which is distributed with CPython. Using this library, you define tasks which wrap native coroutines, schedule them for execution by the event loop and allow them to wait for e.g. the result of a network request represented by a future. In a nutshell, the asyncio event loop is doing exactly this

FuturesCoroutinesScheduler

In the next post, we will dig a bit deeper into the asyncio library and the implementation of the event loop.

Asynchronous I/O with Python part II – iterators and generators

As explained in my previous post, historically coroutines in Python have evolved from iterators and generators, and understanding generators is still vital to understanding native coroutines. In this post, we take a short tour through iterators in Python and how generators have traditionally been implemented.

Iterables and iterators

In Python (and in other programming languages), an iterator is an object that returns a sequence of values, one at a time. While in languages like Java, iterators are classes implementing a specific interface, Python iterators are simply classes that have a method __next__ which is supposed to either return the next element from the iterator or raise a StopIteration exception to signal that no further elements exist.

Iterators are typically not created explicitly, but are provided by factory classes called iterables. An iterable is simply a class with a method __iter__ which in turn returns an iterator. Behind the scenes, iterables and iterators are used when you run a for-loop in Python – Python will first invoke the __iter__ of the object to which you refer in the loop to get an iterator and then call the __next__ method of this iterator once for every iteration of the loop. The loop stops when a StopIteration is raised.

This might sound a bit confusing, so let us look at an example. Suppose you wanted to build an object which – like the range object – allows you to loop over all numbers from 0 to a certain limit. You would then first write a class that implements a method __next__ that returns the next value (so it has to remember the last returned value), and then implement an iterable returning an instance of this class.

class SampleIterator:

    def __init__(self, limit):
        self._position = 0
        self._limit = limit

    def __next__(self):
        if self._position < self._limit:
            self._position += 1
            return self._position - 1
        else:
            raise StopIteration

class SampleIterable:

    def __init__(self, limit):
        self._limit = limit

    def __iter__(self):
        return SampleIterator(self._limit)


myIterable = SampleIterable(10)
for i in myIterable:
    print("i = %d" % i)

Often, the same object will implement the __next__ method and the __iter__ method and therefore act as iterable and iterator at the same time.

Note that the iterator typically needs to maintain a state – it needs to remember the state after the last invocation of __next__ has completed. In our example, this is rather straightforward, but in more complex siutations, programmatically managing this state can be tricky. With PEP-255, a new approach was introduced into Python which essentially allows a programmer to ask the Python interpreter to take over this state management – generators.

Generators in Python

The secret sauce behind generators in Python is the yield statement. This statement is a bit like return in that it returns a value and the flow of control to the caller, but with the important difference that state of the currently executed function is saved by Python and the function can be resumed at a later point in time. A function that uses yield in this way is called a generator function.

Again, it is instructive to look at an example. The following code implements our simple loop using generators.

def my_generator(limit=5):
    _position = 0
    while _position < limit:
        yield _position 
        _position += 1

for i in my_generator(10):
    print("i = %d" % i)

We see that we define a new function my_generator which, at the first glance, looks like an ordinary function. When we run this function for the first time, it will set a local variable to set its current position to zero. We then enter a loop to increase the position until we reach the limit. In each iteration, we then invoke yield to return the current position back to the caller.

In our main program, we first call my_generator() with an argument. As opposed to an ordinary function, this invocation does not execute the function. Instead, it evaluates the argument and builds and returns an object called a generator object. This object is an iterator, i.e. it has a __next__ method. When this method is called for the first time, the execution of our function body starts until it hits the first yield statement. At this point, the execution returns to the caller and whatever we yield is returned by the call to __next__. When now __next__ is invoked again, the Python interpreter will restore the current state of the function and resume its execution after the yield. We increase our internal position, enter the loop again, hit the next yield and so forth. This continues until the limit is reached. Then, the function returns, which is equivalent to raising a StopIteration and signals to the caller that the iterator is exhausted.

Instead of using the for loop, we can also go through the same steps manually to see how this works.

generator = my_generator(5)
while True:
    try:
        value = generator.__next__()
        print("Value: %d" % value)
    except StopIteration:
        break

This is already quite close to the programming model of a co-routine – we can start a coroutine, yield control back to the caller and resume execution at a later point in time. However, there are a few points that are still missing and that have been added to Python coroutines with additional PEPs.

Delegation to other coroutines

With PEP-380, the yield from statement was added to Python, which essentially allows a coroutine to delegate execution to another coroutine.

A yield from statement can delegate either to an ordinary iterable or to another generator.

What yield from is essentially doing is to retrieve an iterator from its argument and call the __next__ method of this iterator, thus – if the iterable is a generator – running the generator up to the next yield. Whatever this yield returns will then be yielded back to the caller of the generator containing the yield from statement.

When I looked at this first, I initially was under the impression that if a generator A delegates to generator B by doing yield from B, and B yields a value, control would go back to A, similar to a subroutine call. However, this is not the case. Instead of thinking of a yield from like a call, its better to think of it like a jump. In fact, when B yields a value, this value will be returned directly to the caller of A. The yield from statement in A only returns when B either returns or raises a StopIteration (which is equivalent), and the return value of B will then be the value of the yield from statement. So you might think of the original caller and A as being connected through a pipe through which yielded values are sent back to the caller, and if A delegates to B, it also hands the end of the pipe over to B where it remains until B returns (i.e. is exhausted in the sense of an iterator).

YieldFrom

Passing values and exceptions into coroutines

We have seen that when a coroutine executes a yield, control goes back to the caller, i.e. to the code that triggered the coroutine using __next__, and when the coroutine is resumed, its execution continues at the first statement after the yield. Note that yield is a statement and takes an argument, so that the coroutine can hand data back to the caller, but not the other way round. With PEP-342, this was changed and yield became an expression so that it actually returns a value. This allows the caller to pass a value back into the generator function. The statement to do this is called send.

Doing a send is a bit like a __next__, with the difference that send takes an argument and this argument is delivered to the coroutine as result of the yield expression. When a coroutine runs for the first time, i.e. is not resumed at a yield, only send(None) is allowed, which, in general, is equivalent to __next__. Here is a version of our generator that uses this mechanism to be reset.

def my_generator(limit=5):
    _position = 0
    while _position < limit:
        cur = _position
        val = yield cur 
        if val is not None:
            # 
            # We have been resumed due to a send statement. 
            #
            _position = val
            yield val
        else:
            _position += 1

We can now retrieve a few values from the generator using __next__, then use send to set the position to a specific value and then continue to iterate through the generator.

generator = my_generator(20)
assert 0 == generator.__next__()
assert 1 == generator.__next__()
generator.send(7)
assert 7 == generator.__next__()

Instead of passing a value into a coroutine, we can also throw an exception into a coroutine. This actually quite similar to the process of sending a value – if we send a value into a suspended coroutine, this value becomes visible inside the coroutine as the return value of the yield at which the coroutine is suspended, and if we throw an exception into it, the yield at which the coroutine is suspended will raise this exception. To throw an exception into a coroutine, use the throw statement, like

generator = my_generator(20)
assert 0 == generator.__next__()
generator.throw(BaseException())

If you run this code and look at the resulting stack trace, you will see that in fact, the behavior is exactly as if the yield statement had raised the exception inside the coroutine.

The generator has a choice whether it wants to catch and handle the exception or not. If the generator handles the exception, processing continues as normal, and the value of the next yield will be returned as result of throw(). If, however the generator decides to not handle the exception or to raise another exception, this exception will be passed through and will show up in the calling code as if it had been raised by throw. So in general, both send and throw statements should be enclosed in a try-block as they might raise exceptions.

Speaking of exceptions, there are a few exceptions that are specific for generators. We have already seen the StopIteration exception which is thrown if an iterator or generator is exhausted. A similar exception is GeneratorExit which can be thrown into a generator to signal that the generator should complete. A generator function should re-raise this exception or raise a StopIteration so that its execution stops, and the caller needs to handle the exception. There is even a special method close that can be used to close a coroutine which essentially does exactly this – it throws a GeneratorExit into the coroutine and expects the generator to re-raise it or to replace it by a StopIteration exception which is then handled. If a generator is garbage-collected, the Python interpreter will execute this method.

This completes our discussion of the “old-style” coroutines in Python using generator functions and yielding. In the next post, we will move on to discuss the new syntax for native coroutines introduced with Python 3.5 in 2015.

Asynchronous I/O with Python part I – the basics

Though not really new, a programming model commonly known as asynchronous I/O has been attracting a lot of attention over the last couple of years and even influenced the development of languages like Java, Go or Kotlin. In this and the next few posts, we will take a closer look at this model and how it can be implemented using Python.

What is asynchronous I/O?

The basic ideas of asynchronous I/O are maybe explained best using an example from the world of networking, which is at the same time the area where the approach excels. Suppose you are building a REST gateway that accepts incoming connections and forwards them to a couple of microservices. When a new client connects, you will have to make a connection to a service, send a request, wait for the response and finally deliver the response back to the client.

Doing this, you will most likely have to wait at some points. If, for instance, you build a TCP connection to the target service, this involves a handshake during which you have to wait for network messages from the downstream server. Similarly, when you have established the connection and send the request, it might take some time for the response to arrive. While this entire process is n progress, you will have to maintain some state, for instance the connection to the client which you need at the end to send the reply back.

If you do all this sequentially, your entire gateway will block while a request is being processed – not a good idea. The traditional way to deal with this problem has been to use threads. Every time a new request comes in, you spawn a thread. While you have to wait for the downstream server, this thread will block, and the scheduler (the OS scheduler if you use OS-level threads or some other mechanism) will suspend the thread, yield the CPU to some other thread and thus allow the gateway to serve other requests in the meantime. When the response from the downstream server arrives, the thread is woken up, and, having saved the state, the processing of the client’s request can be completed.

This approach works, but, depending on the implementation, creating and running threads can create significant overhead. In addition to the state, concurrently managing a large number of threads typically involves a lot of scheduling, locking, handling of concurrent memory access and kernel calls. This is why you might try a different implementation that entirely uses user-space mechanism.

You could, for instance, implement some user-space scheduler mechanism. When a connection is being made, you would read the incoming request, send a connection request (a TCP SYN) to the downstream server and then voluntarily return control to the scheduler. The scheduler would then monitor (maybe in a tight polling loop) all currently open network connections to downstream servers. Once the connection is made, it would execute a callback function which triggers the next steps of the processing and send a request to the downstream server. Then, control would be returned to the scheduler which would invoke another callback when the response arrives and so forth.

With this approach, you would still have to store some state, for instance the involved connections, but otherwise the processing would be based on a sequence of individual functions or methods tied together by a central scheduler and a series of callbacks. This is likely to be very efficient, as switching between “threads” only involves an ordinary function call which is much cheaper than a switch between two different threads. In addition, each “thread” would only return control to the scheduler voluntarily, implementing a form of cooperative multitasking, and can not be preempted at unexpected points. This of course makes synchronization much easier and avoids most if not all locking, which again removes some overhead. Thus such a model is likely to be fast and efficient.

On the downside, without support from the used programming language for such a model, you will easily end up with a complex set of small functions and callbacks, sometimes turning into a phenomenon known as callback hell. To avoid this, more and more programming languages offer a programming model which supports this approach with libraries and language primitives, and so does Python.

Coroutines and futures

The model which we have described is not exactly new and has been described many years ago. In this model, processing takes place in a set of coroutines. Coroutines are subroutines or functions which have the ability to deliberately suspend their own execution – a process known as yielding. This will save the current state of the coroutine and return control to some central scheduler. The scheduler can later resume the execution of the coroutine which will pick up the state and continue to run until it either completes or yields again (yes, this is cooperative multitasking, and this is where the name – cooperative routines – comes from).

Coroutines can also wait for the result of a computation which is not yet available. Such a result is encapsulated in an object called a future. If, for instance, a coroutine sends a query to a downstream server, it would send the HTTP request over the network, create a future representing the reply and then yield and wait for the completion of this future. Thus the scheduler would gain back control and could run other coroutines. At the same time, the scheduler would have to monitor open network connections, and, when the response arrives, complete the future, i.e. provide a value, and reschedule the corresponding coroutine.

FuturesCoroutinesScheduler

Finally, some additional features would be desirable. To support modularization, it would be nice if coroutines could somehow call each other, i.e. if a coroutine could delegate a part of its work to another coroutine and wait for its completion. We would probably also want to see some model of exception handling. If, for instance, a coroutine has made a request and the response signals an error, we would like to see a way how the coroutine learns about this error by being woken up with an exception. And finally, being able to pass data into an already running coroutines could be beneficial. We will later see that the programming model that Python implements for coroutines supports all of these features.

Organisation of this series

Coroutines in Python have a long history – they started as support for iterators, involved into what is today known as generator-based coroutines and finally turned into the native coroutines that Python supports today. In addition, the asyncio library provides a framework to schedule coroutines and integrate them with asynchronous I/O operations.

Even today, the implementation of coroutines in Python is still internally based on iterators and generators, and therefore it is still helpful to understands these concepts, even if we are mainly interested in the “modern” native coroutines. To reflect this, the remaining posts in this series will cover the following topics.

  • Iterators and generator-based coroutines
  • Native coroutines
  • The main building blocks of the low-level asyncio API – tasks, futures and the event loop
  • Asynchronous I/O and servers
  • Building an asynchronous HTTP server from scratch

To follow the programming examples, you will need a comparatively new version of Python, specifically you will need Python 3.7 or above. In case you have an older version, either get the latest version from the Python download page and build it from source, or (easier) try to get a more recent package for your OS (for Ubuntu, for instance, there is the deadsnake PPA that you can use for that purpose).