Building a bitcoin controller for Kubernetes part V – establishing connectivity

Our bitcoin controller now has the basic functionality that we expect – it can synchronize the to-be state and the as-is state and update status information. However, to be really useful, a few things are still missing. Most importantly, we want our nodes to form a real network and need to establish a mechanism to make them known to each other. Specifically, we will use RPC calls to exchange IP addresses between the nodes in our network so that they can connect.

Step 10: talking to the bitcoin daemon

To talk to the bitcoin daemon, we will use its JSON RPC interface. We thus need to be able to send and receive HTTP POST requests and to serialize and de-serialize JSON. Of course there are some libraries out there that could do this for us, but it is much more fun to implement our own bitcoin client in Go. For that purpose, we will use the packages HTTP and JSON.

While developing this client, it is extremely useful to have a locally running bitcoind. As we already have a docker image, this is very easy – simply run

$ docker run -d -p 18332:18332 christianb93/bitcoind

on your local machine (assuming you have Docker installed). This will open port 18332 which you can access using for instance curl, like

$ curl --user 'user:password' --data '{"jsonrpc":"1.0","id":"0","method":"getnetworkinfo","params":[]}' -H 'content-type:text/plain;' http://localhost:18332

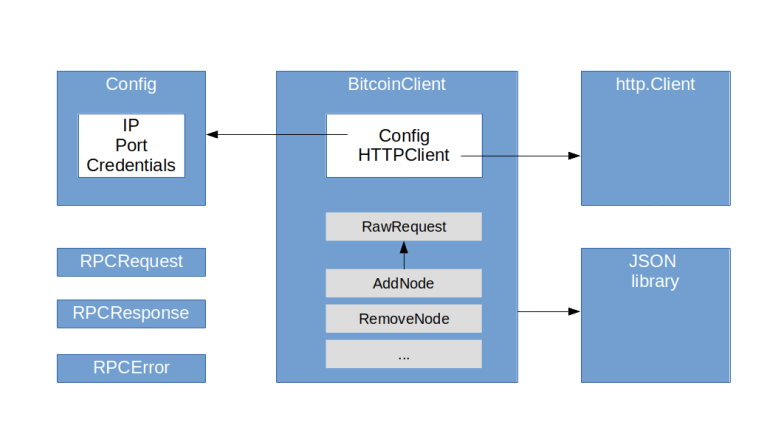
Our client will be very simple. Essentially, it consists of the following two objects.

  • A Config represents the configuration data needed to access an RPC server (IP, port, credentials)
  • A BitcoinClient which is the actual interface to the bitcoin daemon and executes RPC calls

A bitcoin client holds a reference to a configuration which is used as default if no other configuration is supplied, and a HTTP client. Its main method is RawRequest which creates an RPC request, adds credentials and parses the response. No error handling to e.g. deal with timeouts is currently in place (this should not be a real restriction in practice, as we have the option to re-queue our processing anyway). In addition to this generic function which can invoke any RPC method, there are specific functions like AddNode, RemoveNode and GetAddedNodeList that accept and return Go structures instead of JSON objects. In addition, there are some structures to model RPC request, RPC responses and errors.

BitcoinClient

Node that our controller now needs to run inside the cluster, as it needs to access the bitcoind RPC servers (there might be ways around this, for instance by adding a route on the host similar to what minikube tunnel is doing for services, but I found that this is easily leads to IP range conflicts with e.g. Docker).

Step 11: adding new nodes to our network

When we bring up a network of bitcoin nodes, each node starts individually, but is not connected to any other node in the network – in fact, if we bring up three nodes, we maintain three isolated blockchains. For most use cases, this is of course not what we want. So let us now try to connect the nodes to each other.

To do this, we will manipulate the addnode list that each bitcoind maintains. This list is like a database of known nodes to which the bitcoind will try to connect. Before we automate this process, let us first try this out manually. Bring up the network and enter

$ ip1=$(kubectl get bitcoinnetwork my-network -o json | jq -r ".status.nodes[1].ip")
$ kubectl exec my-network-sts-0 -- /usr/local/bin/bitcoin-cli -regtest -conf=/bitcoin.conf addnode $ip1 add

This will find out the (node) IP address of the second node using our recently implemented status information and invoke the JSON-RPC method addnode on the first node to connect the first and the second node. We can now verify that the IP address of node 1 has been added to the addnode list of node 0 and that node 1 has been added to the peer list of node 0, but also node 0 has been added to the peer list of node 1.

$ kubectl exec my-network-sts-0 -- /usr/local/bin/bitcoin-cli -regtest -conf=/bitcoin.conf getaddednodeinfo
$ kubectl exec my-network-sts-0 -- /usr/local/bin/bitcoin-cli -regtest -conf=/bitcoin.conf getpeerinfo
$ kubectl exec my-network-sts-1 -- /usr/local/bin/bitcoin-cli -regtest -conf=/bitcoin.conf getpeerinfo

We can now repeat this process with the third node – we again make the node known to node 0 and then get the list of nodes each nodes knows about.

$ ip2=$(kubectl get bitcoinnetwork my-network -o json | jq -r ".status.nodes[2].ip")
$ kubectl exec my-network-sts-0 -- /usr/local/bin/bitcoin-cli -regtest -conf=/bitcoin.conf addnode $ip2 add
$ kubectl exec my-network-sts-0 -- /usr/local/bin/bitcoin-cli -regtest -conf=/bitcoin.conf getpeerinfo
$ kubectl exec my-network-sts-1 -- /usr/local/bin/bitcoin-cli -regtest -conf=/bitcoin.conf getpeerinfo
$ kubectl exec my-network-sts-2 -- /usr/local/bin/bitcoin-cli -regtest -conf=/bitcoin.conf getpeerinfo

We see that

  • Node 0 knows both node 1 and node 2
  • Node 1 knows only node 0
  • Node 2 knows only node 1

So in contrast to my previous understanding, the nodes do not automatically connect to each other when there is a node that is known to all of them. After some research, I suspect that this is because bitcoind puts addresses into buckets and only connects to one IP address in the bucket. As IP addresses in the same subnet go into the same bucket, only one connection will be made by default. To avoid an artificial dependency on node 0, we therefore explicitly connect each node to any other node in the network.

To do this, we create an additional function syncNodes which is called during the reconciliation if we detect a change in the node list. Within this function, we then simply loop over all nodes that are ready and, for each node:

  • Submit the RPC call addednodeinfo to get a list of all nodes that have previously been added
  • For each node that is not in the list, add it using the RPC call addnode with command add
  • For each node that is in the list, but is no longer ready, use the same RPC call with command remove to remove it from the list

As there might be another worker thread working on the same network, we ignore, for instance, errors that a bitcoind returns when we try to add a node that has already been added before, similarly for deletions.

Time again to run some tests. First, let us run the controller and bring up a bitcoin network called my-network (assuming that you have cloned my repository)

$ kubectl apply -f deployments/controller.yaml
$ kubectl apply -f deployments/testNetwork.yaml

Wait for some time – somewhere between 30 and 45 seconds – to allow all nodes to come up. Then, inspect the log file of the controller

$ kubectl logs bitcoin-controller -n bitcoin-controller

You should now see a few messages indicating that the controller has determined that nodes need to be added to the network. To verify that this worked, we can print all added node lists for all three instances.

$ for i in {0..2}; 
do
  ip=$(kubectl get pod my-network-sts-$i -o json  | jq -r ".status.podIP")
  echo "Connectivity information for node $i (IP $ip):" 
  kubectl exec my-network-sts-$i -- /usr/local/bin/bitcoin-cli -regtest -conf=/bitcoin.conf getaddednodeinfo | jq -r ".[].addednode"
done

This should show you that in fact, all nodes are connected to each other – each node is connected to all other nodes. Now let us connect to one node, say node 0, and mine a few blocks.

$ kubectl exec my-network-sts-0 -- /usr/local/bin/bitcoin-cli -regtest -conf=/bitcoin.conf generate 101

After a few seconds, we can verify that all nodes have synchronized the chain.

$ for i in {0..2}; 
do
  ip=$(kubectl get pod my-network-sts-$i -o json  | jq -r ".status.podIP")
  blocks=$(kubectl exec my-network-sts-$i -- /usr/local/bin/bitcoin-cli -regtest -conf=/bitcoin.conf getblockchaininfo | jq -r ".blocks")
  echo "Node $i (IP $ip) has $blocks blocks" 
done

This should show you that all three nodes have 101 blocks in their respective chain. What happens if we bring down a node? Let us delete, for instance, pod 0.

$ kubectl delete pod my-network-sts-0

After a few seconds, the stateful set controller will have brought up a replacement. If you wait for a few more seconds and repeat the command above, you will see that the new node has been integrated into the network and synchronized the blockchain. In the logfiles of the controller, you will also see that two things have happened (depending a bit on timing). First, the controller has realized that the node is no longer ready and uses RPC calls to remove it from the added node lists of the other nodes. Second, when the replacement node comes up, it will add this node to the remaining nodes and vice versa, so that the synchronization can take place.

Similarly, we can scale our deployment. To do this, enter

$ kubectl edit bitcoinnetwork my-network

Then change the number of replicas to four and save the file. After a few seconds, we can inspect the state of the blockchain on the new node and find that is also has 101 blocks.

$ kubectl exec my-network-sts-3 -- /usr/local/bin/bitcoin-cli -regtest -conf=/bitcoin.conf getblockchaininfo

Again, the log files of the controller tell us that the controller has detected the new node and added it to all other nodes. Similarly, if we use the same procedure to scale down again, the nodes that are removed from the stateful set will also be removed from the added node lists of the remaining nodes.

We now have the core functionality of our controller in place. As in the previous posts, I have pushed the code into a new tag on GitHub. I have also pushed the latest image to Docker Hub so that you can repeat the tests described above without building the image yourself. In the next post, we will start to add some more meat to our controller and to implement some obvious improvements – proper handling of secrets, for instance.

Building a bitcoin controller for Kubernetes part IV – garbage collection and status updates

In our short series on implementing a bitcoin controller for Kubernetes, we have reached the point where the controller is actually bringing up bitcoin nodes in our network. Today, we will extend its logic to also cover deletions and we will start to add additional logic to monitor the state of our network.

Step 9: owner references and deletions

As already mentioned in the last post, Kubernetes has a built-in garbage collector which we can utilize to handle deletions so that our controller does not have to care about this.

The Kubernetes garbage collector is essentially a mechanism that is able to perform cascading deletes. Let us take a deployment as an example. When you create a deployment, the deployment will in turn create a replica set, and the replica set will bring up pods. When you delete the deployment, the garbage collector will make sure that the replica set is deleted, and the deletion of the replica set in turn will trigger the deletion of the pods. Thus we only have to maintain the top-level object of the hierarchy and the garbage collector will help us to clean up the dependent objects.

The order in which objects are deleted is controller by the propagation policy which can be selected when deleting an object. If “Foreground” is chosen, Kubernetes will mark the object as pending deletion by setting its deletionTimestamp and delete all objects that are owned by this object in the background before itself is eventually removed. For a “Background” deletion, the order is reversed – the object will be deleted right away, and the cleanup will be performed afterwards.

How does the garbage collector identify the objects that need to be deleted when we delete, say, a deployment? The ownership relation underlying this logic is captured by the ownership references in the object metadata. This structure contains all the information (API version, kind, name, UID) that Kubernetes needs to identify the owner of an object. An owner reference can conveniently be generated using the function NewControllerRef in the package k8s.io/apimachinery/pkg/apis/meta/v1

Thus, to allow Kubernetes to clean up our stateful set and the service when we delete a bitcoin network, we need to make two changes to our code.

  • We need to make sure that we add the owner reference to the metadata of the objects that we create
  • When reconciling the status of a bitcoin network with its specification, we should ignore networks for which the deletion timestamp is already set, otherwise we would recreate the stateful set while the deletion is in progress

For the sake of simplicity, we can also remove the delete handler from our code completely as it will not trigger any action anyway. When you now repeat the tests at the end of the last post and delete the bitcoin, you will see that the stateful set, the service and the pods are deleted as well.

At this point, let us also implement an additional improvement. When a service or a stateful set changes, we have so far been relying on the periodic resynchronisation of the cache. To avoid long synchronization times, we can also add additional handlers to our code to detect changes to our stateful set and our headless service. To distinguish changes that affect our bitcoin networks from other changes, we can again use the owner reference mechanism, i.e. we can retrieve the owner reference from the stateful set to figure out to which – if any – bitcoin network the stateful set belongs. Following the design of the sample controller, we can put this functionality into a generic method handleObject that works for all objects.

BitcoinControllerStructureII

Strictly speaking, we do not really react upon changes of the headless service at the moment as the reconciliation routine only checks that it exists, but not its properties, so changes to the headless service would go undetected at the moment. However, we add the event handler infrastructure for the sake of completeness.

Step 10: updating the status

Let us now try to add some status information to our bitcoin network which is updated regularly by the controller. As some of the status information that we are aiming at is not visible to Kubernetes (like the synchronization state of the blockchain), we will not add additional watches to capture for instance the pod status, but once more rely on the periodic updates that we do anyway.

The first step is to extend the API type that represents a bitcoin network to add some more status information. So let us add a list of nodes to our status. Each individual node is described by the following structure

type BitcoinNetworkNode struct {
	// a number from 0...n-1 in a deployment with n nodes, corresponding to
	// the ordinal in the stateful set
	Ordinal int32 `json:"ordinal"`
	// is this node ready, i.e. is the bitcoind RPC server ready to accept requests?
	Ready bool `json:"ready"`
	// the IP of the node, i.e. the IP of the pod running the node
	IP string `json:"ip"`
	// the name of the node
	NodeName string `json:"nodeName"`
	// the DNS name
	DNSName string `json:"dnsName"`
}

Correspondingly, we also need to update our definition of a BitcoinNetworkStatus – do not forget to re-run the code generation once this has been done.

type BitcoinNetworkStatus struct {
	Nodes []BitcoinNetworkNode `json:"nodes"`
}

The next question we have to clarify is how we determine the readiness of a bitcoin node. We want a node to appear as ready if the bitcoind representing the node is accepting JSON RPC requests. To achieve this, there is again a Kubernetes mechanism which we can utilize – readiness probes. In general, readiness probes can be defined by executing an arbitrary command or by running a HTTP request. As we are watching a server object, using HTTP requests seems to be the way to go, but there is a little challenge: the bitcoind RPC server uses HTTP POST requests, so we cannot use a HTTP GET request as a readiness probe, and Kubernetes does not allow us to configure a POST request. Instead, we use the exec-option of a readiness check and run the bitcoin CLI inside the container to determine when the node is ready. Specifically, we execute the command

/usr/local/bin/bitcoin-cli -regtest -conf=/bitcoin.conf getnetworkinfo

Here we use the configuration file that contains, among other things, the user credentials that the CLI will use. As a YAML structure, this readiness probe would be set up as follows (but of course we do this in Go in our controller programmatically).

   readinessProbe:
      exec:
        command:
        - /usr/local/bin/bitcoin-cli
        - -regtest
        - -conf=/bitcoin.conf
        - getnetworkinfo
      failureThreshold: 3
      initialDelaySeconds: 10
      periodSeconds: 10
      successThreshold: 1
      timeoutSeconds: 1

Note that we wait 10 seconds before doing the first probe, to give the bitcoind sufficient time to come up. It is instructive to test higher values of this, for instance 60 seconds – when the stateful set is created, you will see how the creation of the second pod is delayed for 60 seconds until the first readiness check for the first pod succeeds.

Now let us see how we can populate the status structure. Basically, we need to retrieve a list of all pods that belong to our bitcoin network. We could of course again use the ownership references to find those pods, or use the labels that we need anyway to define our stateful set. But in our case, there is even a an easier approach – as we use a stateful set, the names of the pods are completely predictable and we can easily retrieve them all by name. So to update the status information, we need to

  • Loop through the pods controlled by this stateful set, and for each pod
  • Find the status of the pod, using its conditions
  • Retrieve the pods IP address from its status
  • Assemble the DNS name (which, as we know, is the combination of the name of the pod and the name of the headless service)
  • Put all this into the above structure
  • Post this using the UpdateStatus method of our client object

Note that at this point, we follow the recommended best practise and update the status independent of the spec. It is instructive to extend the logging of the controller to log the generation of the bitcoin network and the resourceVersion. The generation (contained in the ObjectMeta structure) represents a version of the desired state, i.e. the spec, and is only updated (usually incremented by one) if we change the spec for the bitcoin network resource. In contrast to this, the resource version is updated for every change of the persisted state of the object and represents the etcd’s internal sequence number.

When you try to run our updated controller inside the cluster, however, you will find that there is again a problem – with the profile that we have created and to which our service account is linked, the update of the status information of a bitcoin network is not allowed. Thus we have to explicitly allow this by granting the update right on the subresource status, which is done by adding the following rule to our cluster role.

- apiGroups: ["bitcoincontroller.christianb93.github.com"]
  resources: ["bitcoinnetworks/status"]
  verbs: ["update"] 

We can now run a few more tests to see that our status updates work. When we bring up a new bitcoin network and use kubectl with “-o json” to retrieve the status of the bitcoin network, we can see that the node list populates as the pods are brought up and the status of the nodes changes to “Ready” one by one.

I have again created a tag v0.4 in the GitHub repository for this series to persist the state of the code at this point in time, so that you have the chance to clone the code and play with it. In the next post, we will move on and add the code needed to make sure that our bitcoin nodes detect each other at startup and build a real bitcoin network.

Building a bitcoin controller for Kubernetes part III – service accounts and the reconciliation function

In the previous post, we have reached the point where our controller is up and running and is starting to handle events. However, we hit upon a problem at the end of the last post – when running in-cluster, our controller uses a service account which is not authorized to access our bitcoin network resources. In todays post, we will see how to fix this by adding RBAC rules to our service account. In addition, we will implement the creation of the actual stateful set when a new bitcoin network is created.

Step 7: defining a service account and roles

To define what a service account is allowed to do, Kubernetes offers an authorization scheme based on the idea of role-based access control (RBAC). In this model, we do not add authorizations to a user or service account directly. Instead, the model knows three basic entities.

  • Subjects are actors that need to be authorized. In Kubernetes, actors can either be actual users or service accounts.
  • Roles are collection of policy rules that define a set of allowed actions. For instance, there could be a role “reader” which allows read-access to all or some resources, and a separate role “writer” that allows write-access.
  • Finally, there are role bindings which link roles and subjects. A subject can have more than one role, and each role can be assigned to more than one subject. The sum of all roles assigned to a subject determines what this subject is allowed to do in the cluster

The actual data model is a bit more complicated, as there are some rules that only make sense on the cluster level, and other rules can be restricted to a namespace.

RBAC

How do we specify a policy rule? Essentially, a policy rule lists a set of resources (specified by the API group and the resource type or even specific resource names) as they would show up in an API path, and a set of verbs like GET, PUT etc. When we add a policy rule to a role, every subject that is linked to this role will be authorized to run API calls that match this combination of resource and verb.

A cluster role then basically consists of a list of policy rules (there is also a mechanism called aggregation which allows us to build hierarchies or roles). Being an API object, it can be described by a manifest file and created using kubectl as any other resource. So to set up a role that will allow our controller to list, get and update bitcoin network resources and pods and create, update, get, list and delete stateful sets, we would apply the following manifest file.

kind: ClusterRole
apiVersion: rbac.authorization.k8s.io/v1
metadata:
  name: bitcoin-controller-role
rules:
- apiGroups: ["apps", ""]
  resources: ["statefulsets", "services"]
  verbs: ["get", "watch", "list", "create", "update", "delete"]
- apiGroups: [""]
  resources: ["pods"]
  verbs: ["get", "list", "watch"]
- apiGroups: ["bitcoincontroller.christianb93.github.com"]
  resources: ["bitcoinnetworks"]
  verbs: ["get", "list", "watch"]

Next, we set up a specific service account for our controller (otherwise we would have to add our roles to the default service account which is used by all pods by default – this is not what we want). We need to do this for every namespace in which we want to run the bitcoin operator. Here is a manifest file that creates a new namespace bitcoin-controller with a corresponding service account.

apiVersion: v1
kind: Namespace
metadata:
    name: bitcoin-controller
---
apiVersion: v1
kind: ServiceAccount
metadata:
  name: bitcoin-controller-sva
  namespace: bitcoin-controller

Let us now link this service account and our cluster role by defining a cluster role binding. Again, a cluster role binding can be defined in a manifest file and be applied using kubectl.

apiVersion: rbac.authorization.k8s.io/v1
kind: ClusterRoleBinding
metadata:
  name: bitcoin-controller-role-binding
subjects:
- kind: ServiceAccount
  name: bitcoin-controller-sva
  namespace: bitcoin-controller
roleRef:
  kind: ClusterRole
  name: bitcoin-controller-role
  apiGroup: rbac.authorization.k8s.io

Finally, we need to modify our pod specification to instruct Kubernetes to run our controller using our newly created service account. This is easy, we just need to add the service account as a field to the Pod specification:

...
spec:
  serviceAccountName: bitcoin-controller-sva
...

When we now run our controller using the modified manifest file, it should be able to access all the objects it needs and the error messages observed at the end of our last post should disappear. Note that we need to run our controller in the newly created namespace bitcoin-controller, as our service account lives in this namespace. Thus you will have to create a service account and a cluster role binding for every namespace in which you want to run the bitcoin controller.

Step 8: creating stateful sets

Let us now start to fill the actual logic of our controller. The first thing that we will do is to make sure that a stateful set (and a matching headless service) is created when a new bitcoin network is defined and conversely, the stateful set is removed again when the bitcoin network is deleted.

This requires some additional fields in our controller object that we need to define and populate. We will need

  • access to indexers for services and stateful sets in order to efficiently query existing stateful sets and services, i.e. additional listers and informers (strictly speaking we will not need the informers in todays post, but in a future post – here we only need the listers)
  • A clientset that we can use to create services and stateful sets

Once we have this, we can design the actual reconciliation logic. This requires a few thoughts. Remember that our logic should be level-based and not edge-based, because our controller could actually miss events, for instance if it is down for some time and comes up again. So the logic that we implement is as follows and will be executed every time when we retrieve a trigger from the work queue.

Retrieve the headless service for this bitcoin network 
IF service does not exist THEN
  create new headless service
END IF
Retrieve the stateful set for this bitcoin network 
IF stateful set does not exist THEN
  create new stateful set
END IF
Compare number of nodes in bitcoin network spec with replicas in stateful set
IF they are not equal
  update stateful set object
END IF

For simplicity, we will use a naming convention to match bitcoin networks and stateful sets. This has the additional benefit that when we try to create a second stateful set by mistake, it will be refused as no two stateful sets with the same name can exist. Alternatively, we could use a randomly generated name and use labels or annotations to match stateful sets and controllers (and, of course, there are owner references – more on this below).

Those of you who have some experience with concurrency, multi-threading, locks and all this (for instance because you have built an SMP-capable operating system kernel) will be a bit alerted when looking at this code – it seems very vulnerable to race conditions. What if a node is just going down and the etcd does not know about it yet? What if the cache is stale and the status in the etcd is already reflecting updates that we do not see? What if two events are processed concurrently by different worker threads? What if a user updates the bitcoin network spec while we are just bringing up our stateful sets?

There are two fundamentally different ways to deal with these challenges. Theoretically, we could probably use the API mechanisms provided for optimistic locking ( resource versions that are being checked on updates) to implement basic synchronization primitives like compare-and-swap as it is done to implement leader election on Kubernetes, see also this blog. We could then implement locking mechanisms based on these primitives and use them to protect our resources. However, this will never be perfect, as there will always be a lag between the state in the etcd and the actual state of the cluster. In addition, this can easily put us in a situation where deadlocks occur or locks at least slow down the processing massively.

The second approach – which, looking at the source code of some controllers in the Kubernetes repositories, seems to be the approach taken by the K8s community – is to accept that full consistency will never be possible and to strive for eventual consistency. All actors in the system need to prepare for encountering temporary inconsistencies and implement mechanisms to deal with them, for instance be re-queuing events until the situation is resolved. This is the approach that we will also take for our controller. This implies, for instance, that we re-queue events when errors occur and that we leverage the periodic resync of the cache to reconcile the to-be state and the as-is state periodically. In this way, inconsistencies can arise but should be removed in the next synchronisation cycle.

In this version of the code, error handling is still very simple – most of the time, we simply stop the reconciliation when an error occurs without re-queuing the event and rely on the periodic update that happens every 30 seconds anyway because the cache is re-built. Of course there are errors for which we might want to immediately re-queue to retry faster, but we leave that optimization to a later version of the controller.

Let us now run a few tests. I have uploaded the code after adding all the features explained in this post as tag v3 to Github. For simplicity, I assume that you have cloned this code into the corresponding directory github.com/christianb93/bitcoin-controller in your Go workspace and have a fresh copy of a Minikube cluster. To build and deploy the controller, we have to add the CRD, the service account, cluster role and cluster role binding before we can build and deploy the actual image.

$ kubectl apply -f deployments/crd.yaml
$ kubectl apply -f deployments/rbac.yaml
$ ./build/controller/minikube_build.sh
$ kubectl apply -f deployments/controller.yaml

At this point, the controller should be up and running in the namespace bitcoin-controller, and you should be able to see its log output using

$ kubectl logs -n bitcoin-controller bitcoin-controller

Let us now add an actual bitcoin network with two replicas.

$ kubectl apply -f deployments/testNetwork.yaml

If you now take a look at the logfiles, you should see a couple of messages indicating that the controller has created a stateful set my-network-sts and a headless service my-network-svc. These objects have been created in the same namespace as the bitcoin network, i.e. the default namespace. You should be able to see them doing

$ kubectl get pods
$ kubectl get sts
$ kubectl get svc

When you run these tests for the first time in a new cluster, it will take some time for the containers to come up, as the bitcoind image has to be downloaded from the Docker Hub first. Once the pods are up, we can verify that the bitcoin daemon is running, say on the first node

$ kubectl exec my-network-sts-0 -- /usr/local/bin/bitcoin-cli -regtest -rpcuser=user -rpcpassword=password getnetworkinfo

We can also check that our controller will monitor the number of replicas in the stateful set and adjust accordingly. When we set the number of replicas in the stateful set to five, for instance, using

$ kubectl scale --replicas=5 statefulset/my-network-sts

and then immediately list the stateful set, you will see that the stateful set will bring up additional instances. After a few seconds, however, when the next regular update happens, the controller will detect the difference and scale the replica set down again.

This is nice, but there is again a problem which becomes apparent if we delete the network again.

$ kubectl delete bitcoinnetwork my-network

As we can see in the logs, this will call the delete handler, but at this point in time, the handler is not doing anything. Should we clean up all the objects that we have created? And how would that fit into the idea of a level based processing? If the next reconciliation takes place after the deletion, how can we identify the remaining objects?

Fortunately, Kubernetes offers very general mechanisms – owner references and cascading deletes – to handle these problems. In fact, Kubernetes will do all the work for us if we only keep a few points in mind – this will be the topic of the next post.