In the previous post in this series, I have presented a simple architecture for an NFT wallet app, written in ReactJS. Today, I will dive a bit deeper into the implementation. The source code for this post can be found here. As most of it is fairly standard ReactJS code, I will not discuss all of it, but only look at a few specific points.
I assume that you are familiar with React. In addition to the React framework, we will also use the web3.js framework to interact with our smart contract. The idea of this post is not to provide a systematic introduction to this framework. In fact, this is not even necessary as the documentation is quite good and – if you have read my previous posts on the corresponding Python framework web3.py – you will soon realize that the structure of the API is quite similar to the Python API that we have used before. There are, however, a few notable differences on which we will focus.
Handling the wallet
One part of web3.js which has no direct counterpart in web3.py is the wallet functionality, available under web3.eth.accounts.wallet. This wallet is essentially an in-memory list of accounts to which you can add accounts and from which you can remove accounts. In addition, the web3 library allows you to store accounts locally, more specifically in browser local storage, encrypted using a password that the caller has to provide.
The wallet component of our sample application loads a wallet from local storage into memory when the page is rendered for the first time (this is realized using a React hook). Once the wallet has been loaded, the list of accounts stored in the wallet is copied to the application state, i.e. the Redux store. When a user adds an account to the wallet or removes an account, the updated wallet is saved again and the wallet is re-synchronized with the list of accounts kept in the state store.
Getting the token image and token data
Another crucial difference between the Python and the JavaScript web3 API becomes apparent if we look at the code that the token details component uses to retrieve the token URI from the smart contract and load the token image. Here is (a simplified version) of the code.
Let us try to understand this code. At the point in time when it executes, the variable nft holds a web3.eth.Contract object that we can use to interact with the smart contract. We then call the method tokenURI of the smart contract, passing, as an argument, the ID of the token. We know that this returns the URI of the token metadata. In the JavaScript code, however, the object that we get back is not yet the URI, but a promise. So internally, web3.js submits the request asynchronously, and the promise resolves when the reply is received.
Once this happens, we use Axios to submit a HTTP GET request for this URI. This again returns a promise, and once this promise resolves, we can extract the token description and the URL of the token image from the metadata returned as a response. When assembling our page, we can then embed the image itself using the image URL, so that the image is only loaded once the page is rendered.
Of course, both promises can raise an error, so we need two catch blocks where we log the respective error. Also note that this code is placed in a hook, and therefore the data is not yet available upon first rendering. We thus need to make sure that we update the state with the received data to trigger a re-rendering, and that the JSX code we use to build the page is prepared to also work if the data we need, like the image URL, is not yet present.
Submitting and tracking transactions
The code that we use to actually submit a transaction, i.e. sell a token, has a very similar structure. Again, let us look at a simplified version of it.
nft.methods.safeTransferFrom(...).estimateGas(..).then((gas) => {
  nft.methods.safeTransferFrom(...).send(...)
    .on("transactionHash", (hash) => {
       // add transaction to transaction list
    })
    .on("receipt", (receipt) => {
       // update transaction status
    })
    .then(() => {
       // success, clear errors
    })
    .catch((err) => {
       // handle error during transaction
    });
  }).catch((err) => {
     // handle error during gas estimation
})
Let us again go through this line by line to see how it works. First, we access the method safeTransferFrom which, as we know, is the recommended way to trigger a transfer. We could now immediately call the send method of the resulting method object, in order to send a transaction to the Ethereum node (by the way: we do not have to sign this transaction manually, as the account that we use is part of the wallet managed by web3.js). The problem with this approach, however, is that we need to provide a gas limit. Of course we could guess, but this would not be very efficient. Instead, we first run a gas estimate, which will result in a first call to the server.
In JavaScript, this call is handled via a corresponding promise. Once this promise resolves, we know that the gas estimation was successful and also know the gast limit – time to call the send method to trigger the actual transaction. What this returns is what the web3.js documentation calls a PromiEvent. This is a promise which has some mixed-in methods of an event emitter, and allows our code to react on events like the availability of a transaction hash or a transaction receipt in a promise-like notation. When we first receive the transaction hash, we add the transaction to the transaction list and force a re-rendering of the list. Similarly, when we receive the receipt, we update the status of the transaction to “mined”. At this point, the promise will resolve and the transaction is complete. Note that we do not wait for a confirmation in the sense that our transaction is not only included in a block (i.e. we have a receipt), but a few additional blocks have been mined so that we can be confident that the transaction is also part of the canonical chain.
Running the sample app
To try out the sample app, clone my repository, then switch to the frontend directory and use npm to install all required packages.
git clone https://github.com/christianb93/nft-bootcamp.git
cd nft-bootcamp/frontend
npm install
This might of course take a while, depending on the speed of your network connection, as it will download and installed all required JavaScript packages and their dependencies. Once the last command completes, you can start the frontend by running
npm start
To use the frontend, you will of course need a running Ethereum node and a copy of the smart contract deployed. To this end, start a copy of geth by executing ./tools/run_geth from a second terminal (assuming that you have installed geth as described in one of my previous posts), open a third terminal, navigate to the root directory of the repository and run
This should set up a few test accounts with sufficient balance, deploy a copy of the smart contract, print out the contract address and mint five token. Having this in place, go back to the welcome page of the wallet app which should look as follows.
Pick a password, enter it in the input field right above the “Refresh” button and hit that button. Next you will have to set up a few test accounts. For starters, enter the private key 0xc65f2e9b1c360d44070ede41d5e999d30c23657e2c5889d3d03cef39289cea7c in the input field next to the button “Add account” and press that button. This should result in the account 0xFC2a2b9A68514E3315f0Bd2a29e900DC1a815a1D being added to the wallet. Mark this account as primary account by activating the radio button next to it. Then, enter the private key 0x2d7bdb58c65480ac5aee00b20d3558fb18a916810d298ed97174cc01bb809cdd to create a second account.
Next, we will add a token to the watch list. Click on “Token Watchlist”, enter the contract address which was spit out by the deployment script and token ID 1 and click on “Add Token”. Repeat this process for the remaining token IDs 2 to 5.
The setup is now complete, and you can start playing with the app. You can, for instance, hit any of the “Details” buttons to display an individual token or to sell a token (make sure to have selected the correct primary account in the wallet first, which needs to match the current owner to be able to sell). This should also populate the list of transactions, with the transactions showing up as mined immediately.
Have fun! There are probably still tons of bugs in the code, after all this is only a bit more than a quick hack to demonstrate how to use the involved libraries – still, if you find one and wish to contribute, I am happy to accept pull requests.
In the last two posts, we have installed geth and implemented our NFT contract in Solidity according to the ERC-721 standard. Today, we will start to dive into the implementation of a React front-end serving as a simple wallet for our NFT.
Overall architecture and components
First, let us pause for a moment and think about which components our application will have overall. Of course, there will be the actual front-end, running in the browser and written in JavaScript using React. If you have not worked with React before, do not worry – this is not a series about JS frameworks but about the Ethereum blockchain, and we will explain what you need to know when we get into the implementation. For today, simply think of React as a framework that allows you to implement components that can render themselves into a DOM tree and react upon changes of the state that they represent.
To store the state of our front-end, like accounts, token and balances, we will use the Redux framework, along with its React binding react-redux. Routing (i.e. choosing which page or component to display) is done using react-router.
But there is more – we need to be able to connect to an Ethereum node in order to talk to our smart contract, and, in order to retrieve token metadata, we also need a JSON request library. I have chosen to use web3.js to connect to the Ethereum node. If you have read my previous posts in this series, the structure and API of that framework should be familiar, simply because the Python library web3.py that we have used before is modelled after web3.js. As a JSON request library, I have picked Axios.
To actually run the Ethereum backend, we have several options. As long as we are in our isolated, private test environment, any of the clients used so far (Go-Ethereum or Ganache) will do. Later, we will learn how to run a client connecting to the Rinkeby test network, or, as an alternative, how to use a provider like Infura. We will also need a web server to server our front-end code (we will use NPM and Node.js to keep things simple, but you could also deploy the web page to a server like NGINX). Finally, I have opted to use DigitalOcean Spaces to host token metadata and the actual images.
Frontend components
Next, let us dive into the components of the actual frontend, as summarized in the diagram below. In this section, we will discuss the screens and React components, leaving the state for the next section.
The first page that will be displayed when a user starts the application is the Login page. Our application will store a few pieces of data in the browser local storage, including the URL of the geth backend and a wallet. To protect this data, the user is required to enter a password. If using the front-end for the first time or if the user has forgotten the password, it can be reset, but then all existing data will be erased. In addition, the user will be prompted to enter or confirm the geth URL on this page.
Once the login is successful, the main screen is displayed. At the top of the screen, there is a navigation bar, followed by a (usually invisible) component that displays errors that have occurred in a previous action. Below this, there are the the following pages.
The first page that the user gets to to see is the wallet. This is simply a list of accounts that the application is aware of. To add an account, the user needs to enter the private key, and the application will import the account and display the corresponding address. A user can also remove accounts from the list if they are no longer relevant and select an account which will then be used to sign transactions.
At this point we have to make a decision – where do we store this data? Of course, having private keys in a JS application is inherently a risk – no matter how solid your application is, there is a certain, non-zero possibility that data stored even in memory can be stolen by a malicious script, maybe running in a different tab. In particular, using local storage makes the application vulnerable to XSS attacks. So in a real world application, you might want to store only the public keys and prompt the user to enter the private key when a transaction is made. For our purposes, however, we are not dealing with real money anyway (did I mention that this application is not meant to be used in production already?), so the risk of having the private keys in local storage is probably acceptable.
The next screen is the token watchlist. This is very similar to the wallet and is simply a list of token (i.e. contract address and token ID) that the user wants to monitor. A user can add a token to this list and remove a token. In addition, a user can navigate to the details page for an individual token. At the bottom of the page, there is also a list displaying transactions that have been made along with their status. This transaction history is actually a separate component which is used for the token detail page as well.
Finally, there is token details page that displays data for an individual token and allows the current owner to sell the token. This page shows the token metadata and the token image, and at the bottom of the page, we again display the transaction history.
State
Let us now see which data we need to store in order to realize all these pages. First, we need the login data, namely the user password and the URL of the Ethereum node that we will connect to. We also need a list of accounts, which correspond to the accounts displayed on the wallet screen. For the token watchlist, we also need to maintain an array of token that should be displayed on this page.
To realize the transaction history, we need to remember transactions that we have triggered, i.e. we have an array of transactions in our state as well. In addition, there are some flags that turn out to be useful to display status and error information, namely the last error that occurred (and that we will display on the error page), and flags that allow us to render a loading indicator if a request to populate a page is in progress. In addition, I have added a simple counter chainEvents that is increased by one whenever a change of the blockchain state is detected and which serves as a trigger to re-render. Thus our initial state looks as follows.
Most updates to the state will be done asynchronously, typically by web3 requests that are running in the background and are waiting for the Ethereum node to respond. A typical sequence of events would be as follows.
The user hits a button, for instance to transfer a token
The event handler invokes a web3 function to submit a transaction to the Ethereum network
web3 returns a promise and the execution continues – so the rendering is not blocked
when the promise resolves, an update to the state is made
Redux recognizes the state change and triggers a re-rendering of the components
We will see how exactly this works in the next post, in which we will start to discuss the implementation. See you there!
Most of the time, we have been using the Brownie development environment for our tests so far, and with it the Ganache Ethereum client that Brownie runs behind the scenes. For some applications, it is useful to have other clients at our disposal. The Go-Ethereum client (geth) is the most commonly used client at the time of writing, and today we take a slightly more detailed look at how to run and configure it.
Getting started
We have already installed the geth binary in a previous post, so I assume that the geth binary is still on your path. However, geth is evolving quickly – when I started this series, I used version 1.10.6, but in the meantime, 1.10.8 has been released which contains an important bugfix (for this vulnerability which we have analyzed in depth in a previous post ), so let us use this going forward. So please head over to the download page, get the archive for version 1.10.8 for your platform (here is the link for Linux AMD64), extract the archive, copy the geth binary to a location on your path and make it executable.
Geth stores blockchain data and a keystore in a data directory which can be specified via a command line flag. We will use ~/.ethereum, and it is easier to follow along if you start over with a clean setup, so if you have used geth before, you might want to delete the contents of the data directory before proceeding. To actually start the client, we can then use the command
For the sake of convenience, I have put that command into a script in the tools directory of my repository, so if you have a clone of this directory, you could as well run ./tools/run_geth. Let us go through the individual flags that we have used and try to understand what they imply.
First, there is the dev flag. If you start geth with this flag, the client will actually not try to connect to any peers. Instead, it will create a local blockchain, with a genesis block which is created on the fly (here). In addition, geth will create a so-called developer account (or re-use an existing one). This account shows up at several places. It will be the first account in the keystore managed by geth and therefore the first account that the API method eth_accounts will return. This account (or rather the associated address) will also be used as the etherbase, i.e. as the address to which mined Ether will be credited. Finally, the genesis contains an allocation of 2256 – 9 Wei (the genesis block will also contain allocations for the nine pre-compiled contracts).
The next flag is the data directory, which we have already discussed. The following couple of flags are more interesting and configure the HTTP endpoint. Geth offers APIs over three different channels – HTTP, WebSockets (WS) and a local Unix domain socket (IPC). Whereas the IPC endpoint is enabled by default, the other two are disabled by default, and the http flag enables the HTTP endpoint.
The next three flags are important, as they determine who is allowed to access this API. First, http.address is the address on which the client will be listening. By default, this is the local host (i.e. 127.0.0.1), which implies that the client cannot be reached from the outside world. Especially, this will not work if you run geth inside a docker container or virtual machine. Specifying 0.0.0.0 as in the example above allows everybody on the local network to connect to your client – this is of course not a particularly secure setup, so modify this if you are not located on a secure and private network.
In addition, geth also uses the concept of a virtual host to validate requests. Recall that RFC7320 defines the HTTP header field Host which is typically used to allow different domains to be served by one web server running on one IP address only. This field is added by web browsers to requests that are the result of a navigation, but also the requests generated by JavaScript code running in the browser. When serving an incoming request, geth will validate the content of this header field against a list configured via the http.vhosts flag. This flag defaults to “localhost”. Thus, if you want to serve requests from outside, maybe from a web browser running on a different machine in your local network, you have to set this flag, either to the domain name of your server or using the wildcard “*” to accept incoming requests regardless of the value of the host header.
Finally, there is the CORS domain flag http.corsdomain. CORS is the abbreviation for cross-origin request surgery and refers to an attack which tries to access a server from JavaScript code loaded from a different domain. To prevent this sort of attack, browsers ask a server upfront before sending such a request whether the server will accept the request by submitting a so-called pre-flight request. When we develop our frontend later on, we will need to make sure that this pre-flight request is successful, so we need to include the domain from which we will load our JavaScript code to the list that we configure here, or, alternatively, also use a wildcard here. If you want to learn more about CORS, you might want to read this documentation on the Mozilla developer network.
The last flag that we use determines which of the APIs that geth offers will be made available via the HTTP endpoint. The most important API is the eth API, which contains all the methods that we need to submit and read transactions, get blocks or interact with smart contracts. In addition, it might be helpful to enable the debug API, which we will use a bit later when tracing transactions. There are also a few APIs which you almost never want to make available over the network like the personal API which allows you to access the accounts maintained by the client, or the admin API.
Using the geth console
We have just mentioned that there are some APIs which you would typically not want to make accessible via the API. Instead, you usually access these APIs via the IPC endpoint and the geth console. This is a JavaScript-based interactive console that allows you to invoke API methods and thus interact with a running geth client. To start the console, make sure that the geth client is running, open a separate terminal window and enter
geth attach ~/.ethereum/geth.ipc
Note that the second argument is the Unix domain socket that geth will create in its data directory. To see how the console works, let us play a bit with accounts. At the prompt, enter the following commands.
The first command will return the block number for the block at the head of the chain. Currently, this is zero – we only have the genesis block, no other blocks. The second command displays the list of accounts managed by the node. You should see one account, which is the developer accounts mentioned earlier. The third command displays the genesis block, and you will see that the extra data also contains the developer account.
The accounts managed by the node can be controlled using the personal API. An important functionality of this API is that accounts can be locked, so that they can no longer be used. As an example, let us try to lock the developer account.
dev = eth.accounts[0]
personal.lockAccount(dev)
Unlocking the account again is a bit tricky, as this is not allowed while the HTTP endpoint is being served. So to unlock again, you will have to shutdown geth, start it again without the HTTP flags, attach again and execute the command
personal.unlockAccount(eth.accounts[0], "")
Note the second argument – this is the password that has been used to lock the account (at startup, geth creates the development account with an empty passphrase, alternatively a passphrase can be supplied using the —password command line flag).
Finally, let us see how to use the console to create additional accounts and transfer Ether to them.
dev = eth.accounts[0]
alice = personal.newAccount("secret")
value = web3.toWei(1, "ether")
gas = 21000
gasPrice = web3.toWei(1, "gwei")
txn = {
        from: dev,
        to: alice,
        gas: gas,
        gasPrice: gasPrice,
        value: value
}
hash = eth.sendTransaction(txn)
eth.getTransactionReceipt(hash)
eth.getBalance(alice)
You could now proceed like this and set up a couple of accounts, equipped with Ether, for testing purposes. To simplify this procedure, I have provided a script that sets up several test accounts – if you have cloned the repository, simply run it by typing
python3 tools/GethSetup.py
Geth and Brownie
What about Brownie? Do we have to say good-bye to our good old friend Brownie if we choose to work with geth? Fortunately the answer is no – Brownie is in fact smart enough and will automatically detect a running geth (in fact, a running Ethereum client) when it is started and use it instead of launching Ganache. Let us try this. Make sure that geth is running and start Brownie as usual.
brownie console
At this point, it is important that we have enabled the web3 API when starting geth, as Brownie uses the method web3_clientVersion to verify connectivity at startup. If everything works, Brownie will spit out a warning that the blockchain that it has detected has a non-zero length and greet you with the usual prompt.
Great, so let us transfer some Ether to a new account as we have done it before from the console to see that everything works.
dev = accounts[0]
bob = accounts.add()
dev.transfer(to=bob, amount=web3.toWei(1, "ether"))
Hmm…this does not look good. It appears that Brownie has created a transaction and sent it, but is now waiting for the receipt and does not receive it. To understand the problem, let us switch again to a different terminal and start the geth console again. At the console prompt, inspect the pending transactions by running
txpool
The output should show you that there is one pending transaction (which you can also inspect by using eth.getTransaction) which is not included in a block yet. If you look at this transaction for a second, you will find that there are two things that look suspicious. First, the gas price for the transaction is zero. Second, the gas limit is incredibly high. If you inspect the last block that has been mined, you will find that the gas limit is exactly the gas limit of the last block that has been mined successfully.
Why is this a problem? The gas limit for a new block is determined by geth aiming at a certain target value. At the moment, this target value is lower than the gas limit of the genesis block, meaning that geth will try to decrease the gas limit with each new block (the exact algorithm is here). Thus the gas limit for the new block that the miner tries to assemble is lower than that for the previous one and therefore lower than the gas limit of our transaction, so that the transaction will not fit into the block and the miner will ignore it.
Let us try to fix this. First, we need to replace our pending transaction. The easiest way to do this is to use the geth console. What we need to do is to get the transaction from the pool of pending transactions, correct the gas limit and increase the gas price, so that the miner will pick up this transaction instead of the previous one. We also set the value to zero, so that the transaction will effectively be cancelled.
Note that we did not change the nonce, so our transaction replaces the pending one. After a few seconds, Brownie should note that the transaction has been dropped and stop waiting for a receipt.
The reason for our problem is related to the way how Brownie determines the gas limit and gas price to be used for a transaction. When a transaction is created, Brownie tries to figure out a gas limit and gas price from the network configuration. For the gas limit, the default setting is “max”, which instructs Brownie to use the block gas limit of the latest blocks (which will be cached for one hour). For the gas price, the default is zero. To make Brownie work with geth, we need to adjust both settings. In the console, enter
When you now repeat the commands above to transfer Ether, the transaction should go through. For versions of Brownie newer than version 1.15.2, however, you will receive an error message saying that the sleep method is not implemented by geth. The transaction will still work (the error comes from this line of the code which is executed in a separate thread initiated here), so the error message is only annoying, however you might want to downgrade to version 1.15.2 if you plan to work with Brownie and geth more often (it appears that the problem was introduced with this commit).
Note that the settings for the gas price and the gas limit that we have made enough will be lost when we restart Brownie. In order to make these changes permanent, you can add them to the configuration file for Brownie. Specifically, Brownie will, upon startup, load configuration data from a file called brownie-config.yaml. To set the gas price and the gas limit, create such a file with the following content
networks:
    default: development
    development:
        gas_limit: auto
        gas_price: auto
Here we adjust the configuration for the network development which we also declare as the default network and set the gas limit and the gas price to “auto”, instructing Brownie to determine a good approximation at runtime.
This closes our post for today. We have learned how to run geth in a local development environment, discussed the most important configuration options and seen how we can still use Brownie to work with transactions and contracts. In the next post, we will start to design and build our NFT wallet application and first try to understand the overall architecture.
In the previous posts, we have discussed the ERC721 standard and how metadata and the actual asset behind a token are stored. With this, we have all the ingredients in place to tackle the actual implementation. Today, I will show you how an NFT contract can be implemented in Solidity and how to deploy and test a contract using Brownie. The code for this post can be found here.
Data structures
As for our sample implementation of an ERC20 contract, let us again start by discussing the data structures that we will need. First, we need a mapping from token ID to the current owner. In Solidity, this would look as follows.
mapping (uint256 => address) private _ownerOf;
Note that we declare this structure as private. This does not affect the functionality, but for a public data structure, Solidity would create a getter function which blows up the contract size and thus makes deployment more expensive. So it is a good practice to avoid public data structures unless you really need this.
Now mappings in Solidity have a few interesting properties. In contrast to programming languages like Java or Python, Solidity does not offer a way to enumerate all elements of a mapping – and even if it did, it would be dangerous to use this, as loops like this can increase the gas usage of your contract up to the point where the block limit is reached, rendering it unusable. Thus we cannot simply calculate the balance of an owner by going through all elements of the above mapping and filtering for a specific owner. Instead, we maintain a second data structure that only tracks balances.
mapping (address => uint256) private _balances;
Whenever we transfer a token, we also need to update this mapping to make sure that it is in sync with the first data structure.
We also need a few additional mappings to track approvals and operators. For approvals, we again need to know which address is an approved recipient for a specific token ID, thus we need a mapping from token ID to address. For operators, the situation is a bit more complicated. We set up an operator for a specific address (the address on behalf of which the operator can act), and there can be more than one operator for a given address. Thus, we need a mapping that assigns to each address another mapping which in turn maps addresses to boolean values, where True indicates that this address is an operator for the address in the first mapping.
/// Keep track of approvals per tokenID
mapping (uint256 => address) private _approvals;

/// Keep track of operators
 mapping (address => mapping(address => bool)) private _isOperatorFor;
Thus the sender of a message is an operator for an address owner if and only if _isOperatorFor[owner][msg.sender] is true, and the sender of a message is authorized to withdraw a token if and only if _approvals[tokenID] === msg.sender.
Burning and minting a token is now straightforward. To mint, we first check that the token ID does not yet exist. We then increase the balance of the contract owner by one and set the owner of the newly minted token to the contract owner, before finally emitting an event. To burn, we reverse this process – we set the current owner to the zero address and decrease the balance of the current owner. We also reset all approvals for this token. Note that in our implementation, the contract owner can burn all token, regardless of the current owner. This is useful for testing, but of course you would not want to do this in production – as a token owner, you would probably not be very amused to see that the contract owner simply burns all your precious token. As an aside, if you really want to fire up your own token in production, you would probably want to take a look at one of the available audited and thoroughly tested sample implementations, for instance by the folks at OpenZeppelin.
Modifiers
The methods to approve and make transfers are rather straightforward (with the exception of a safe transfer that we will discuss separately in a second). If you look at the code, however, you will spot a Solidity feature that we have not used before – modifiers. Essentially, a modifier is what Java programmers might know as an aspect – a piece of code that wraps around a function and is invoked before and after a function in your contract. Specifically, if you define a modifier and add this modifier to your function, the execution of the function will start off by running the modifier until the compiler hits upon the special symbol _ in the modifier source code. At this point, the code of the actual function will be executed, and if the function completes, execution continues in the modifier again. Similar to aspects, modifiers are useful for validations that need to be done more than once. Here is an example.
/// Modifier to check that a token ID is valid
modifier isValidToken(uint256 _tokenID) {
    require(_ownerOf[_tokenID] != address(0), _invalidTokenID);
    _;
}

/// Actual function
function ownerOf(uint256 tokenID) external view isValidToken(tokenID) returns (address)  {
    return _ownerOf[tokenID];
}
Here, we declare a modifier isValidToken and add it to the function ownerOf. If now ownerOf is called, the code in isValidToken is run first and verifies the token ID. If the ID is valid, the actual function is executed, if not, we revert with an error.
Safe transfers and the code size
Another Solidity feature that we have not yet seen before is used in the function _isContract. This function is invoked when a safe transfer is requested. Recall from the standard that a safe transfer needs to check whether the recipient is a smart contract and if yes, tries to invoke its onERC721Received method. Unfortunately, Solidity does not offer an operation to figure out whether an address is the address of a smart contract. We therefore need to use inline assembly to be able to directly run the EXTCODESIZE opcode. This opcode returns the size of the code of a given address. If this is different from zero, we know that the recipient is a smart contract.
Note that if, however, the code size is zero, the recipient might in fact still be a contract. To see why, suppose that a contract calls our NFT contract within its constructor. As the code is copied to its final location after the constructor has executed, the code size is still zero at this point. In fact, there is no better and fully reliable way to figure out whether an address is that of a smart contract in all cases, and even the ERC-721 specification itself states that the check for the onERC721Received method should be done if the code size is different from zero, accepting this remaining uncertainty.
Inline assembly is fully documented here. The code inside the assembly block is actually what is known as Yul – an intermediate, low-level language used by Solidity. Within the assembly code, you can access local variables, and you can use most EVM opcodes directly. Yul also offers loops, switches and some other high-level constructs, but we do not need any of this in your simple example.
Once we have the code size and know that our recipient is a smart contract, we have to call its onERC721Received method. The easiest way to do this in Solidity is to use an interface. As in other programming languages, an interface simply declares the methods of a contract, without providing an implementation. Interfaces cannot be instantiated directly. Given an address, however, we can convert this address to an instance of an interface, as in our example.
interface ERC721TokenReceiver
{
  function onERC721Received(address, address, uint256, bytes calldata) external returns(bytes4);
}

/// Once we have this, we can access a contract with this interface at
/// address to
ERC721TokenReceiver erc721Receiver = ERC721TokenReceiver(to);
bytes4 retval = erc721Receiver.onERC721Received(operator, from, tokenID, data);
Here, we have an address to and assume that at this address, a contract implementing our interface is residing. We then convert this address to an instance of a contract implementing this interface, and can then access its methods.
Note that this is a pure compile-time feature – this code will not actually create a contract at the address, but will simply assume that a contract with that interface is present at the target location. Of course, we can, at compile time, not know whether this is really the case. The compiler can, however, prepare a call with the correct function signature, and if this method is not implemented, we will most likely end up in the fallback function of the target contract. This is the reason why we also have to check the return value, as the fallback function might of course execute successfully even if the target contract does not implement onERC721Received.
Implementing the token URI method
The last part of the code which is not fully straightforward is the generation of the token URI. Recall that this is in fact the location of the token metadata for a given token ID. Most NFT contracts that I have seen build this URI from a base URI followed by the token ID, and I have adapted this approach as well. The base URI is specified when we deploy the contract, i.e. as a constructor argument. However, converting the token ID into a string is a bit tricky, because Solidity does again not offer a standard way to do this. So you either have to roll your own conversion or use one of the existing implementations. I have used the code from this OpenZeppelin library to do the conversion. The code is not difficult to read – we first determine the number of digits that our number has by dividing by ten until the result is less than one (and hence zero – recall that we are dealing with integers) and then go through the digits from the left to the right and convert them individually.
Interfaces and the ERC165 standard
Our smart contract implements a couple of different interfaces – ERC-721 itself and the metadata extension. As mentioned above, interfaces are a compile-time feature. To improve type-safety at runtime, it would be nice to have a feature that allows a contract to figure out whether another contract implements a given interface. To solve this, EIP-165 has been introduced. This standard does two things.
First, it defines how a hash value can be assigned to an interface. The hash value of an interface is obtained by taking the 4-byte function selectors of each method that the interface implements and then XOR’ing these bytes. The result is a sequence of four bytes.
Second, it defines a method that each contract should implement that can be used to inquire whether a contract implements an interface. This method, supportsInterface, accepts the four-byte hash value of the requested interface as an argument and is supposed to return true if the interface is supported.
This can be used by a contract to check whether another contract implements a given interface. The ERC-721 standard actually mandates that a contract that implements the specification should also implement EIP-165. Our contract does this as well, and its supportsInterface method returns true if the requested interface ID is
0x01ffc9a7, which corresponds to ERC-165 itself
0x80ac58cd which is the hash value corresponding to ERC-721
0x5b5e139f which is the hash value corresponding to the metadata extension
Testing, deploying and running our contract
Let us now discuss how we can test, deploy and run our contract. First, there is of course unit testing. If you have read my post on Brownie, the unit tests will not be much of a surprise. There are only two remarks that might be in order.
First, when writing unit tests with Brownie and using fixtures to deploy the required smart contracts, we have a choice between two different approaches. One approach would be to declare the fixtures as function scoped, so that they are run over and over again for each test case. This has the advantage that we start with a fresh copy of the contract for each test case, but is of course slow – if you run 30 unit tests, you conduct 30 deployments. Alternatively, we can declare the fixture as sessions-scoped. They will then be only executed once per test session, so that every test case uses the same instance of the contract under test. If you do this, be careful to clean up after each test case. A disadvantage of this approach, though, remains – if the execution of one test case fails, all test cases run after the failing test case will most likely fail as well because the clean up is skipped for the failed test case. Be aware of this and do not panic if all of a sudden almost all of your test cases fail (the -x switch to Brownie could be your friend if this happens, so that Brownie exits if the first test case fails).
A second remark is concerning mocks. To test a safe transfer, we need a target contract with a predictable behavior. This contract should implement the onERC721Received method, be able to return a correct or an incorrect magic value and allow us to check whether it has been called. For that purpose, I have included a mock that can be used for that purpose and which is also deployed via a fixture.
To run the unit tests that I have provided, simply clone my repository, make sure you are located in the root of the repository and run the tests via Brownie.
git clone https://github.com/christianb93/nft-bootcamp.git
cd nft-bootcamp
brownie test tests/test_NFT.py
Do not forget to first active your Python virtual environment if you have installed Brownie or any of the libraries that it requires in a virtual environment.
Once the unit tests pass, we can start the Brownie console which will, as we know, automatically compile all contracts in the contract directory. To deploy the contract, run the following commands from the Brownie console.
owner = accounts[0]
// Deploy - the constructor argument is the base URI
nft = owner.deploy(NFT, "http://localhost:8080/")
Let us now run a few tests. We will mint a token with ID 1, pick a new account, transfer the token to this account, verify that the transfer works and finally get the token URI.
I invite you to play around a bit with the various functions that the NFT contract offers – declare an operator, approve a transfer, or maybe test some validations. In the next few posts, we will start to work towards a more convenient way to play with our NFT – a frontend written using React and web3.js. Before we are able to work on this, however, it is helpful to expand our development environment a bit by installing a copy of geth, and this is what the next post will be about. Hope to see you there.
If you read about NFTs for the first time, you might be under the impression that an NFT somehow stores a digital asset in the blockchain. In most of the cases, however, this is not true. If you have read my previous post, you will remember that in its essence, an NFT is nothing but a registry that maps assets, identified by a token ID, to its owners. So an NFT documents ownership, but does not even reference the asset itself in its basic form. But where is the asset itself? Answering this question is the purpose of todays post.
Storage options
Before getting into how and where digital assets managed by NFTs are typically stored, let us briefly discuss the storage options that we have at our disposal.
First, there is the Ethereum blockchain itself. Using the Ethereum state as long-term storage has a number of remarkable advantages – the data, once stored, is essentially immutable, easy to access and almost impossible to delete. However, there is also a major disadvantage which, in most cases, is actually a show-stopper – it is incredibly expensive.
Let us see what incredible really means and do some math. Writing a 32 byte word to storage by running the SSTORE opcode costs 20.000 units of gas. Thus 1 KB (1024 bytes, i.e. 32 words) cost 640.000 units of gas. The current gas price is at around 75 gWei, meaning that storing 1 kB would cost around 48 Mio. gWei, i.e. 0.05 Ether. At a price of 3000 USD / ETH, storing 1 kB of data would therefore cost roughly 150 USD. Storing a full digital asset, maybe an image, on-chain is therefore not really an option in most cases.
Alternatively, we could of course use any available centralized storage solution. This could be a web server that you or someone else operates, or one of the many available cloud-based storage solutions like Amazons S3, GCP storage or even Dropbox. These solutions are typically very affordable and might even have a free tier, and the data is backed up regularly and thus well protected against accidental data loss. These storage solutions are, however, centrally managed and operated. If someone mints an NFT and stores the digital asset that a token represents on a web server run on some AWS EC2 machine, there is a risk that this person either loses interest (or goes out of business) and simply shuts down the machine or deletes the asset at some point, or even manipulates the asset after the token has been minted. So data stored in these centralized solutions is typically not well protected against being tampered with and not durable.
Therefore, a third option is very popular in the NFT universe – decentralized peer-to-peer storage. In a previous post, we have already touched on IPFS. In addition to being decentralized, IPFS has the additional advantage of using content-based addressing. This simply means that the address under which data is accessible in the IPFS network is a hash of the data itself. If the data changes, so does the address, which implies that data stored in IPFS is effectively immutable – as long as you use the same address to access it, you can be sufficiently confident that the data is the same every time you access it. As a downside, however, the network can forget your data – everything that you store in IPFS will be distributed over many nodes, and a node can decide to drop your data in favor of data that is more frequently requested. Thus using IPFS to store real digital assets is only a good idea if you also find a node that pins your data (which, of course, again introduces a certain centralization).
NFT metadata
In many cases, you will not simply want to store the asset itself, but maybe other data somehow associated with the image, like a human-readable description, the artist or other attributes. To support this, most NFTs use a two-step approach. The token itself contains a link to a file with metadata in JSON format. One of the fields stored in this file is then a link (or, more precisely, an URI) pointing to the actual image.
In this way, all we have to store on-chain is the URI of the metadata. We can then choose any of the storage options that we have discussed for the metadata and the actual image. Note, however, that these choices of course will have an impact on the integrity of the image and the metadata, we will discuss this in a bit more depth in the next section.
As this scheme is very common, it has actually been standardized as part of the ERC-721 standard. In fact, the standard defines an (optional) method tokenURI which receives the token ID and returns a URI pointing to the metadata. The standard also proposes a scheme for the metadata, however, when we look at a few real-word example further below, we will find that none of them actually fully adheres to this standard – some leave out fields the description and most of them add non-standard fields like attributes.
The standard does not say anything about how the token URI is built from the token ID. It does, however, specify that the URI be unique, i.e. no two different token IDs should result in the same URI. A natural choice that we see in reference implementations is to use a base URI that is a property of the contract in combination with the token ID. This has the advantage that the token URI is automatically unique, and, assuming that the base URI is fixed over the lifetime of the contract, also stable. If the implementation allows a re-use of token IDs, this is especially useful as it avoids an attack where a token is burnt and then re-minted with the same ID but a different token URI (of course, such an attempt could be detected by listening on the created events, but could still be confusing for everybody who has stored the token ID).
Ensuring image integrity
How secure are the various storage options that we can use for metadata and image? If you place the metadata on a traditional, centrally managed web server, i.e. if you use a token URI like “http://my.site.com/token/…”, then, of course, whoever controls the domain “site.com” is able to change the metadata or even redirect queries to a different server. One approach to protect against this is to somehow add a cryptographic hash of the metadata to the token as well, so that this hash is stored on-chain, and can be used to validate the metadata.
This approach has been standardized in EIP-2477. This standard (which, actually, is only a draft at the time of writing) adds the method tokenURIIntegrity which is supposed to return a hash value of the metadata and the algorithm used to create the hash. It appears, however, that this is not yet widely adopted, and in fact, none of the examples that we will analyze in the next section offers this method.
So if you really want to make sure that the metadata is not changed, you can either use this approach or a content-based medium like IPFS or a non-standard extension (the token URI could, for instance, contain a hash of the metadata even if it points to a traditional web server).
What about the image itself? The image URI is part of the metadata, but of course whoever controls the storage system could replace the image itself by some other content. Again, there are several options to mitigate this risk – you could use content-addressable storage for the image as well, add a cryptographic hash of the image to the metadata or add a cryptographic hash value of the image to the token data.
The choice is yours, and probably depends on the nature of the asset and the infrastructure which is at your disposal. As a guidance, however, it is of course helpful to see how existing contracts out there in the wild are approaching this, and this is what we will do now.
Real world use cases
To get an idea for some real-world use cases, let us head over to the OpenSea NFT market place and look at some NFTs. Our first example is the ArtBlocks collection. Technically, this is an ERC721 contract which implements a couple of additional methods, among them the methods of the metadata extensions. Let us take a look at one specific item in this collection, say #507 which has the token ID 21000507. We can use Etherscan to query the tokenURI method for this token ID.
As a result, you should get the following URI back.
https://api.artblocks.io/token/21000507
So the token URI is built from a base URI and the token ID (if you look at the source code of the contract, you will find that theoretically, the contract also allows to optionally use IPFS, but at least for this specific token, this option has apparently not been chosen). If you navigate to this URL, you will obtain a JSON-formatted file which contains a couple of attributes, like the artist, a description, a hash value and a link to the image.
Taking a look at the description on the project homepage tells us that the hash value is, in this case, not a hash of the image itself, but a seed from which the image can be recreated at any point in time. This seed is also stored on-chain, in a public mapping called tokenIdToHash. As Solidity automatically generates getter functions for public variables, you can query this mapping using Etherscan and confirm that the hash string in the metadata and the entry in the mapping match. The same is true for the script itself, thus even though the image is stored at a central location, the data needed to reconstruct the image and verify its integrity is completely stored on-chain.
As a second example, let us look at the 0N1 Force collection. This is a collection of 7.777 randomly-generated virtual characters which are traded as an NFT. Again, this is an NFT according to the ERC721 standard that also realizes the metadata extension. This time, however, both metadata and image are stored on IPFS.
To illustrate this, we will use character 493 out of this collection. In order to retrieve the token URI, again head over to the contract on Etherscan, select the tokenURI method, enter the token ID 493 and hit the “Query” button. As a result you should see
This is a link into the IPFS file system. To get the metadata behind, you either need to install an IPFS node yourself or – much easier – use one of the available web-based IPFS gateways. Let us use ipfs.io itself, which makes the content of the metadata we are after available at this URL. The metadata file which we obtain this way again contains a few attributes and an image link, again pointing to an IPFS CID which contains the actual image (be careful, accessing this link is slow and might result in HTML error 429 a few times). Thus we are in the scheme presented above – the CID for the metadata protects the integrity of the metadata, the metadata contains the CID of the image and therefore the integrity of the image is protected as well.
Finally, let us look at a more classical example – the “Now you are free” painting from the first Damien Hirst collection “Currency”. From a technical point, this again follows the same pattern – the contract has a tokenURI method, querying this for the token ID 7813 returns a link to the IPFS metadata and this in turn contains a link to the actual image, both on IPFS. According to the official project homepage, however, each of the images initially exists twice – purely digital and as a physical painting. During a certain period of time after minting the NFT, the owner can then decide to either exchange the NFT for the physical painting – in which case the token will be burnt – or keep the token – in which case the physical painting will be destroyed.
This closes our post for today. In this post and the previous post, we have covered the ERC-721 token standard in sufficient detail to be ready to get our hands dirty and dive into the actual implementation. To implement an NFT, we will need some additional features of Solidity which we will discuss in the next post.
NFTs (non-fungible token) are one of the latest and most exciting developments in the blockchain universe, with use cases ranging from such essential things as breeding cute virtual kitten digitally on the blockchain to digital auctions as conducted earlier this year by the renowned fine art auctioneer Sothebys’s. In this post, we will explain why an NFT is nothing but a smart contract with specific functionality and talk about the ERC-721 standard that formally defines NFTs.
Non-fungible token
In a previous post in this series, we have looked at token according to the ERC-20 standard. We have seen that in its essence, a token is implemented by a smart contract that is maintaining a mapping of accounts to balances to track ownership in a digital currency.
As for a traditional currency, documenting ownership by just keeping track of how many token you own works because such a token is completely fungible – any two are the same. If you hold a token, say the Chainlink (LINK) token, the blockchain records a balance, say 100 LINK, and if you transfer 20 LINK to another account, it does not make sense to ask which of the 100 LINK you have transferred.
This is a good approach to model a currency, but sometimes, you want to achieve something else – you want to document ownership in a uniquely identifyable asset, say a piece of art, or a property. To do this, you would assign a unique ID to each asset, and then keep track of who owns which asset by maintaining a mapping of asset IDs to owners. This is more or less what a non-fungible token does.
Correspondingly, a non-fungible token contract (NFT contract) is essentially a smart contract that maintains a data structure to document ownership in a specific item, modeled as a mapping from item IDs (the so-called token ID) to the current owner. Suppose, for instance, an artist releases a collection of digital pieces of art, numbered from 1 to 100, and sells them as NFTs. Then, the token ID would range from 1 to 100, every ID would represent the corresponding piece of art, and the mapping would document who owns which item.
Apart from the mapping itself, the contract would also have to offer methods to transfer ownership, say a method transfer that would accept a token ID and the new owner as input and would adjust the mapping to update the owner accordingly. You could also come up again with an approach to pre-approve transfers so that the new owner could actively call into the contract to claim ownership, and, in addition, you would probably add a few convenience functions, for instance to figure out the current owner for a given token ID.
The ERC-721 standard
Similar to the ERC-20 standard, the community has developed a standard – the ERC-721 standard – for smart contracts representing NFTs. However, the ERC-721 standard is considerably more complicated than the ERC-20 standard. Here is an overview of its methods and events.
That might look a bit intimidating, but do not worry – we will go through each of the building blocks step by step, and things will fall into place.
Let us start with balances. ERC-721 defines two different approaches to balances. First, there is the ownerOf method which simply returns the owner of a specific asset, identified by the token ID. Essentially, this simply queries the mapping of token IDs to current owners that the contract maintains. Here, the token ID is a 256-bit integer, i.e. a uint256 in Solidity. In addition, there is still a balanceOf method that returns the total number of NFTs owned by a specific account (this is useful in combination with the enumeration features that we will discuss below).
Next, let us start to discuss transfers. The easiest way to initiate a token transfer is to use the method transferFrom. This method allows a caller to transfer a given token, identified by the token ID, from its current holder to different address. Of course, the sender of the message needs to be authorized to perform the transfer – the current owner of a token is always authorized, but there are more options, we will get to this point below.
This is essentially the same structure and logic as the transfer method of a fungible token according to ERC20. However, there is a risk associated with using this method. Suppose that you use this method to transfer a token to a certain address, and that the receiver is a smart contract. Then the NFT will be transferred to the smart contract, and only a transaction originating from the smart contract can transfer the token to another account. If the smart contract is not prepared for this, i.e. if it does not have a method to initiate such a transfer, the NFT is forever lost (unless, maybe, the contract is an upgradeable contract) and therefore the NFT will remain assigned to the contract forever.
To at least partially mitigate this risk, the ERC-721 standard encourages contracts that are capable of managing NFTs to make this visible by implementing a marker interface. Specifically, a contract that is prepared to receive NFT should implement a method
The idea behind this is similar to the receive and fallback functions in Solidity. Of course, the pure presence of this function does not say anything about its implementation, but at least it indicates that the author of the contract was aware of the possibility that the contract might receive an NFT.
In order to restrict transfers to transfers to either an EOA or a contract that implements the marker interface, an NFT contract offers the method safeTransferFrom. This method is very similar to an ordinary transfer, with two exceptions. First, it is supposed to check whether the receiving address is a smart contract (or, which is not exactly the same thing, has a non-zero code). If yes, it will try to invoke the method onERC721Received of the target contract which is supposed to return a defined sequence of four bytes (a “magic value”). If the target contract does not implement the method, or the method exists but returns a different value, then the transfer will fail.
Second, the method safeTransferFrom optionally accepts a data field that can contain an arbitrary sequence of bytes which is handed over to onERC721Received of the recipient. The target contract can then, for instance, log this data or perform some other operations like updating a balance and storing the passed data as a reference.
Let us now turn to authorizations – who is allowed to initiate a transfer? Of course, the owner of an NFT is always authorized to transfer it. In addition to this, the withdrawal pattern is supported as well, similar to the ERC20 standard. In fact, there is a method approve that the owner of an NFT can invoke to authorize someone else to transfer this token. Approvals can also be explicitly revoked, and of course approvals are reset if ownership for an NFT changes.
In addition to this explicit approval that refers to a specific token ID, it is also possible to register another address as being authorized to make any transfer on your behalf, i.e. as an operator. Once defined, an operator can transfer any token that you own and can also make approvals and therefore authorize withdrawals. This global approval method has no equivalent in the ERC20 standard, but there is an extension (EIP-777) to the standard which adds this functionality for fungible token as well.
Finally, the standard defines events that are supposed to be emitted when a transfer is made, an approval is granted or revoked or an operator is named or removed.
The enumeration extension
The ERC721 standard makes it easy to figure out the current owner of an NFT once you know the token ID – simply call ownerOf using the token ID as argument. However, the token ID can, in general, be any 256 bit number, and there is no reason to assume that this will always be a simple sequence. As a consequence, it is not obvious how to figure out which token IDs are actually in use, i.e. which token have already been minted.
To address this, the standard defines a set of optional methods that allow a user to enumerate all existing tokens. This proceeds in two steps. First, the method totalSupply is supposed to return the total number of token in existence, i.e. token that have already been minted. Then, the method tokenByIndex can be called with an index less than the total supply to get the ID of a specific token. Similar, the balanceOf method (which is mandatory) returns the number of token held by a specific owner, and tokenOfOwnerByIndex can be used to enumerate these token. Implementing these optional methods requires an additional data structure in the contract, for instance an array that contains all token IDs.
This enumeration extension is the only standardized way to get a list of existing token IDs. It forces the contract, however, to implement and maintain additional data structures and I would assume that many contract owners have chosen not to implement it (in the next post, we will look at a few real-word examples, and as a matter of fact, none of them implements this extension). Alternatively, a contract could emit a (non-standard) initial log entry upon contract creation to indicate all token IDs that are available directly after contract creation, and then a user could monitor the Transfer events which, per the specification, should be emitted if an additional token is minted.
That concludes our post for today. You might have noted that we have not yet discussed an extension that is indicated in the diagram at the top of this article – the metadata extension. This extension touches upon an interesting question – if an NFT documents ownership in (say) a digital asset, where is the actual asset stored? This question and its ramifications will be the topic of the next post in this series.
On August 27th 2021, a malicious transaction was created on the Ethereum mainnet, targeting a vulnerability in all versions of Go-Ethereum up to 1.10.7. If successful, this could have resulted in a fork of the production network. Fortunately, this could be avoided as a sufficient number of nodes were already running version 1.10.8 of Go-Ethereum which had been released as a hotfix three days ago. Armed with the understanding from my previous posts of how the EVM and in particular calls work internally, we are now in a position to analyze what really happened and how the exploit works.
What happened
On August 24th, the Go-Ethereum developer team rushed to release geth v1.10.8 which was announced as a hotfix, fixing a vulnerability that had been discovered during an audit of the Telos EVM, which is a copy of the Ethereum EVM running on the Telos blockchain. In the announcement, no details were made public yet, but in the meantime, more details have been posted by other teams and researchers (for instance here).
If you release a hotfix in an open source project, making it easy for everybody to simply ask GitHub to create a diff for you, obviously the black hats will start to reverse-engineer the changes to understand what the problem was and will try to exploit this. This is exactly what happened in this case as well.
In fact, three days later, on August 27th, one of the Go-Ethereum core developers posted an alert on Twitter, urging node maintainers to upgrade and announcing that an active attempt to exploit the vulnerability had been observed on mainnet. In the same thread, a link to the malicious transaction (with transaction hash 0x1cb6fb36633d270edefc04d048145b4298e67b8aa82a9e5ec4aa1435dd770ce4) on Etherscan was published shortly after. It turns out that the root cause of the issue is related to how geth handles the processing of calls and their return values, and, having gone through all this in the previous posts, we are now in a good position to understand what the problem was. In this section, we will use the details of the malicious transaction to replay it, both with geth 1.10.8 (where the problem has been fixed) and geth 1.10.6 (where the problem still exists), to understand why it has the potential to cause a split of the blockchain. In the next section, we will then analyze the source code to understand the issue and how it has been fixed.
Let us first replay the transaction using geth 1.10.8. I assume that you have copies of geth 1.10.8 and geth 1.10.6 in your path (if not, head over to the project download page and get the binaries for your OS). Our approach will be to create two blockchain data directories, one for each version, so that we start with the same initial state. We will then run the transaction against both versions and observe that the outcomes differ.
There is a little subtlety, though. If you start geth with a fresh data directory, it will also randomly create a new developer account which becomes part of the genesis block. Therefore, running geth twice with different data directories will in general not produce the same initial state. To avoid this, we share the key store between both instances, so that they both use the same developer account. So we will have three directories – geth1108 which will be the data directory for v1.10.8, geth1106 which will be the data directory for v1.10.6, and gethcommon which will contain the key store. We will start with geth v1.10.8 which will also create the developer account for us.
# Assume that geth1108 and geth1106 are the respective binary
# and on your path
mkdir geth1108
mkdir gethcommon
geth1108 \
   --datadir $(pwd)/geth1108/ \
   --keystore $(pwd)/gethcommon/ \
   --dev \
   --http
Once the client is running, let us, for later reference, get the hash of the genesis block. In a separate terminal (but in the same working directory), attach a geth console, and, once the console prompt appears, get the hash value of the genesis block.
Write down this hash value somewhere, for me, it was 0x3b154292c6ec669d736df498663075cf7140b3aa3f287a5dc6b55477937f8ad6, but when you try this, you will get a different value as you will most likely get a different etherbase account and thus a different genesis block.
Now let us run the exploit transaction, determine the address of the contract that has been generated and get the contract (runtime) code and the hash of the resulting block.
dev = eth.accounts[0]
input = "0x3034526020600760203460045afa602034343e604034f3"
value = 0
txn = {
  "from": dev,
  "value": value,
  "input": input,
  "gas": 200000
}
txnhash = eth.sendTransaction(txn)
// wait until the transaction has been mined, then run
c = eth.getTransactionReceipt(txnhash).contractAddress
eth.getCode(c)
eth.getBlockByNumber(1).hash
Again, write down the the hash value of the second block and the contract code. Now let us repeat all this with geth 1.10.6. Stop the console and the running instance of geth. Then start a new instance of geth 1.10.6, using, as explained above, a different data directory but the same key store directory.
Looking at the startup messages of the client, you should be able to verify that the developer account is the same as before. Now start the geth console again, this time pointing to the IPC endpoint of the now running geth 1.10.6
geth1106 attach $(pwd)/geth1106/geth.ipc
Now, repeat the steps above. First, determine the hash value of the first block and verify that you get the same result as previously. Then, run the code above to also submit the transaction in our new blockchain, get the code and the hash number of the generated block.
You should see that the code generated by geth 1.10.6 is different. In fact, the code produced with geth 1.10.8 should be the contract address (32 bytes), followed by the last seven bytes of the contract address and filled up with zeros. For geth 1.10.6, the code consists of the first seven bytes of the contract address, followed by the full contract address and again filled up with zeros . Correspondingly, the hash of the new block is different (because the state is different and the state root is part of the block).
So we see that two different versions of the client start with the same state (the genesis block) and run the same transaction, but arrive at a different state after the transaction has been processed. This, of course, is a desaster – if a network is comprised of nodes with these two versions, the nodes will form two partitions (one running the new version and one running the old version) and the members of the two partitions will disagree about the correct state. Thus, in the worst case, the chain will fork.
Fortunately, this is not what happened in real life, as apparently a sufficiently large number of nodes had already upgraded to the latest version when the exploit hit the network.
So we have managed to reconstruct the attack and verify that it does, in fact, lead to a potential fork. Let us now try to understand what the problem was and how the exploit works.
Why it happened
To understand what the exploit code is doing, let us disassemble it, using for instance debug.traceBlockByNumber(1)[0].result in the geth console. Here is an opcode view of the input data (which, as we know, will be run as deploy bytecode when the transaction is processed).
The first three lines will push the address of the contract being created and the call value (which is zero) onto the stack and run MSTORE, so that the stack will be empty again and the memory will contain the contract address at position 0x0.
Next, the code again sets up the stack, which, when we reach the STATICCALL, will look as follows (items at the top of the stack on the left)
remaining gas | 0x4 | 0x0 | 0x20 | 0x7 | 0x20
Now we know that a call to address 0x04 invokes the precompiled contract “data copy”. The input is specified by items three and four on the stack, i.e. the 32 bytes at address 0x0, which, as we know, is the contract address. The output is to be placed at address 0x7. Thus after returning, the memory contains the first 7 bytes of the contract at 0x0, followed by the full contract address.
Next, we again see a couple of instructions that prepare the stack, and then we invoke RETURNDATACOPY. Upon reaching this opcode, our stack is
0x0 | 0x0 | 0x20 | 0x1
Recall that RETURNDATACOPY is supposed to copy the result of the last call-like operation to memory. In this case, we ask the EVM to copy the result of the last CALL (which, as we know, is the contract address) to address 0x0. Thus after executing this statement, the memory should contain the contract address at location 0x0, followed by the last seven bytes of the contract address at the beginning of the second 32 byte word. The final RETURN would the return these two words as runtime bytecode, so that the runtime bytecode should be the contract address, followed by the last seven bytes of the contract address repeated. This, in fact, is what you observe when you look at the trace and the contract generated with geth 1.10.8
Unfortunately, with geth 1.10.6, the trace shows that here, the RETURNDATACOPY does not change the memory content at all. Consequently, the runtime bytecode is the current memory content, i.e. the first seven bytes of the contract address followed by the full contract address. This is the bug that has been discovered and exploited.
Let us now take a look at the Go-Ethereum source code and try to understand what the problem is. In our previous posts (here, here and here) on the inner workings of the EVM, we have already analyzed in detail how a call works internally. We process the STATICCALL in the opStaticCall function where we invoke the StaticCall method of the EVM. Here, we figure out that the target of the call is a precompiled contract, so we call RunPrecompiledContract. At this point in time, the input is a pointer to the memory of the calling contract, starting at offset 0x0, i.e. the contract address.
The implementation of the precompiled contract at address 0x4 now simply returns the exact same pointer again. Thus, when we get back into opStaticCall, the variable ret is now a pointer to offset 0x0 in the contract memory. Next, we copy the return value of the call (the contract address) to its target location in memory, i.e. to offset 0x7.
The problem is that this of course modifies the memory to which ret still points. Thus the value at the memory location pointed to by ret is now no longer the return value of the precompiled contract, but the new, overwritten memory content. Unfortunately, back in the main interpreter loop, we nevertheless use the returned pointer and assign it to the return data buffer (here). Thus the return data buffer does now not contain the original return value of the precompiled contract,as it should, but the already modified memory content. When we now access this with RETURNDATACOPY, we copy this memory content to itself, resulting in the effective no-op that we observe.
In version 1.10.8, this line has been added in opStaticCall which creates a copy of the return value before modifying the memory content, thereby avoiding the problem. Thus, as we can observe, version 1.10.8 correctly returns the actual contract address when executing the RETURNDATACOPY opcode. A nice example for the risks inherent with the use of pointers in any programming language…..
Personally, I was a bit surprised to see this happening, as a related vulnerability was already identified and fixed with v1.9.17 in July 2020. This is also an interesting coincidence as at this time, the developers had chosen not to declare this release a hotfix, and consequently, many miners did not upgrade. The vulnerability was then actually exploited in November 2020, and splitted nodes that had not yet been upgraded off from the network. The geth team later conducted a post mortem in which they also argued why they had chosen not the announce the fix in public but to effectively ship it as an unannounced hard fork. In hindsight, this probably was a good decision – after all, almost four months had passed after the release without anyone noticing and exploiting the change. In the current case, where the team has chosen to make the fix public and to urge operators to upgrade on social media, it only took three days between the upgrade and the exploit, so this will most likely re-ignite the debate on how the team should handle consensus bugs once they have been discovered (but hopefully also a debate about how to better catch this sort of issues in the future).
This closes our post for today – I hope you found it interesting to see how a real-world consensus bug might look like and how it could be exploited. Hope to see you soon.
Having found our way through the mechanics of the Ethereum virtual machine in the last post, we are now in a position to better understand what exactly goes on when a smart contracts hand over control to another smart contract or transfers Ether.
Calls and static calls
Towards the end of the previous post in this series, we have already taken a glimpse at how an ordinary CALL opcode is being processed. As a reminder, here is the diagram that displays how the EVM and the EVM interpreter interact to run smart contract
In our case – the processing of a CALL – this specifically implies that the following steps will be carried out (we ignore gas processing for the time being, as this is a bit more complicated and will be discussed in depth in a separate section).
the interpreter hits upon the CALL opcode
it performs a look up in the jump table and determines that the function opCall needs to be run
it gets the parameters from the stack, in particular the address of the contract to be called (the second stack item)
it then extracts the input data from the memory of the currently executing code
we then invoke the Call method of the EVM, using the contract address and the input data as arguments
as we have learned, this will result in a new execution context (i.e. a new Contract object, a new stack and a freshly initialized memory) in which the code of the target contract will be executed
at the end, we get the returned data (an array of bytes) back
if everything went fine, we copy the returned data back into the memory of the currently executing contract
It is important to understand that this comes with a full context switch – the target contract will execute with its own stack and memory, state changes made by the target contract will refer to the state of the target contract, and Ether transferred with the call is credited to the target contract.
Also note that there are actually two ways how the result of the call is made available to the caller. First, the result of the call (a pointer to a byte array) will be copied to the memory of the calling contract. In addition, the return value is also returned by opCall and there it is copied once more, this time to a special buffer called the return data buffer. The caller can copy the data stored in this buffer and determine its length using the RETURNDATACOPY and RETURNDATALENGTH opcodes introduced with EIP-211 (in order to make it easier to pass back return data whose length is not yet known when the call is made).
In summary, the called contract is executed essentially as if it were the initial contract execution of the underlying transaction. Calls can of course be nested, so we now see that a transaction should be considered as the top-level call, which can be followed by a number of nested calls (actually, this number is limited, for instance by the limited depth of the call stack).
Of course, executing an unknown contract can be a significant security risk. We have seen an example in our post on smart contract security, where a malicious contract calling back into your own contract can cause a double-spending. Therefore, it is natural to somehow try to restrict what a called contract can due. One of the first restrictions of this type is the introduction of the STATICCALL with EIP-214. A static call is very much like an ordinary call, except that the called contract is not allowed to make any state changes, in particular no value transfer is possible as part of a static call.
The function opStaticCall realizing this is actually very similar to the processing of an ordinary call. There are two essential differences. First, there is no value and therefore one parameter less that needs to be taken from the stack. Second, the method of the EVM that is eventually invoked is not Call but StaticCall. The structure of this function is very similar to that of an ordinary call, so let us focus on the differences. Here is a short snipped (leaving out some parts to focus on the differences) of the Call method.
So we see that there are three essential differences. First, in a static call, there is value transfer – this is as expected, as a static call is not allowed to make a value transfer which represents a change to the state. Second, when we build the contract, the third parameter is zero – again, this is related to the fact that there is no value transfer, as this parameter determines the value that, for instance, the opcode CALLVALUE returns. Finally, we set the third parameter of the Run function to true. In our discussion of the Run method in the previous post, we have already seen that this disallows all instructions which are marked as state changing.
Delegation and the proxy pattern
Apart from calls and static calls, there is a third way to invoke another contract, namely a delegate call. Roughly speaking, a delegate call implies that instead of executing the code of the called contract within the context of the called contract, we execute the code within the context of the caller. Thus, we essentially run the code of the called contract as if it were a part of the caller code, as you would run a library (however, this is of course not how libraries are actually realized in Solidity where a library is simply linked into the contract at build time).
In the EVM, a delegate call is done using the opcode DELEGATECALL (well, that did probably not come as a real surprise). Similar to a static call, there is no value transfer for this call and correspondingly no value parameter on the stack. Going through the same analysis as for a static call, we find that execution of the opcode delegates to the method DelegateCall() of the EVM. Let us again look at the parts of the code that differ from an ordinary call.
Looking at this , we spot three differences compared to an ordinary call. First, the second parameter used for the creation of the new contract (which is the parameter which will determine the self field of the new contract and with that the address used to read and change state during contract execution) is not set to the target contract, but to the address of the caller, i.e. the currently executing contract, while the address used to determine the code to be run is still that of the target contract. Thus, as promised, we execute the code of the target contract within the context of the currently executing contract.
A second difference is the third argument used for contract creation, which is the value transferred with this call. Again, this is zero (even nil). Finally, after creating the contract, we execute its AsDelegate() method. This changes the attributes CallerAddress and value of the contract to that of the currently executing contract. Thus, whenever we execute the opcodes CALLVALUE or CALLER, we get the same values as in the context of the currently executing contract, as promised by EIP-7, the EIP which introduced delegate calls.
One of the motivations behind introducing this possibility was that it allows for a pattern known as proxy pattern. In this pattern, there are two contracts involved. First, there is the proxy contract. The proxy contract accepts a call or transaction and is responsible for holding the state. It does, however, not contain any non-trivial logic. Instead, it uses a delegate call to invoke the logic residing in a second contract, the logic contract.
Why would you want to do this? There are, in fact, a couple of interesting use cases for this pattern. First, it allows you to build an upgradeable contract. Recall that – at least until the CREATE2 opcode was introduced – it was not possible to change a smart contract after is has been deployed. Even though this is of course by intention and increases trust in a smart contract (it will be the same, no matter when you interact with it), it also implies a couple of challenges, most notably that it makes it impossible to add features to a smart contract over time or to fix a security issue. The proxy pattern, however, does allow you to do this. You could, for instance, store the address of the logic contract in the proxy contract instead of hard-coding it, and then add a method to the proxy that allows you to change that address. You can then deploy a new version of the logic to a new address and then update the address stored in the proxy contract to migrate from the old version to the new version. As the state is part of the proxy contract which stays at its current location, the state will be untouched, and as the address that the users interact with does not change, the users might not even notice the change. Needless to say that this is very useful for some cases, but can also be abused by tricking a user into trusting a contract and then changing its functionality, so be careful when interacting with a smart contract that performs delegation.
A second use case is related to re-use. As an example, suppose you have developed a smart contract that implements some useful wallet-like functionality, maybe time-triggered transfers. You want to make this available to others. Now you could of course allow anybody to deploy your smart contract, but this would lead to many addresses on the blockchain containing exactly the same code. Alternatively, you could store the logic in one logic contract and than only distribute the code for the proxy. A new user would then simply deploy a proxy, so each proxy would act as a wallet with an individual state and balance, but all of them would run the same logic. Again, it goes without saying that this implies that your users trust you and your contract – if, for instance, your logic contract is able to remove itself (“self-destruct” using the corresponding opcode), than this would of course render all deployed proxies useless and the balance stored in them would be lost forever.
Finally (and this apparently was one of the motivation behind EIP-7) you could have a large contract whose deployment consumes more gas than the gas limit of a block allows. You could then split the logic into several smaller logic contracts and use a proxy to tie them together into a common interface.
There are several ongoing attempts to standardize this pattern and in particular upgradeable contracts. EIP-897, for instance, proposes a standard to expose the address to which a proxy is pointing. EIP-1967 addresses an interesting problem that the pattern has – the logic contract and the proxy contract share a common state, and thus the proxy contract needs to find a way to store the address of the logic contract without conflicting with the storage layout of the logic contract. Finally, EIP-1822 proposes a standard for upgradeable contracts. It is instructive to read through these EIPs and I highly advise you to do so and also have a look at the implementations described or linked in them.
Gas handling during a call
Let us now turn to gas handling during a call. We have already seen that, as for every instruction, there is a constant gas cost and a dynamic gas cost. In addition, there are two special contributions which are not present for other instructions – a refund and a stipend.
The constant gas cost is simple – this is simply a constant value of (currently) 700 units of gas, increased from previously 40 with EIP-150. The dynamic gas cost is already a bit more complicated and itself consists of four positions. The first three positions are rather straightforward
first, there is a fee of 9000 units of gas when a non-zero value is transferred as part of the call
second, there is an account creation fee of 25000 whenever a non-zero value is transferred to a non-existing account as part of the call
third, there is the usual gas fee for memory expansion, as for many other instructions
The fourth contribution to the dynamic gas cost is a bit more tricky. The problem we are facing at this point is that the contract which is called will of course consume gas as well, but at this point in time, we do not know how much this is going to be. To solve this, a position called the gas cap is used. Initially, this gas cap was simply the first stack item, i.e. the first argument to the CALL instruction, which specifies the gas limit for the contract to be executed, i.e. the part of our remaining gas that we want to pass on to the called contract. We could now simply use this number as additional gas cost and then, once the called contract returns, see how much of that is still unused and refund that amount.
This is indeed how the gas payment for a call worked before EIP-150 was introduced. This EIP was drafted to address denial-of-service attacks that utilized the fact that the costs for some instructions, among them making a call, was no longer reflecting the actual computing cost on the client. As a counter-measure, the cost for a call was increased from previously 40 to the new still valid 700. This, however, caused problems with existing contract that tried to calculate the amount of gas they would make available to called contract by taking the currently remaining gas (inquired via the GAS opcode) and subtracting the constant fee of 40 units of gas. To avoid this, the developers thought about coming up with a mechanism which allowed a contract to make “almost all” remaining gas available to the caller, without having to hard-code gas fees. More precisely, “almost all” means that the following algorithm is applied to calculate the gas cap.
Determine the gas which is currently still available, after having deducted the constant gas cost already
Determine the base fee, i.e. the dynamic gas cost for the call calculated so far (memory fee, transfer fee and creation fee)
Subtract this from the remaining gas to determine the gas which will still be available after paying for all other gas cost contributions (“projected available gas”)
Read out the first value from the stack (the first parameter of the GAS instruction), i.e. the requested gas limit
determine a gas cap as 63 / 64 times the projected available gas
if the requested gas limit is higher than the gas cap, return the gas cap, otherwise return the requested gas limit
Thus a contract can effectively pass almost all of the remaining gas to the callee by providing a very large requested gas limit as first argument to the CALL instruction, so that the requested gas limit is definitely smaller than the calculated cap. The factor of 63 / 64 has been put in as an additional protection against recursive calls. The outcome of this algorithm is then used for two purposes – as an upfront payment to cover the maximum amount of gas that the callee might need, and as the gas supply that the callee actually obtains for its execution.
Now, I have been cheating a bit as there are two components in the diagram above that we have not yet discussed. First, I have just told you that the outcome of the EIP-150 algorithm is passed as available gas to the callee. This, however, is only true if the call does not transfer any Ether. If it does, there is an additional stipend of 2300 gas which is added to the gas made available to the callee before actually making the call. Note that this stipend does not count against the gas cost of the callee, as it is not part of the dynamic gas cost, so it effectively has two implications – it reduces the cost of the call by 2300 units of gas and, at the same time, it makes sure that even if the caller specified zero as gas limit for the call, the callee has at least 2300 units of gas available. The motivation of this is that a call with a non-zero value typically triggers the receive function or fallback function of the called contract, and calls with a gas supply of zero will let this function fail. Thus the gas stipend serves as a safe-guard to reduce the risk of a value transfer failing because the recipient is a smart contract and its receive- or fallback-function runs out of gas.
Finally, there is the refund, which happens here and simply amounts to adding the gas that the callee has not consumed to the available gas of the current execution context again.
The gas stipend and transfers in Solidity
The gas stipend is one of the less documented features of smart contracts, and a part of the confusion that I have seen around this topic (which, in fact, was the main motivation for the slightly elaborated treatment in this post) comes from the fact that a gas stipend exists in the EVM as well as in Solidity.
As explained above, the EVM adds the gas stipend depending on the value transferred with the call – in fact, the stipend only applies to calls with a non-zero value. In addition to this, Solidity applies the same logic, but only if the value is zero. To see this, you might want to use a simple contract like this one.
contract Transfer {

    uint256 value;

    function doIt() public {
        payable(msg.sender).transfer(value);
    }
}
If you compile this, for instance in Remix, and take a look at the generated bytecode, you will see that eventually, the transfer translates into a CALL instruction. The preparation of the stack preceding this instruction is a bit involved, but if you go through this carefully and wait until the dust has settled, you will find that the top of the stack looks as follows.
(value == 0) * 2300 | sender | value |
Thus the first value, which specified the gas to be made available for the subcontract, is 2300 (the gas stipend) if the value is zero, and zero otherwise. In the first case, the EVM will not add anything, in the second case, the EVM will add its own gas stipend. Thus, regardless of the value, the net effect will be that the gas stipend of 2300 units of gas always applies for a transfer. You might also want to look at this snippet in the Solidity source code that creates the corresponding code (at least if I interpret the code correctly).
What this analysis tells us as well is that there is no way to instruct the compiler to increase the gas limit of the transfer. As the 2300 units of gas will only be sufficient for very simple functions, you need a different approach when invoking contracts with a more complex receive function. When we discuss NFTs in a later post in this series, we will see how you can use interfaces in Solidity to easily call functions of a target contract. Alternatively, to simply invoke the fallback function or the receive function with a higher gas limit, you can use a low-level call. To see this in action, change the transfer in the above sample code to
When you now compile again, take a look at the resulting bytecode and locate the CALL instruction, you will see that immediately before we do the CALL, we execute the GAS opcode. As we know, this pushes the remaining available gas onto the stack. Thus the first argument to the CALL is the remaining gas. As, by the EIP-150 algorithm above, this is in every case more than the calculated cap, the result is that the cap will be used, i.e. almost all remaining gas will be made available to the called contract. Be sure, however, to check the return value and handle any errors that might have occurred in the called contract, as Solidity does not add extra code to make sure that we revert upon errors. Note that there is an ongoing discussion to extend the functionality of transfer in Solidity to allow a transfer to explicitly pass on all the remaining gas, see this thread.
With this, we have reached the end of our post for today. In this and the previous two posts, we have taken a deep-dive into how the Ethereum virtual machine actually works, guided by the yellow paper and the code of the Go-Ethereum client. In the next post, we will move on and start to explore one of the currently “hottest” applications of smart contract – non-fungible token. Hope to see you soon!
In todays post, we will complete our understanding of how the EVM executes a smart contract. We will investigate the actual interpreter loop, discuss gas handling and have a short look at pre-compiled contracts.
The jump table and the main loop
In the last post, we have seen that the entry point to the actual code execution is the Run method of the EVM interpreter. This method is essentially going through the bytecode step by step and, for each opcode, looking up the opcode in a data structure known as jump table– Among other things, this table contains a reference to a Go function that is to be executed to process the instruction. More specifically, an entry in the jump table contains the following fields, which partially refer to other tables in other source code files.
First, there is a Go function which is invoked to process the operation
Next, there is a gas value which is known as the constant gas cost of the operation. The idea behind this is that the gas cost for the execution of an instruction typically has two parts – a static part which is independent of the parameters and a dynamic part which depends on parameters like the memory consumption or other parameters. This field represents the static part
The third field is again a function that can be used to derive the dynamic part of the gas cost
The fourth field – minStack – is the number of stack items that this operation expects
The next field – maxStack – is the maximum size of the stack that will still allow this operation to work without overflowing the stack. For most operations, this is simply the maximum stack size minus the number of items that the operation pops from the stack plus the number of items that it adds to the stack
The next field, memorySize, specifies how much memory the opcode needs to execute. Again, this is a function, as the result could depend on parameters
The remaining fields are a couple of flags that describe the type of operation. The flag halts is set if the operation ends the execution of the code. At the time of writing, this is set for the opcodes STOP, RETURN and SELFDESTRUCT.
Similarly, the reverts flag indicates whether this opcode explicitly reverts the execution and is currently only set for the REVERT opcode itself
The return flag indicates whether this opcode returns any data. This is the case for the call operations STATICCALL, DELEGATECALL, CALL, and CALLCODE, but also for REVERT and contract creation via CREATE and CREATE2
The writes flag indicates whether the operation modifies the state and is set of operations like SSTORE
Finally, the jumps flag indicates whether the operation is a jump instruction and therefore modifies the program counter
Another data structure that will be important for the execution of the code is a set of fields known as the call context. This refers to a set of variables that make up the current of the interpreter and are reset every time a new execution starts, like memory, stack and the contract object.
Let us now go through the Run method step by step and try to understand what it does. First, it increments the call stack depth which will be decremented again at the end of the function. It also sets the read only flag of the interpreter if not yet done and resets the return data field. Next, we initialize the call context and set the program counter to zero before we eventually enter a loop called the main loop.
Within this loop, we first check every 1000th step whether the abort flag is set. If yes, we stop execution (my understanding is that this feature is primarily used to cancel running EVM operations that were started as part of an API call). Next, we use the current value of the program counter to read the next opcode that we need to process, and look up that operation in the jump table (raising an error if there is no entry, which indicates an invalid opcode).
Once we have the jump table entry in our hands, we can now check the current stack size against the minimum and maximum stack size of the instruction and make sure that we raise an error if we try to process an operation in read-only mode that potentially updates the state.
We then calculate the gas required to perform the operation. As already explained, the gas consumption has two parts – a static part and a dynamic part. For each of these two contributions, we invoke the method UseGas() of the contract object, which will reduce the gas left that the contract tracks and also raise an error if we are running out of gas.
We then execute the operation by invoking the Go function to which it is mapped. This function will typically get some data from the stack, perform some calculations and push data back to the stack, but can also modify the state and perform more complex operations. Most if not all operations are contained in instructions.go, and it is instructive to scan the file and look at a few operations to get a feeling for how this works (we will go through a more complex example, the CALL operation, in a later post).
Once the instruction completes, we check the returns flag of the jump table entry to see whether the instruction returns any data, and if yes, we copy this data to the returnData field of the interpreter so that it is available for the next instruction. We then decide whether the execution is complete and we need to return to leave the main loop, or whether we need to continue execution with an updated program counter.
So the main loop is actually rather straightforward, and, together with our discussion of the Call() method in the previous post, we now have a fairly complete picture of how contract execution works.
Handling gas consumption
Let us leverage this end-to-end view to put together the various bits and pieces to understand how gas consumption is handled. We start our discussion on the level of an entire block. In one of the previous posts, we have already seen that when a block is processed here, two gas related variables are maintained. First, the processing keeps track of the gas used for all transactions in this block, which corresponds to the gasUsed field of a block header. In addition, there is a block gas pool, which is simply a counter initialized with the current block gas limit and used to keep track of the gas which is still available without violating this limit.
When we now process a single transaction contained in the block, we invoke the function applyTransaction. In this function, we increase the used gas counter on the block level by the gas consumed by the transaction and use that information to create the transaction receipt, that contains both the gas used by the transaction and the current value of the cumulative gas usage on the block level. This is done based on the return value of the ApplyMessage function, which itself immediately delegates to the TransitionDB method of a newly created state transition object.
The state transition object contains two additional gas counters. The first counter (st.gas) keeps track of the gas still available for this transaction, and is initialized with the gas limit of the transaction, so this is the equivalent of the gas pool on the block level. The second counter is the initial value of this field and only used to be able to calculate the gas actually used later on.
When we now process the transaction, we go through the following steps.
First, we initialize the gas counters
Then, we deduct the upfront payment from the senders balance. The upfront payment is the gas price times the gas limit and therefore the maximum amount of Ether that the sender might have to pay for this transaction
Similarly, we reduce the block gas limit by the gas limit of the transaction
Next, we calculate the intrinsic gas for the transaction. This is the amount of gas just for executing the plain transaction, still without taking any contract execution into account. It is calculated (ignoring contract creations) by taking a flat fee of currently 21000 units of gas per transaction, plus a fee for every byte of the transaction input (which is actually different for zero bytes and non-zero bytes). In addition, there is a fee for each entry in the access list (this is basically a list of accounts and addresses for which a discount applies when accessing them, see EIP-2930). In the yellow paper, the intrinsic gas is called g0 and defined in section 6.2
We then reduce the remaining gas by the intrinsic gas cost (again according to what section 6.2 of the yellow paper prescribes) and invoke Call(), using the remaining gas counter st.gas as the parameter which determines the gas available for this execution. Thus the gas available to the contract execution is the gas limit minus the intrinsic gas cost. We have already seen that this creates a Contract containing another gas counter which keeps track of the gas consumed during the execution. Within the interpreter main loop, we calculate static and dynamic gas cost for each opcode and reduce the counter accordingly. At the end, the remaining gas is returned
We update the remaining gas counter st.gas with the value returned by Call(). We then perform a refund, i.e. we the remaining gas times gas price back to the sender and also put the remaining gas back into the gas pool on block level
This has a few interesting consequences. First, it demonstrates that the total gas cost of executing a transaction does actually consist of two parts – the intrinsic gas for the transaction and the cost of executing the opcodes of the smart contract (if any). Both of these components have a static part (the 21000 base fee for the intrinsic gas cost and the static fee per opcode for the code execution) and a dynamic part, which depends on the transaction.
The second thing that you want to remember is that in order to make sure that a transaction is processed, it is not sufficient to have enough Ether to pay for the gas actually used. Instead, you need to have at least the gas limit times the gas price, otherwise the upfront payment will fail. Similarly, you need to make sure that the gas limit of your transaction is lower than the block gas limit, otherwise the block will not be mined.
Pre-compiled contracts
There is a special case of calling a contract that we have ignored so far – pre-compiled contracts. Before diving down into the code once more, let me quickly explain what pre-compiled contracts are and why they are useful.
Suppose you wanted to develop a smart contract that needs to calculate a hash value. The EVM has a built-in opcode SHA3 to calculate the Keccak hash, but what about other hashing algorithms? Of course, as the EVM is Turing-complete, you could develop a contract that does this, but this would blow up your contract considerably and, in addition, would probably be extremely slow as this would mean executing complex mathematical operations in the EVM. As an alternative, the Ethereum designers came up with the idea of a pre-compiled contract. Roughly speaking, this is a kind of extension of the instruction set of the EVM, realized as contracts located at pre-defined addresses. The contract at address 0x2, for instance, calculates an SHA256 hash, and the contract at address 0x3 a RIPEMD-160 hash. These contracts are, however, not really placed on the blockchain – if you look at the code at this address using for instance the JSON API method eth_getCode, you will not get anything back. Instead, these pre-defined contracts are handled by the EVM. If the EVM processes a CALL targeting one of these addresses, it does not actually call a contract at this address, but simply runs a native Go function that performs the required calculation.
We have already seen where in the code this happens – when we initialize the target contract in the Call() method of the EVM, we check whether the target address is a pre-compiled contract and, if yes, execute the associated Go function instead of running the interpreter. The return values are essentially the same as for an ordinary call – return data, an error and the gas used for this operation.
The pre-compiled contracts as well as the gas cost for executing them are defined in the file contracts.go. At the time of writing, there are nine pre-compiled contracts, residing (virtually) at the addresses 0x1 to 0x9:
EC recover algorithm, which can be used to determine the public key of the signer of a transaction
SHA256 hash function
RIPEMD-160 hash function
the data copy function, which simply returns the input as output and can be used to copy large chunks of memory more efficiently than by using the built-in opcodes
exponentation module some number M
three elliptic curve operations to support zero-knowledge proofs (see the EIPs 196 and 197)
Here is the final flow diagram for the smart contract execution that now also reflects the special case of a pre-compiled contract.
With this, we close our post for today. In the next post, we will take a closer look at the CALL opcode and its variations to understand how a smart contract can invoke another contract.
In todays post, we will shed some light on how the Ethereum virtual machine (EVM) actually works under the hood. We start with an overview of the most relevant data structures and methods and explain the big picture before we look at the interpreter main loop in the next post.
The Go-Ethereum EVM – an overview
To be able to analyze in depth what really happens if a specific opcode is executed, it is helpful to take a look at both the yellow paper and the source code of the Go-Ethereum (geth) client implementing what the yellow paper describes. The code for the EVM is in this folder (I have used version 1.10.6 for the analysis, but the structure should be rather stable across releases).
Let us first try to understand the data structures involved. The diagram below shows the most important classes, attributes and methods that we need to understand.
First, there is the block context. This class is simple, it simply contains some data fields that represent attributes of the block in which the transaction is located and is used to realize opcodes like NUMBER or DIFFICULTY. Similarly, the transaction context (TxContext) holds some fields of the transaction as part of which we execute the smart contract.
Let us now turn to the Contract class. The name of this class is a bit misleading, as it does in fact not represent a smart contract, but the execution of a smart contract, either as the result of a transaction or, more generally, of a message call. Its most important attributes (at least for our present discussion) are
The code, i.e. the smart contract code which is actually executed
the input provided
the gas available for the execution
the address at which the smart contract resides (self)
the address of the caller (caller and CallerAddress)
It is important to understand the meanings of the various addressed contained in this structure. First, there is the self attribute, which is the contract address, i.e. the address at which the contract itself resides. This is the address which is called Ia in the yellow paper, which is returned by the ADDRESS opcode and which is the address holding the state manipulated by the code, for instance when we run an SSTORE operation. This is also the address returned by the Address() method of the contract.
Next, there is the caller and the callerAddress. In most cases, these two addresses are identical and represent the source of the message call, i.e. what is called the sender Is in the yellow paper. There are cases, however, namely so called delegate calls, where these address are not identical. We will come back to this in the next post.
The contract object also maintains the gas available for the execution. This field is initialized when the the execution starts and can then be reduced by calling UseGas() to consume a certain amount of gas.
Next, there is the EVM itself. The EVM refers to a state (StateDB), a transaction context and a block context. It also holds an attribute abort which can be set to abort the execution, and a field callGasTemp which is used to hold the gas value in some cases, we will see this field in action later.
Finally, there is the EVM interpreter. The interpreter is doing all the hard work of running a piece of code. For that purpose, it references a jump table which is essentially a list of opcodes together with references to corresponding Go functions that need to be run whenever this opcode is encountered. The interpreter also maintains the scope context which is a structure bundling the data that is refreshed with every execution of a smart contract – the content of the memory, the content of the stack and the contract execution, represented by a contract object.
Code execution in the yellow paper
Before we move on to understand how the code execution actually works, let us take a short look at the yellow paper, in particular sections 6, 8 and 8 describing contract execution, and try to map the data structures and functions described there to the part of the source code that we have just explored.
The central function that describes the execution of a contract code in the yellow paper is a function denoted by a capital Theta (Θ) in the yellow paper. This function has the following arguments.
the state on which the code operates
the sender of the message call or transaction
the origin of the transaction (which is always an EOA and the address which signed the transaction)
the recipient of the message call
the address at which the code to be executed is located (this is typically the same as the recipient, but might again differ in the case of delegated calls)
the gas available for the execution
the gas price
the value to be transferred as part of the message call (again, there is a subtlety for delegate calls that we postpone to the next post)
the input data of the message call
the depth of the call stack
a flag that can be used to prevent the transaction from making any changes to the state (this is required for the STATICCALL functionality)
If you compare this list with the data structures displayed above, you will find that this is essentially the combination of the EVM attributes, the transaction context, the scope context and the contract execution object. All this data is tied together in the EVM class, so it is natural to assume that the function Θ itself is realized by a method of this class – in fact, this is the Call method that we will look at in the next section.
The output of Θ is the updated state, the remaining gas, an object known as accrued substate that contains touched and destroyed accounts, the logs generated during the execution and the gas to be refunded.
The inner workings of Θ are described in section 8 of the yellow paper, First, the value to be transferred is deducted from the balance of the sender and added to the balance of the recipient. Then, the actual code is executed – this happens by calling another function denoted by Ξ (a capital greek xi) – again, there is an exception to this rule for pre-compiled contracts that we discuss in the next post. If the execution is not succesful, then the state is reset to the its previous value, if it is successful, the state returned by Ξ is used. The function Ξ is again not terribly to identify in the source code – it is the method Run() of the EVM interpreter which will be the subject of the next post.
The call method of the EVM
Let us now take a closer look at the method Call() of the EVM which implements what the yellow paper calls Θ. The source code for this method can be found here. For today, I will ignore pre-compiled contracts completely which we will discuss in the next post.
The method starts by running a few checks, like making sure that we do not exceed the call depth limit (which is defined to be 1024 at the moment) or that we do not attempt to transfer more than the available balance.
The next step is to take a snapshot of the current state. Internally, Go-Ethereum uses revisions to keep track of different versions of the state, and taking a snapshot simply amounts to remembering a revision to which we can revert later if needed.
Next, we check whether the contract address already exists. This might be a bit confusing, as it does not seem to make sense to call a contract at a non-existing address, or, more precisely, at an address not yet initialized in the state DB. Note, however, that “calling” means a bit more general “sending a message to an account”, which is also done if you simply want to transfer Ether to an account. Sending a message to a non-contract account is perfectly valid, and it might even be that this account has never been used before and is therefore not part of the cached state.
The next step is to actually perform the transfer of any Ether involved in the message call, i.e. we send value Wei from the sender to the recipient. We then get into the actual bytecode execution by performing the following steps.
get the code associated with the contract address (i.e. the runtime bytecode) from the state
if the length of the code is zero, return – there is nothing left to be done
initialize a new Contract object that represents the current execution.
initialize the contract code
call the Run method of the interpreter
We then collect the return value from the Run method and a potential error code and set gas to contract.Gas – this represents the gas still remaining after executing the code. We then determine the final return values according to the following logic.
If Run did not result in an error, return the return value, error code and remaining gas just assembled
If Run returned a special error code indicating that the execution was reverted, reset the state to the previously created snapshot
If the error code returned by Run is not a reverted execution, also fall back to the snapshot but in addition, set the remaining gas to zero, i.e. such an error will consume all the available gas
Invocations of the call method
Having understood how Call works, we are now left with two tasks. First, we need to understand how the EVM interpreters Run method works, which will be the topic of our next post. Second, we have to learn where Call is actually invoked within the Go-Ethereum source code.
Not quite surprisingly, this happens at several points (ignoring tests). First, in a previous post, I have already shown you that the EVM’s Call method is invoked whenever a transaction is processed as part of a state transition. This call happens here, and the parameters are as we would expect – the the caller is the sender of the transaction, the contract address is the recipient, and the input data, gas and value are taken from the StateTransition object. The remaining gas returned is again stored in the state transition object and used as a basis for computing the gas refunded to the sender. Note that this entry point is (via the ApplyMessage function) also used by the JSON API when the eth_call method or the eth_estimateGas method are requested.
However, this is not the only point in the code where we find a reference to the Call method. A second point is actually the EVM interpreter itself, more precisely the function opCall in instructions.go. The background of this is at in addition to a call due to a transaction, i.e. a call initiated by an EOA, we can of course also call a smart contract from another smart contract using the CALL opcode. This opcode is implemented by the opCall function, and it turns out that it uses the EVM Call method as well. In this case, the parameters are taken from the stack respectively from the memory location referenced by the stack items.
the top level item on the stack is the gas that is made available (as we will see in the next post, this is not exactly true, but almost)
the next item on the stack is the target address
the third item is the value to be transferred
the next two items determine offset and length of the input data which is taken from memory
the last two items similarly determine offset and length of the return data area in memor
It is interesting to compare the handling of the returned error code. First, it is used to determine the status code that is returned. If there was an error, the status code is set to zero, otherwise it is set to one. Then, the returned data is stored in memory in case the execution was successful or explicitly reverted, for other errors no return data is passed. Finally, the unused gas is again returned to the currently executing contract.
This has an important consequence – there is no automatic propagation of errors in the EVM! If a contract A calls a contract B, and contract B reverts (either explicitly or due another error), then the call will technically go through, and contract A does not automatically revert as well. Instead, you will have to explicitly check the status code that the CALL opcode puts on the stack and handle the case that contract B fails somehow. Not doing this will make your contract vulnerable to the “King of the Ether” problem that we have discussed in my previous post on contract security.
Finally, scanning the code will reveal that there is a third point where the Call method is invoked – the EVM utility that allows you to run a specified bytecode outside of the Go-Ethereum client from the command line. It is fun to play with this, here is an example for its usage to invoke the sayHello method of our sample contract (again, assuming that you have cloned my repository for this series and are working in the root directory of the repository). Note that in order to install the evm utility, you will have to download the full geth archive, containing all the tools, and make the evm executable available in a folder in your path.
This little experiment completes this post. In the next post, we will try to fill up the missing parts that we have not yet studied – how the code execution, i.e. the Run method, actually works, what pre-compiled contracts are and how gas is handled during the execution. We will also take a closer look at contract-to-contract calls and its variations.

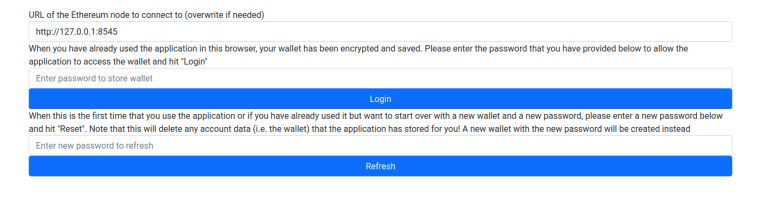

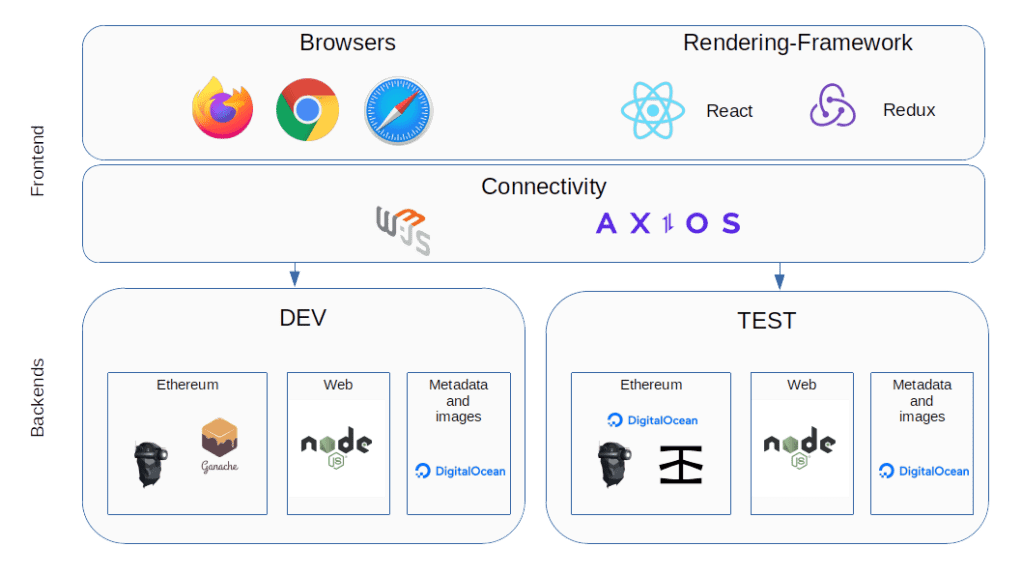
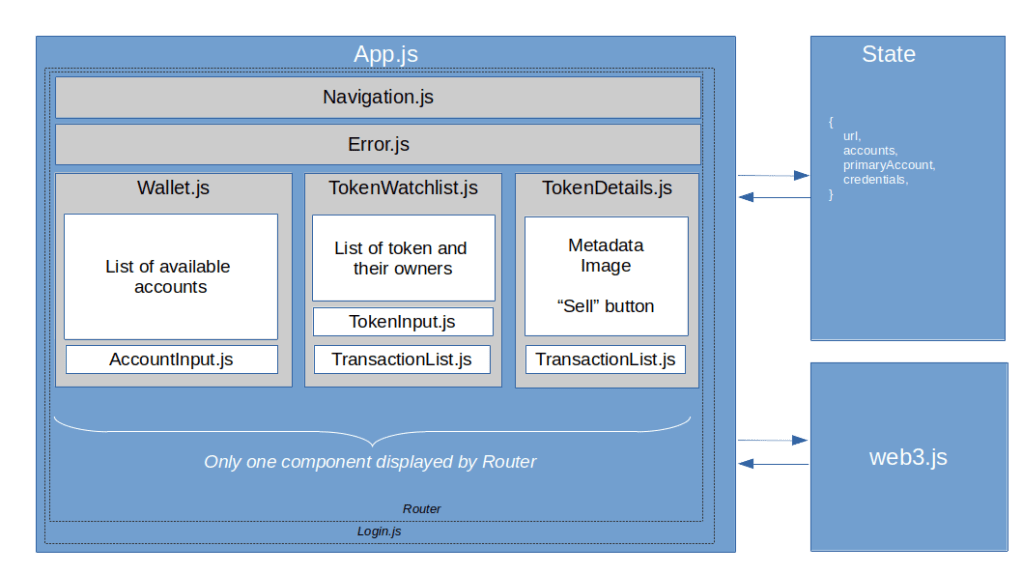
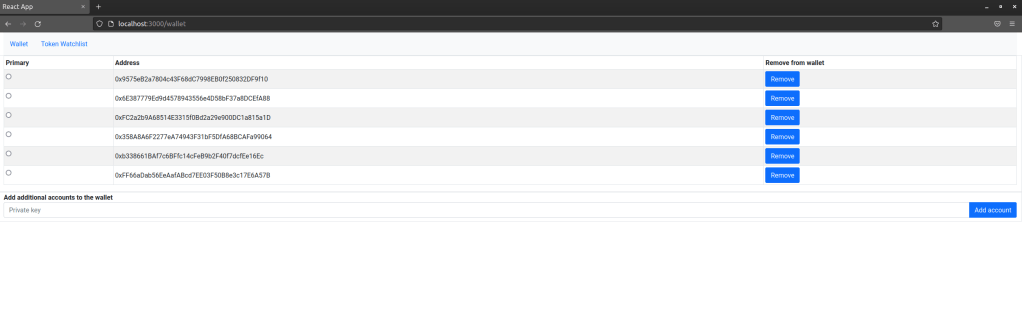
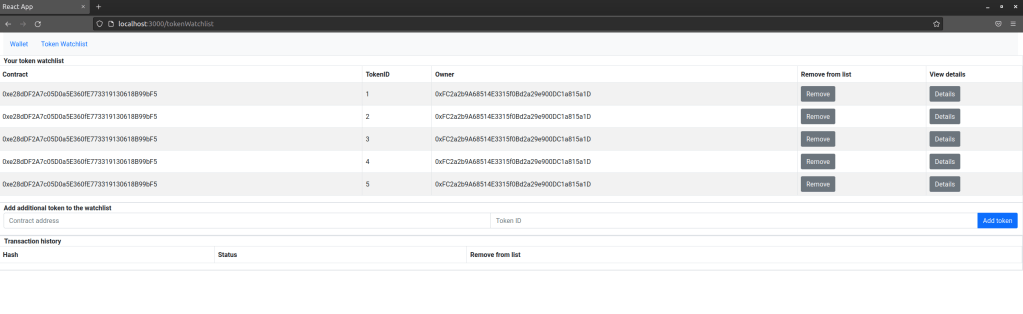
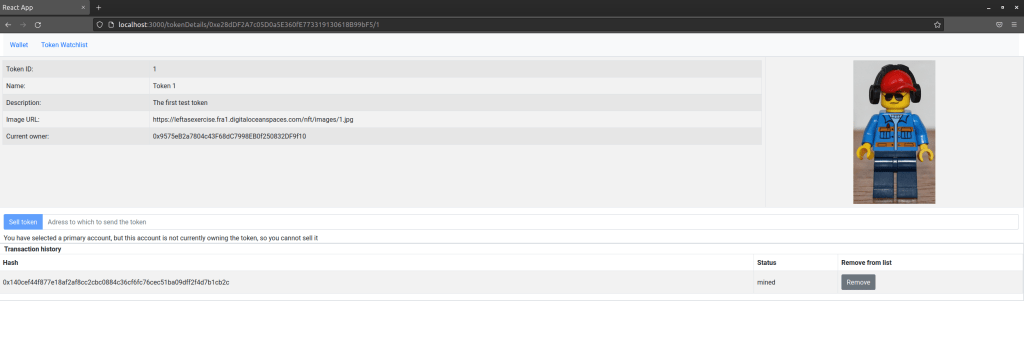


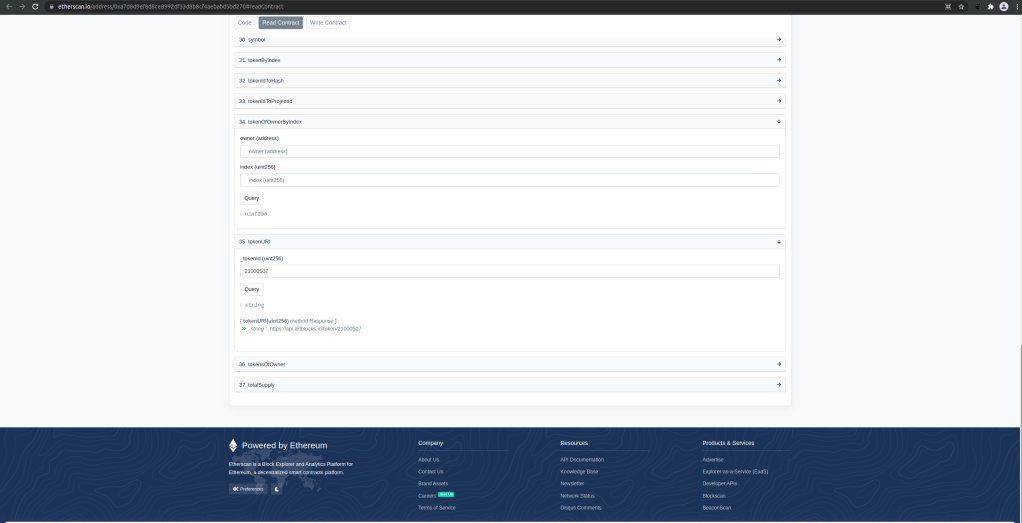


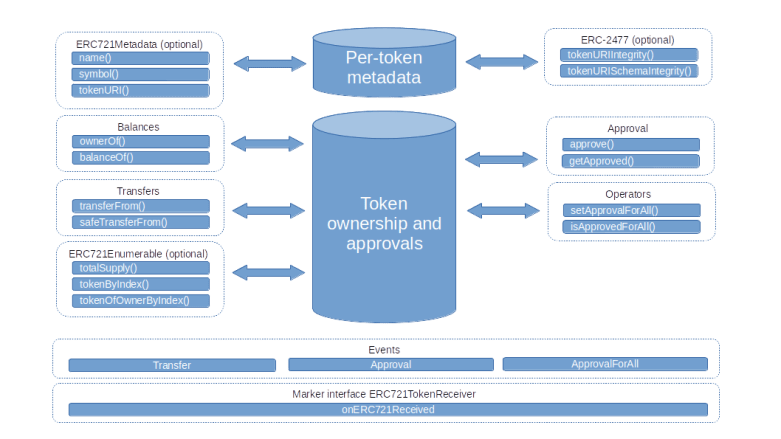


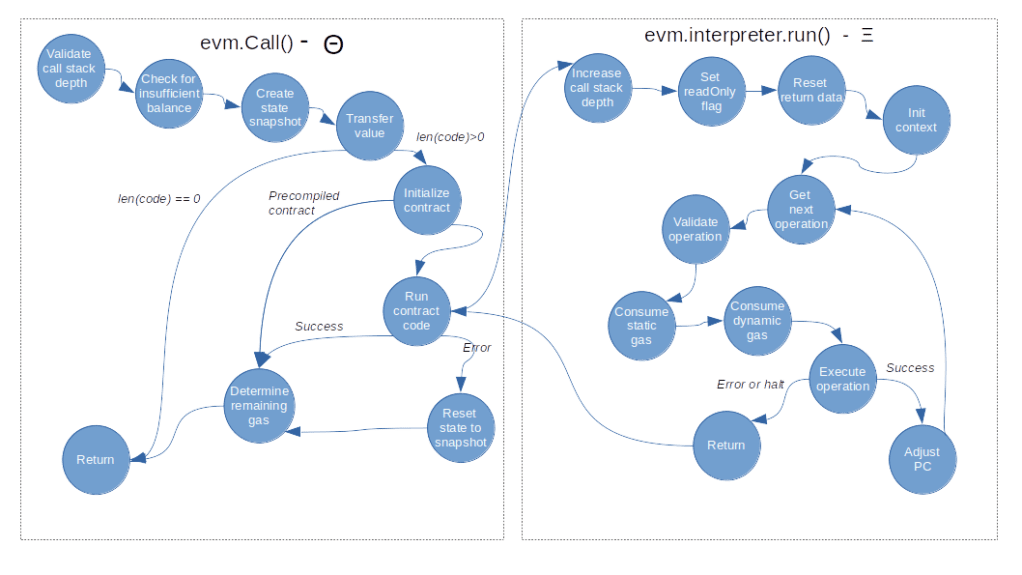
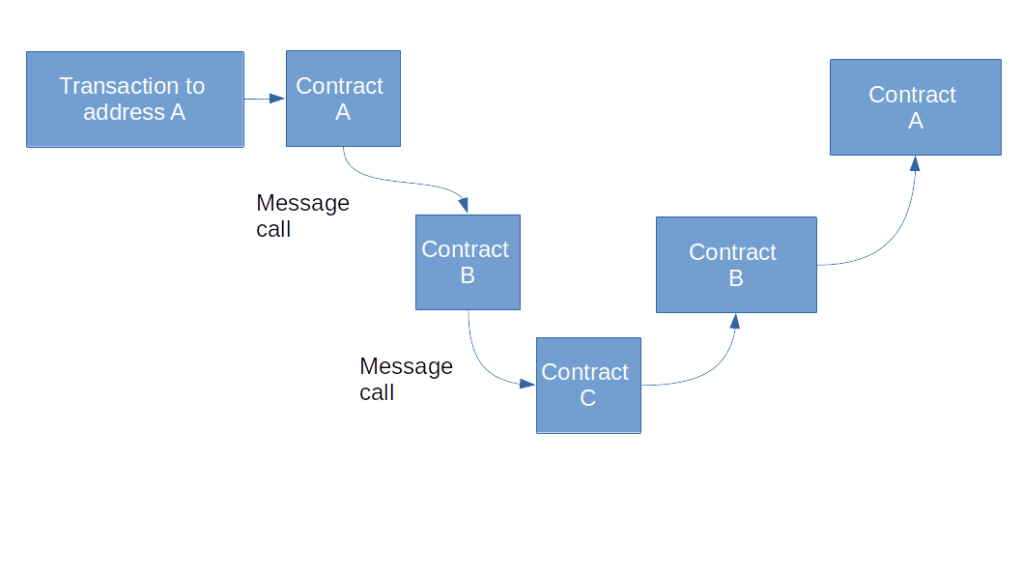
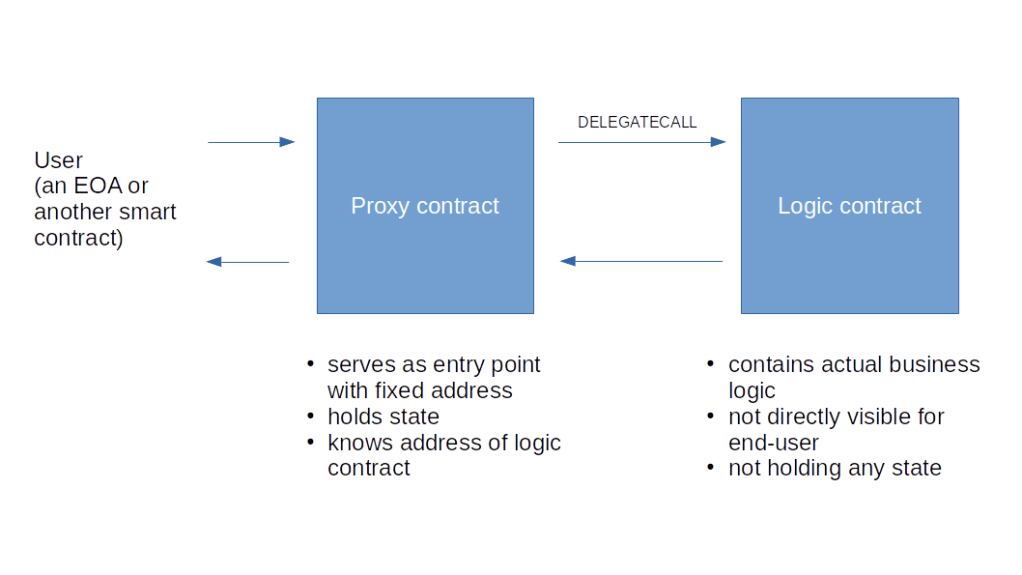
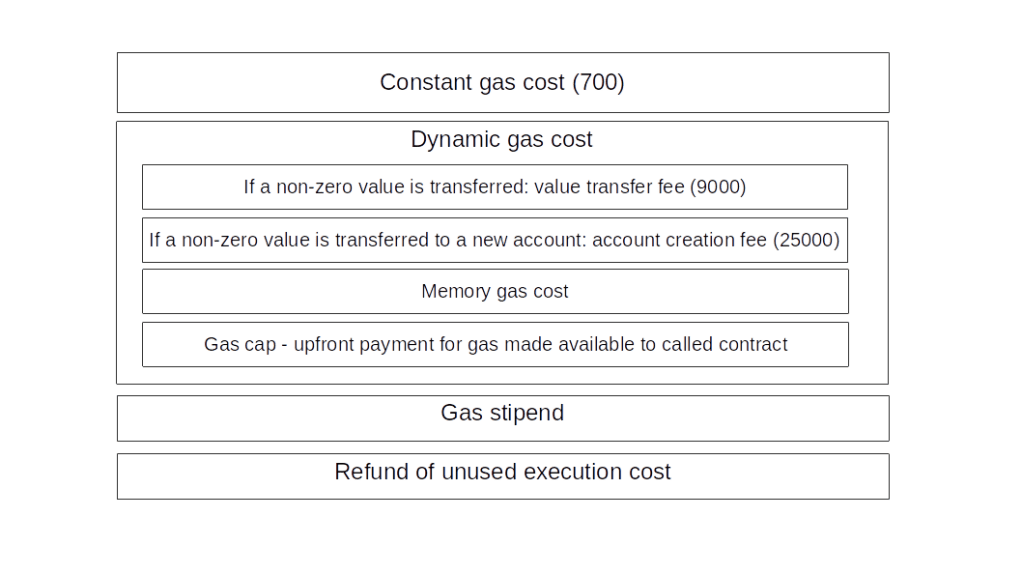

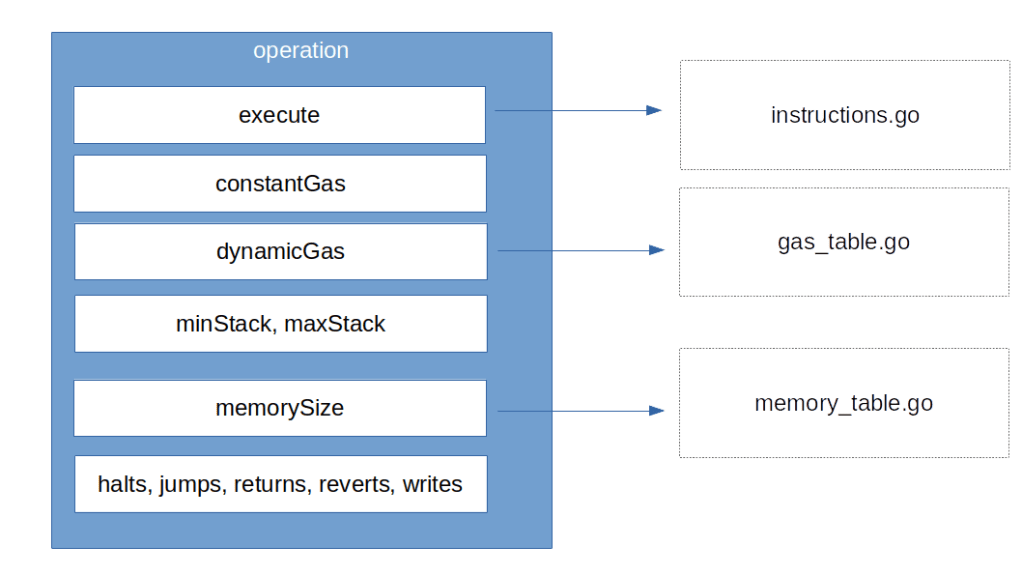
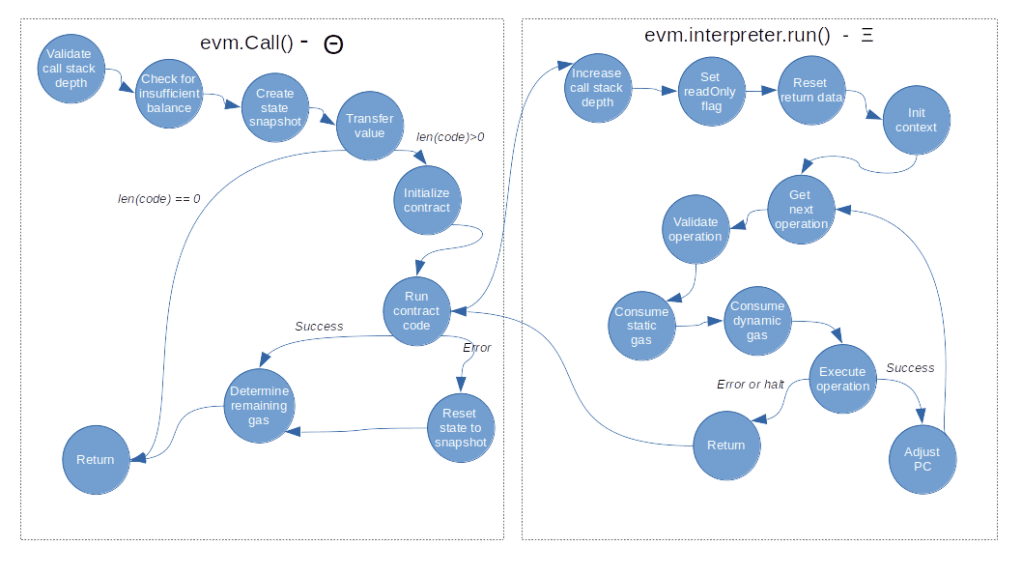
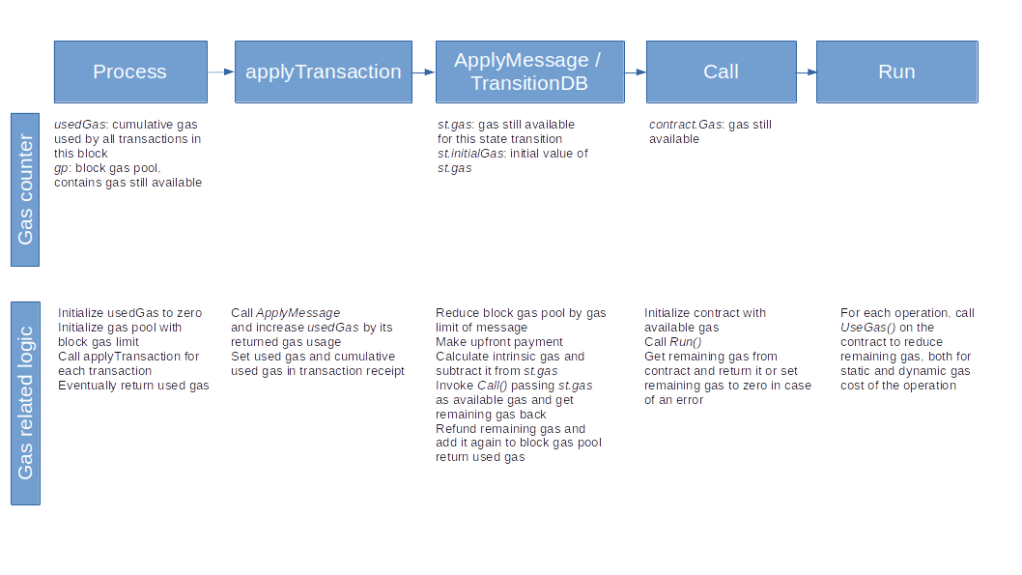


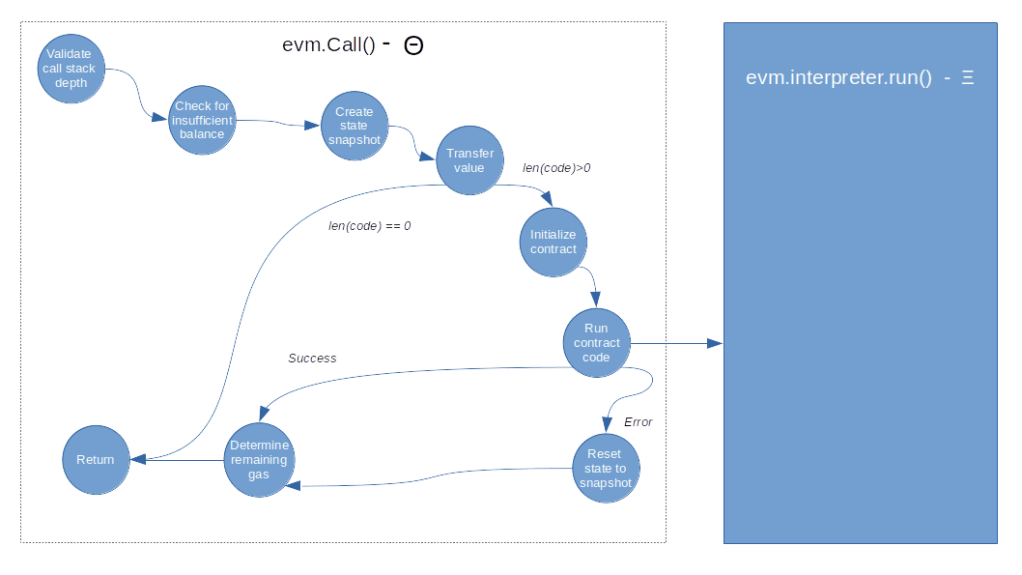
