
In a cloud environment, a virtual instance typically uses a DHCP server to receive its assigned IP address and DNS services to resolve IP addresses. In this post, we will look at how these services are realized in our OpenStack playground environment.
DHCP basics
To understand what follows, it is helpful to quickly recap the basis mechanisms behind the DHCP protocol. Historically, the DHCP protocol originated from the earlier BOOTP protocol, which was developed by Sun Microsystems (my first employer, back in the good old days, sigh…) to support diskless workstations which, at boot time, need to retrieve their network configuration, the name of a kernel image (which could subsequently be retrieved using TFTP) and an NFS share to be used for the root partition. The DHCP protocol builds on the BOOTP standard and extends BOOTP, for instance by adding the ability to deliver more configuration options than BOOTP is capable of.
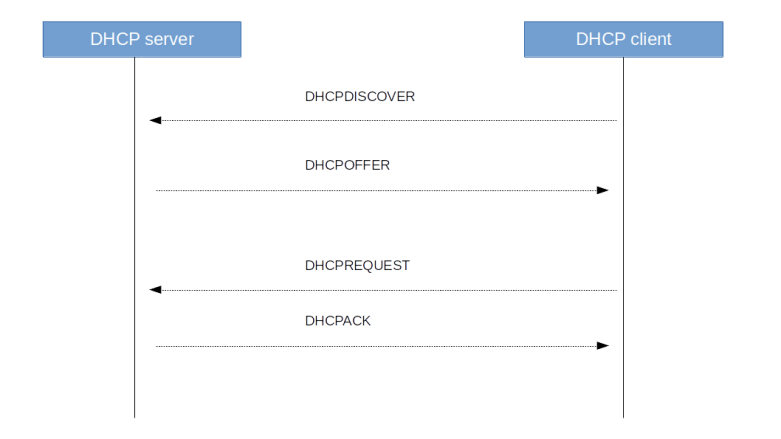
DHCP is a client-server protocol using UDP with the standardized ports 67 (server) and 68 (client). At boot time, a client sends a DHCPDISCOVER message to request configuration data. In reply, the server sends a DHCPOFFER message to the client, offering configuration data including an IP address. More than one server can answer a discovery message, and thus a client might receive more than one offer. The DCHCP client then sends a DHCPREQUEST to all servers, containing the ID of an offer that the client wishes to accept. The server from which that offer originates then replies with a DHCPACK to complete the handshake, all other servers simply record the fact that the IP address that they have offered is again available. Finally, a DHCP client can release an IP address again sending the DHCPRELEASE message.
There are a few additional message types like DHCPINFORM which a client can use to only request configuration parameters if it already has an IP address, or a DHCPDECLINE message that a client sends to a server if it determines (using ARP) that a message offered by the server is already in use, but these message types do usually not take part in a standard bootstrap sequence which is summarized in the diagram below.
We have said that DHCP is using UDP which again is sitting on top of the IP protocol. This raises an interesting chicken-egg problem – how can a client use DHCP to talk to a server if is does not yet have an IP address?
The answer is of course to use broadcasts. Initially, a client sends a DHCP request to the IP broadcast address 255.255.255.255 and the Ethernet broadcast address ff:ff:ff:ff:ff:ff. The IP source address of this request is 0.0.0.0.
Then, the server responds with a DHCPOFFER directed towards the MAC address of the client and using the offered IP address as IP target address. The DHCPREQUEST is again a broadcast (this is required as it needs to go to all DHCP servers on the subnet), and the acknowledge message is again a unicast packet.
This process assumes that the client is able to receive an IP message directed to an IP address which is not (yet) the IP address of one of its interfaces. As most Unix-like operating systems (including Linux) do not allow this, DHCP clients typically use a raw socket to receive all incoming IP traffic (see for instance the relevant code of the udhcp client which is part of BusyBox which uses a so-called packet socket initially and only switches to an ordinary socket once the interface is fully configured). Alternatively, there is a flag that a client can set to indicate that it cannot deal with unicast packets before the interface is fully configured, in which case the server will also use broadcasting for its reply messages.
Note that, as specified in RFC 922, a router will not forward IP broadcasts directed to the broadcast address 255.255.255.255. Therefore, without further precautions, a DHCP exchange cannot pass a router, which implies that a DHCP server must be present on every subnet. It is, however, possible to run a so-called DHCP relay which forwards DHCP requests to a DHCP server in a different network. Neutron will, by default, start a DHCP server for each individual virtual network (unless DHCP is disabled for all subnets in the network).
One of the reasons why the DHCP protocol is more powerful than the older BOOTP protocol is that the DHCP protocol is designed to provide a basically unlimited number of configuration items to a client using so-called DHCP options. The allowed options are defined in various RFCs (see this page for an overview maintained by the IANA organisation). A few notable options which are relevant for us are
- Option 1: subnet mask, used to inform the client about the subnet in which the provided IP address is valid
- Option 3: list of routers, where the first router is typically used as gateway by the client
- Option 6: DNS server to use
- Option 28: broadcast address for the clients subnet
- Option 121: classless static routes (replaces the older option 33) that are transmitted from the server to the client and supposed to be added to the routing table by the client
DHCP implementation in OpenStack
After this general introduction, let us now try to understand how all this is implemented in OpenStack. To be able to play around and observe the system behavior, let us bring up the configuration of Lab 10 once more.
git clone https://github.com/christianb93/openstack-labs
cd openstack-labs/Lab10
vagrant up
ansible-playbook -i hosts.ini site.yaml
ansible-playbook -i hosts.ini demo.yaml
This will install OpenStack with a separate network node, create two networks and bring up instances on each of these networks.
Now, for each virtual network, Neutron will create a network namespace on the network node (or, more precisely, on the node on which the DHCP agent is running) and spawn a separate DHCP server process in each of these namespaces. To verify this, run
sudo ip netns list
on the network node. You should see three namespaces, two of them starting with “qdhcp-“, followed by the ID of one of the two networks that we have created. Let us focus our investigation on the flat network, and figure out which processes this namespace contains. The following sequence of commands will determine the network ID, derive the name of the namespace and list all processes running in this namespace.
source demo-openrc
network_id=$(openstack network show \
    flat-network \
    -f yaml | egrep "^id: " | awk '{ print $2}')
ns_id="qdhcp-$network_id"
pids=$(sudo ip netns pid $ns_id)
for pid in $pids; do
  ps --no-headers -f --pid $pid
done
We see that there are two processes running inside the namespace – an instance of the lightweight DHCP server and DNS forwarder dnsmasq and a HA proxy process (which handles metadata requests, more on this in a separate post). It is interesting to look at the full command line which has been used to start the dnsmasq process. Among the long list of options, you will find two options that are especially relevant.
First, the process is started using the --no-hosts flag. Usually, dnsmasq will read the content of the local /etc/hosts file and return the name resolutions defined there. Here, this is disabled, as otherwise an instance could retrieve the IP addresses of the OpenStack nodes. The process is also started with –no-resolv to skip reading of the local resolver configuration on the network node.
Second, the dnsmasq instance is started with the --dhcp-host-file option, which, in combination with the static keyword in the --dhcp-range option, restricts the address allocations that the DHCP server will hand out to those defined in the provided file. This file is maintained by the DHCP agent process. Thus the DHCP server will not actually perform address allocations, but is only a way to communicate the address allocations that Neutron has already prepared to a client.
To better understand how this actually works, let us go through the process of starting a virtual machine and allocating an IP address in a bit more detail. Here is a summary of what happens.
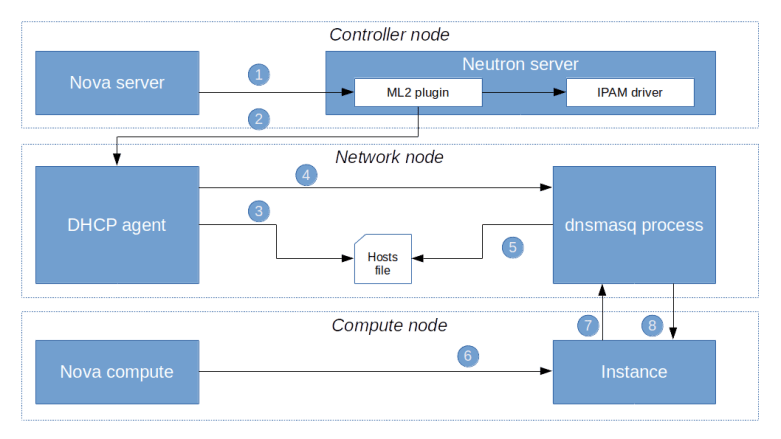
First, when a user requests the creation of a virtual machine, Nova will ask Neutron to create a port (1). This request will eventually hit the create_port method of the ML2 plugin. The plugin will then create the port as a database object and, in the course of doing this, reach out to the configured IPAM driver to obtain an IP address for this port.
Once the port has been created, an RPC message is sent to the DHCP agent (2). The agent will then invoke the responsible DHCP driver (which in our case is the Linux DHCP driver) to re-build the hosts file and send a SIGHUP signal to the actual dnsmasq process in order to reload the changed file (5)
At some later point in the provisioning process, the Nova compute agent will create the VM (6) which will start its boot process. As part of the boot process, a DHCP discover broadcast will be sent out to the network (7). The dnsmasq process will pick up this request, consult the hosts file, read the pre-determined IP address and send a corresponding DHCP offer to the VM. The VM will usually accept this offer and configure its network interface accordingly.
Network setup
We have now understood how the DHCP server handles address allocations. Let us now try to figure out how the DHCP server is attached to the virtual network which it server.
To examine the setup, log into the network node again and repeat the above commands to again populate the environment variable ns_id with the ID of the namespace in which the DHCP server is running. Then, run the following commands to gather information on the network setup within the namespace.
sudo ip netns exec $ns_id ip link show
We see that apart from the loopback device, the DHCP namespace has one device with a name composed of the fixed part tap followed by a unique identifier (the first few characters of the ID of the corresponding port). When you run sudo ovs-vsctl show on the network node, you will see that this device (which is actually an OVS created device) is attached to the integration bridge br-int as an access port. When you dump the OpenFlow rules on the integration bridge and the physical bridge, you will see that for packets with this VLAN ID, the VLAN tag is stripped off at the physical bridge and the packet eventually reaches the external bridge br-ext, confirming that the DHCP agent is actually connected to the flat network that we have created (based on our VXLAN network that we have built outside of OpenStack).

Also note that in our case, the interface used by the DHCP server has actually two IP addresses assigned, one being the second IP address on the subnet (172.16.0.2), and the second one being the address of the metadata server (which might seem a bit strange, but again this will be the topic of the next post).
If you want to see the DHCP protocol in action, you can install dhcpdump on the network node, attach to the network namespace and run a dump on the interface while bringing up an instance on the network. Here is a sequence of commands that will start a dump.
source admin-openrc
sudo apt-get install dhcpdump
port_id=$(openstack port list \
  --device-owner network:dhcp \
  --network flat-network \
  -f value | awk '{ print $1}')
interface="tap$port_id"
interface=${interface:0:14}
source demo-openrc
network_id=$(openstack network show \
    flat-network \
    -f yaml | egrep "^id: " | awk '{ print $2}')
ns_id="qdhcp-$network_id"
sudo ip netns exec $ns_id dhcpdump -i $interface
In a separate window (either on the network node or any other node), enter the following commands to bring up an additional instance
source demo-openrc
openstack server create \
  --flavor m1.nano \
  --network flat-network \
  --key demo-key \
  --image cirros demo-instance-4
You should now see the sequence of DHCP messages displayed in the diagram above, starting with the DHCPDISCOVER sent by the newly created machine and completed by the DHCPACK.
Configuration of the DHCP agent
Let us now go through some of the configuration options that we have for the DHCP agent in the file /etc/neutron/dhcp_agent.ini. First, there is the interface_driver which we have set to openvswitch. This is the driver that the DHCP agent will use to set up and wire up the interface in the DHCP server namespace. Then, there is the dhcp_driver which points to the driver class used by the DHCP agent to control the DHCP server process (dnsmasq).
Let us also discuss a few options which are relevant for the name resolution process. Recall that dnsmasq is not only a DHCP server, but can also act as DNS forwarder, and these settings control this functionality.
- We have seen above that the dnsmasq process is started with the –no-resolv option in order to skip the evaluation of the /etc/resolv.conf file on the network node. If we set the configuration option dnsmasq_local_resolv to true, then dnsmasq will read this configuration and effectively be able to use the DNS configuration of the network node to provide DNS services to instances.
- A similar settting is dnsmasq_dns_servers. This configuration item can be used to provide a list of DNS servers to which dnsmasq will forward name resolution requests
DNS configuration options for OpenStack
The configuration items above give us a few options that we have to control the DNS resolution offered to the instances.
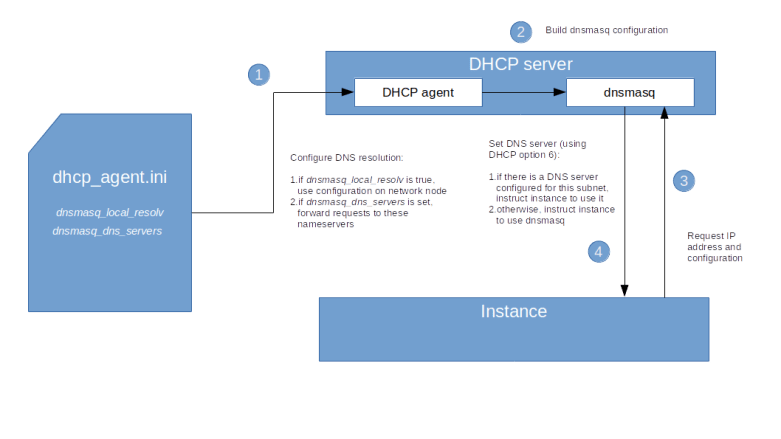
First, we can set dnsmasq_local_resolv to true. When you do this and restart the DHCP agent, all dnsmasq processes will be restarted without the –no-resolv option. The DHCP server will then instruct instances to use its own IP address as the address of a DNS server, and will leverage the resolver configuration on the network node to forward requests. Note, however, that this will only work if the nameserver in /etc/resolv.conf on the network node is set to a server which can be reached from within the DHCP namespace, which will typically not be the case (on a typical Ubuntu system, name resolution is done using systemd-resolved which will listen on a loopback interface on the network node which cannot be reached from within that namespace).
The second option that we have is to put one or more DNS servers which are reachable from the virtual network into the configuration item dnsmasq_dns_servers. This will instruct the DHCP agent to start the dnsmasq processes with the –server flag, thus specifying a name server to which dnsmasq is supposed to forward requests. Assuming that this server is reachable from the network namespace in which dnsmasq is running (i.e. from the virtual network to which the DHCP server is attached), this will provide name resolution services using this nameserver for all instances on this network.
As the configuration file of the DHCP agent is applied for all networks, using this option implies that all instances will be using this DNS server, regardless of the network to which they are attached. In more complex settings, this is sometimes not possible. For these situations, Neutron offers a third option to configure DNS resolution – defining a DNS server per subnet. In fact, a list of DNS servers is an attribute of each subnet. To set the DNS server 8.8.8.8 for our flat subnet, use
source admin-openrc
openstack subnet set \
  --dns-nameserver 8.8.8.8 flat-subnet
source demo-openrc
When you now restart the DHCP agent, you will see that the DHCP agent has added a line to the options file for the dnsmasq process which sets the DNS server for this specific subnet to 8.8.8.8.
Note that this third option works differently from the first two options in that it really sets the DNS server in the instances. In fact, this option does not govern the resolution process when using dnsmasq as a nameserver, but determines the nameserver that will be provided to the instances at boot time via DHCP, so that the instances will directly contact this nameserver. Our first two configuration did work differently, as in both options, the nameserver known to the instance will be the DHCP server, and the DHCP server will then forward the request to the configured name server. The diagram below summarizes this mechanism.
Of course you can combine these settings – use dnsmasq_dns_servers to enable the dnsmasq process to serve and forward DNS requests, and, if needed, override this using a subnet specific DNS server for individual subnets.
This completes our investigation of DHCP and DNS handling on OpenStack. In the next post, we will turn to a topic that we have already touched upon several times – instance metadata.
