
For me, choosing the featured image for a post is often the hardest part of writing it, but today, the choice was clear and I could not resist. But back to business – today we will learn how Brownie can be used to compile smart contracts, deploy them to a test chain, interact with the contract and test it.
Installing Brownie
As Brownie comes as a Python3 package (eth-brownie), installing it is rather straightforward. The only dependency that you have to observe which is not handled by the packet manager is that to Ganache, which Brownie uses as built-in node. On Ubuntu 20.04, for instance, you would run
sudo apt-get update
sudo apt-get install python3-pip python3-dev npm
pip3 install eth-brownie
sudo npm install -g ganache-cli@6.12.1
Note that by default, Brownie will install itself in .local/bin in your home directory, so you will probably want to add this to your path.
export PATH=$PATH:$HOME/.local/bin
Setting up a Brownie project
To work correctly, Brownie expects to be executed at the root node of a directory tree that has a certain standard layout. To start from scratch, you can use the command brownie init to create such a tree (do not do this yet but read on) . Brownie will create the following directories.
- contracts – this is where Brownie expects you to store all your smart contracts as Solidity source files
- build – Brownie uses this directory to store the results of a compile
- interfaces – this is similar to contracts, place any interface files that you want to use here (it will become clearer a bit later what an interface is)
- reports – this directory is used by Brownie to store reports, for instance code coverage reports
- scripts – used to store Python scripts, for instance for deployments
- tests – this is where all the unit tests should go
As some of the items that Brownie maintains should not end up in my GitHub repository, I typically create a subdirectory in the repository that I add to the gitignore file, set up a project inside this subdirectory and then create symlinks to the contracts and tests that I actually want to use. If you want to follow this strategy, use the following commands to clone the repository for this series and set up the Brownie project.
git clone https://github.com/christianb93/nft-bootcamp
cd nft-bootcamp
mkdir tmp
cd tmp
brownie init
cd contracts
ln -s ../../contracts/* .
cd ../tests
ln -s ../../tests/* .
cd ..
Note that all further commands should be executed from the tmp directory, which is now the project root directory from Brownies point of view.
Compiling and deploying a contract
As our first step, let us try to compile our counter. Brownie will happily compile all contracts that are stored in the project when you run
brownie compile
The first time when you execute this command, you will find that Brownie actually downloads a copy of the Solidity compiler that it then invokes behind the scenes. By default, Brownie will not recompile contracts that have not changed, but you can force a recompile via the --all flag.
Once the compile has been done, let us enter the Brownie console. This is actually the tool which you mostly use to interact with Brownie. Essentially, the console is an interactive Python console with the additional functionality of Brownie built into it.
brownie console
The first thing that Brownie will do when you start the console is to look for a running Ethereum client on your machine. Brownie expects this client to sit at port 8545 on localhost (we will learn later how this can be changed). If no such client is found, it will automatically start Ganache and, once the client is up and running, you will see a prompt. Let us now deploy our contract. At the prompt, simply enter
counter = Counter.deploy({"from": accounts[0]});
There is a couple of comments that are in order. First, to make a deployment, we need to provide an account by which the deployment transaction that Brownie will create will be signed. As we will see in the next section, Ganache provides a set of standard accounts that we can uses for that purpose. Brownie stores those in the accounts array, and we simply select the first one.
Second, the Counter object that we reference here is an object that Brownie creates on the fly. In fact, Brownie will create such an object for every contract that it finds in the project directory, using the same name as that of the contract. This is a container and does not yet reference a deployed contract, but if offers a method to deploy a contract, and this method returns another object which is now instantiated and points to the newly deployed contract. Brownie will also add methods to a contract that correspond to the methods of the smart contract that it represents, so that we can simply invoke these methods to talk to the contract. In our case, running
dir(counter)
will show you that the newly created object has methods read and increment, corresponding to those of our contract. So to get the counter value, increment it by one and get the new value, we could simply do something like
# This should return zero
counter.read()
txn = counter.increment()
# This should now return one
counter.read()
Note that by default, Brownie uses the account that deployed the contract as the “from ” account of the resulting transaction. This – and other attributes of the transaction – can be modified by including a dictionary with the transaction attributes to be used as last parameter to the method, i.e. increment in our case.
It is also instructive to look at the transaction object that the second statement has created. To read the logs, for instance, you can use
txn.logs
This will again show you the typical fields of a log entry – the address, the data and the topics. To read the interpreted version of the logs, i.e. the events, use
txn.events
The transaction (which is actually the transaction receipt) has many more interesting fields, like the gas limit, the gas used, the gas price, the block number and even a full trace of the execution on the level of single instructions (which seems to be what Geth calls a basic trace). To get a nicely formatted and comprehensive overview over some of these fields, run
txn.info()
Accounts in Brownie
Accounts can be very confusing when working with Ethereum clients, and this is a good point in time to shed some light on this. Obviously, when you want to submit a transaction, you will have to get access to the private key of the sender at some point to be able to sign it. There are essentially three different approaches how this can be done. How exactly these approaches are called is not standardized, here is the terminoloy that I prefer to use.
First, an account can be node-managed. This simply means that the node (i.e. the Ethereum client running on the node) maintains a secret store somewhere, typically on disk, and stores the private keys in this secret store. Obviously, clients will usually encrypt the private key and use a password or passphrase for that purpose. How exactly this is done is not formally standardized, but both Geth and Ganache implement an additional API with the personal namespace (see here for the documentation), and also OpenEthereum offers such an API, albeit with slightly different methods. Using this API, a user can
- create a new account which will then be added to the key store by the client
- get a list of managed accounts
- sign a transaction with a given account
- import an account, for instance by specifying its private key
- lock an account, which stops the client from using it
- unlock an account, which allows the client to use it again for a certain period of time
When you submit a transaction to a client using the eth_sendTransaction API method, the client will scan the key store to see whether is has the private key for the requested sender on file. If yes, it is able to sign the transaction and submit it (see for instance the source code here).
Be very careful when using this mechanism. Even though this is great for development and testing environments, it implies that while the account is unlocked, everybody with access to the API can submit transactions on your behalf! In fact, there are systematic scans going on (see for instance this article) to detect unlocked accounts and exploit them, so do not say I have not warned you….
In Brownie, we can inspect the list of node-managed accounts (i.e. accounts managed by Ganache in our case) using either the accounts array or the corresponding API call.
web3.eth.get_accounts()
accounts
You will see the same list of ten accounts using both methods, with the difference that the accounts array contains objects that Brownie has built for you, while the first method only returns an array of strings.
Let us now turn to the second method – application-managed accounts. Here, the application that you use to access the blockchain (a program, a frontend or a tool like Brownie) is in charge of managing the accounts. It can do so by storing the accounts locally, protected again by some password, or in memory. When an application wants to send a transaction, it now has to sign the transaction using the private key, and would then use the eth_sendRawTransaction method to submit the signed transaction to the network.
Brownie supports this method as well. To illustrate this, enter the following sequence of commands in the Brownie console to create two new accounts, transfer 1000 Ether from one of the test accounts to the first of the newly created accounts and then prepare and sign a transaction that is transferring some Ether to the second account.
# Will spit out a mnemonic
me = accounts.add()
alice = accounts.add()
# Give me some Ether
accounts[0].transfer(to=me.address, amount=1000);
txn = {
  "from": me.address,
  "to": alice.address,
  "value": 10,
  "gas": 21000,
  "gasPrice": 0,
  "nonce": me.nonce
}
txn_signed = web3.eth.account.signTransaction(txn, me.private_key)
web3.eth.send_raw_transaction(txn_signed.rawTransaction)
alice.balance()
When you now run the accounts command again, you will find two new entries representing the two accounts that we have added. However, these entries are now of type LocalAccount, and web3.eth.get_accounts() will show that they have not been added to the node, but are managed by Brownie.
Note that Brownie will not store the accounts on disk if not being told to do so, but you can do this. By default, Brownie keeps each local account in a separate file. To save your account, enter
me.save("myAccount")
which will prompt you for a password and then store the account in a file called myAccount. When you now exit Brownie and start it again, you can load the account by running
me = accounts.load("myAccount")
You will then be prompted once more for the password, and assuming that you supply the correct password, the account will again be available.
More or less the same code would apply if you had chosen to go for the third method – user-managed accounts. In this approach, the private key is never stored by the application. The user is responsible for managing accounts, and only if a transaction is to be made, the private key is presented to the application, using a parameter or an input field. The application will never store the account or the private key (of course, it will have to reside in memory for some time), and the user has to enter the private key for every single transaction. We will see an example for this when we deploy a contract using Python and web3 in a later post.
Writing and running unit tests
Before closing this post, let us take a look at another nice feature of Brownie – unit testing. Brownie expects test to be located in the corresponding subdirectory and to start with the prefix “test_”. Within the file, Brownie will then look for functions prefixed with “test_” as well and run them as unit tests, using pytest.
Let us look at an example. In my repository, you will find a file test_Counter.py (which should already be symlinked into the tests directory of the Brownie project tree if you have followed the instructions above to initialize the directory tree). If you have ever used pytest before, this file contains a few things that will look familiar to you – there are test methods, and there some fixtures. Let us focus on those parts which are specific to the usage in combination with Brownie. First, there is the line
from brownie import Counter, accounts, exceptions;
This imports a few objects and makes them available, similar to the Brownie console. The most important one is the Counter object itself, which will allow us to deploy instances of the counter and test them. Next, we need access to a deployed version of the contract. This is handled by a fixture which uses the Counter object that we have just imported.
@pytest.fixture
def counter():
    return accounts[0].deploy(Counter);
Here, we use the deploy method of an Account in Brownie to deploy, which is an alternative way to specify the account from which the deployment will be done. We can now use this counter object as if we would be working in the console, i.e. we can invoke its methods to communicate with the underlying smart contract and check whether they behave as expected. We also have access to other features of Brownie, we can, for instance, inspect the transaction receipt that is returned by a method invocation that results in a transaction, and use it to get and verify events and logs.
Once you have written your unit tests, you want to run them. Again, this is easy – leave the console using Ctrl-D, make sure you are still in the root directory of the project tree (i.e. the tmp directory) and run
brownie test tests/test_Counter.py
As you will see, this brings up a local Ganache server and executes your tests using pytest, with the usual pytest output. But you can generate much more information – run
brownie test tests/test_Counter.py --coverage --gas
to receive the output below.
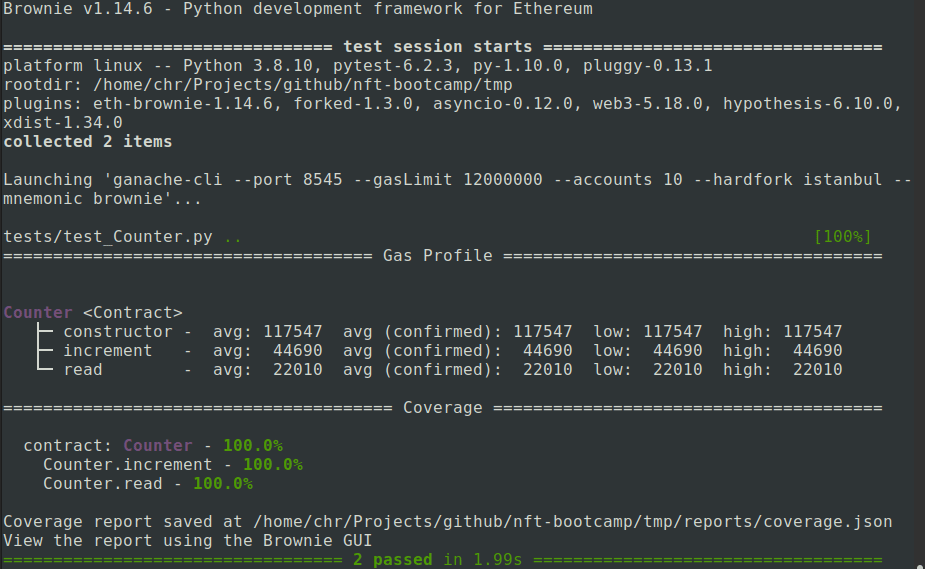
In addition to the test results, you see a gas report, detailing the gas usage of every invoked method, and a coverage report. To get more details on the code, you can use the Brownie GUI as described here. Note, however, that this requires the tkinter package to be installed (on Ubuntu, you will have to use sudo apt-get install python3-tk).
You can also simply run brownie test to execute all tests, but the repository does already contain tests for future blog entries, so this might be a bit confusing (but should hopefully work).
This completes our short introduction. You should now be able to deploy smart contracts and to interact with them. In the next post, we will do the same thing using plain Python and the web3 framework, which will also prepare us for the usage of the web3.js framework that we will need when building our frontend.

5 Comments