
Today, we will actually write our first smart contract, compile and deploy it and discuss some of the features of the Solidity programming language. To be able to start without any installation, we will use the Remix IDE, which is a fully browser-based development environment for Ethereum smart contracts.
Getting started with the Remix IDE
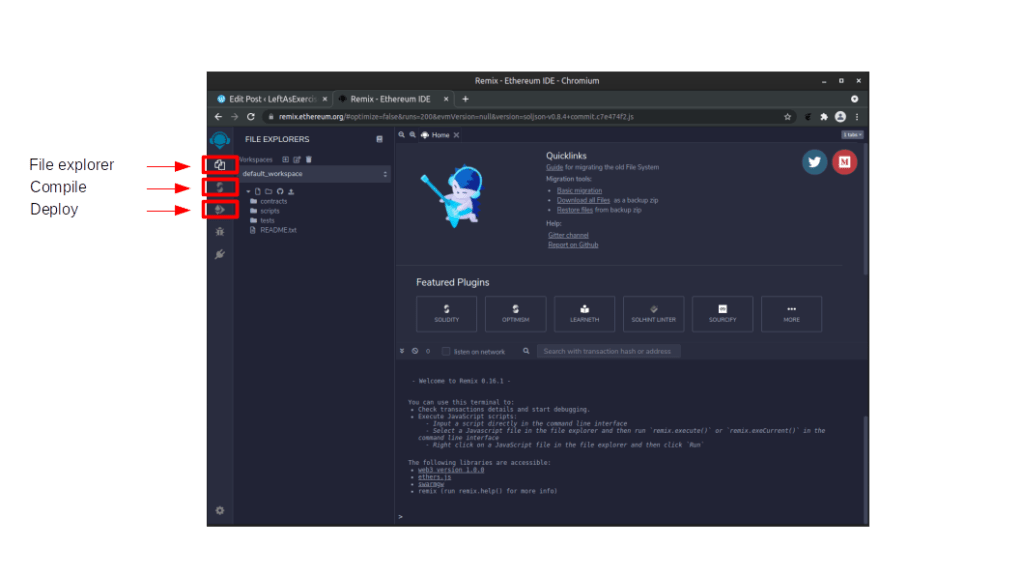
Without further ado, let us go ahead and work on our first contract. Open your browser and point it to http://remix.ethereum.org. The initial load might take a few seconds, but once the load is complete, you should see a screen with the layout of a typical IDE. On the left hand side of the screen, there is navigation bar, with the items (from top to the bottom)
- Home
- Explorer
- Compile
- Deploy
- Debug
Between that screen and the main screen, there is – initially, as we start in the explorer view – a directory tree. Remix will pre-populate this tree with some sample contracts and save them in your browser storage, so if you add, change or remove a file, close the browser and reopen it, your changes will still be visible. It is also possible to synchronize with a GitHub account or with the local machine. Finally, the bottom area of the screen is the terminal that provides some additional output and also allows you to interact directly with Remix using the JS API.
Initially, the contracts directory already contains three smart contracts, called 1_Storage.sol, 2_Owner.sol and 3_Ballot.sol. Delete all those files, and create a new file Counter.sol with the same content as this contract in my GitHub repository. Open the contract in the explorer.
Next, click on the “Compile” icon on the navigation bar (you will have to select the contract in the explorer first). Hit the button “Compile Counter.sol”. After some seconds, the compile should complete. Next, select the “Deploy” icon in the navigation bar. Stick to the standard selection of the environment (this is the built-in virtual machine that is running in your browser) and click “Deploy”. When the deployment succeeds, you should see an entry in the section “Deployed contracts”.
Expanding this entry should reveal two buttons called “increment” and “read”. These buttons allow you to invoke the methods of the contract that we have defined. First, click on “read” once to get the current value of the contract, which should be zero. Then, hit “increment” once and click “read” again.
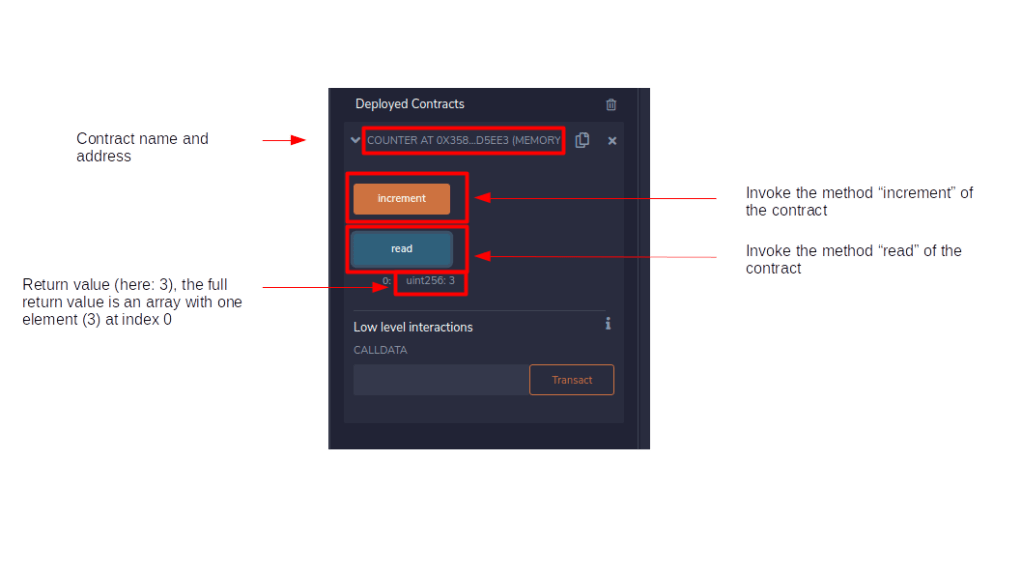
If everything worked, reading after incrementiing should show that the value has increased by one. In the screenshot above, I have hit “increment” three times, so the return value of the read method is three (this is a bit confusing – the zero in front of the variable type is the index of the return value, in our case this is the first return value). Congratulations, we have just tested our first smart contract!
Structure of a smart contract
This is fun, but let us now go back and try to understand what we have actually done. For that purpose, let us go once through the source code. This is not meant to be a systematic introduction to Solidity, and you might want to consult the actually quite readable documentation in parallel, but should give you a first idea of how a contract looks like (we will in fact need and study a few more advanced features of the language as we progress). The first two lines are actually not executed, but more or less metadata.
// SPDX-License-Identifier: GPL-3.0

pragma solidity >=0.8.0 <0.9.0;
The first line is a comment. By convention, a Solidity contract contains a license identifier, I have chosen the GPL license for this example. The second line is a pragma. Like in C or C++, a pragma is an additional instruction for the compiler. In this case, we restrict the Solidity version to somewhere between 0.8 and 0.9 (there is a reason why I have chosen 0.8 as minimum version – this is the version of Solidity which introduced overflow checks, and our counter can of course overflow – at least theoretically, as you will probably not find the time to hit the increment button 2256 times…), and the compile will fail if its own version does not match.
The next block declares our actual contract. In Solidity, a contract is a bit similar to a class in other object-oriented languages. We give our contract a name (Counter) and, inside the curly braces, define its events, methods and attributes.
contract Counter {

    event Increment (
        address indexed sender,
        uint256 oldValue,
        uint256 newValue
    );

    uint256 private counter;

    function increment() public {
        emit Increment(msg.sender,counter,counter + 1);
        counter++;
    }

    function read() public view returns (uint256) {
        return counter;
    }

}
Let us ignore the event that we define for a second, we will discuss this in the next section. After the event declaration, we first declare an attribute counter. This will be a 256-bit integer, which is the native datatype of Solidity, i.e. a 32 byte number. We also declare the attribute as private, i.e. not visible for other contracts, but of course it is not really private – after all, everybody with access to a blockchain explorer can inspect the storage and look at its value.
Speaking of storage, Solidity distinguishes different types of storage. For some data types, like integers, there is a default storage type, for some other data types, you will have to add the storage type explicitly as an additional qualifier called the data location. The three storage types are
- Memory – this is linear storage that is cleaned up and reinitialized with every new transaction. Thus you can use memory inside an invocation of your contract, but as soon as the invocation finishes, the data is lost
- Storage – this instructs Solidity to place the variable in the storage part of the blockchain state of the contract address. Thus, variables which are located in storage are actually persisted in the blockchain. This is expensive, but the only way to store information across invocations
- Calldata – this refers to read-only memory which is used to store parameters for invocations of your contract from an EOA or other contracts and can also be used for function parameters and return values
In our case, we do not have to explicitly define a data location, as our counter is a state variable (i.e. defined on the contract level) and, being an integer, it will automatically be stored in the contract storage. Next, we define two functions, i.e. methods of the contract. We first define the increment function, which does not accept any argument and does not return anything. Note the additional public keyword which declares that our method can be called from outside the contract. Inside the function, we first emit an event (more on this later), and then simply increment the counter by one.
The next function is the function to read out the counter value. This function does not have an argument either, but a return value of type uint256. The interesting part of this function is the additional keyword view. A function can be declared as a view if it does not alter the state (which, in our case, means that the function does not alter the counter value).
What is the point of this? Recall that a change of state can only happen as part of a transaction. Thus a Solidity function can usually only be called as part of a transaction that has an associated gas cost and is executed by all nodes while validating the corresponding transaction. For many cases, this is an enormous overhead. Suppose, for instance, that you build a contract that manages a coin or a token. You would probably not want to burn gas every time you simply want to read out a balance. Here, a view function comes to the rescue. As such a function does not alter the state, but essentially only reads and processes state, it can be executed locally, outside of a transaction, and the execution will not cost you any gas at all.
Invoking a smart contract
To better understand how a function marked as view differs from an ordinary function, it is helpful to understand how a smart contract is actually invoked by an application. There are actually two different ways how this can be done.
First, you can send a transaction to the contract address, using the method eth_sendTransaction or eth_sendRawTransaction of the JSON RPC API. To pass parameters to the contract, include them in the transaction data field. This field is also used to select the method of the smart contract you want to invoke. By convention, the first four bytes of the data field are filled with the hash value of the signature of the method that you want to invoke. Recall that the EVM bytecode does not know anything about methods or arguments, contract execution will always start at address zero. Therefore, the compiler will generate code that reads the data field to first determine the method that needs to invoked, then gets the parameters from the data field, copies them to memory and finally jumps to the code representing the correct method (we will dive deeper into this in a later post).
The transaction is then executed, thereby running the bytecode, incluced in a block and persisted. This is an asynchronous process, and therefore, a contract invocation done via a transaction cannot return a value to the caller. In addition, it consumes gas. These are two good reasons why an alternative is helpful.
This alternative is the eth_call method of the API. This method also executes the bytecode at the target address, but differs in an important point – it is only executed in the local node (i.e. the node to which you direct the API call). No transaction is generated, which implies that no state update can be done, but also that no gas is consumed. The execution is synchronous and can return a value.
Theoretically, you can also make a call to a method that modifies the state. This will again run locally and can be thought of as a simulation, without making any permanent changes to the state. Similary, you could use a transaction to read the counter value, but this would cost you gas and therefore Ether and not even allow you to consume the returned value, as a transaction produces a receipt which does not contain something like a return value. IDEs like Remix or tools like Brownie or Truffle use a description of the methods of a contract which is emitted by a compiler and known as the ABI to determine whether it makes sense to invoke something via a call or a transaction (we will see how this works a bit later when we use Python to compile and deploy a smart contract).
It is instructive to run the increment method in Remix and inspect the resulting transaction. You might already have noted that every time you hit the “increment” button, a new transaction is indicated in the terminal (the tab at the bottom of the screen). At the right hand side of a transaction, you should see a blue “Debug button” (this is also fun, but we resist the temptation for a moment) and a little arrow. Click on the arrow to expand the transaction.
What Remix shows you is actually a mix of data contained in the transaction and the transaction receipt. You see a few fields that we have already discussed in one of the previous posts like the “to” field, the gas limit and the value. You also see a field called “input” which is actually the transaction data and should be
0xd09de08aThis is a four-byte value, and using an online hash calculator (just google for “keccak online”), you can easily verify that these are the first four bytes of the keccak hash of the string “increment()”, i.e. the signature of the method that you invoke.
Logs, transaction receipts and events
It should now be rather obvious what our contract is doing, but we have skipped a point that is a bit more complex – events and logs. If you look at the transaction that we have generated using the increment method, you will see that it also contains a field called logs. The idea of logs is to provide a facility that allows a smart contract to log some data without having to write it into the expensive storage. For that purpose, the EVM offers a set of instructions called LOG0 to LOG4.
The logs of a transaction are part of the transaction receipt that is created by a client when a transaction is processed. As the transaction receipts can be derived from the history of all transactions, they are not actually stored on the blockchain itself (i.e. they are not part of a block), but are maintained by each node individually. A block header does, however, contain a hash of the transaction receipts, so that transaction receipts and therefore logs can be validated.
To structure logs, a log can be assigned to one or more topics. More precisely, to produce a log entry with no topic, you would use the LOG0 instruction, to produce a log entry with one topic, you would use LOG1 and so forth. Consequently, there can only be up to four topics for each log entry. In addition to the topics, a log entry contains a data field of arbitrary length, and the address of the contract that emitted the log. So a full entry consists of
- the sender, i.e. the contract creating the log
- between zero and four topics
- a data field
In Solidity, logs show up as events. Events are defined as part of a contract, as it is the case in our example contract above. By convention, Solidity will always use the first topic to hold the signature of the event. The parameters of the event can be indexed (then Solidity stores them in the remaining topics), or non-indexed (then Solidity uses the data field to store them). Thus, in our example, the events would correspond to log entries where the sender is the contract, the first topic is the signature of the event, i.e. the keccak hash of the string “Increment(address,uint256,uint256)” (note that all white spaces and all parameter names have been removed), which is 0x64f50d594c2a739c7088f9fc6785e1934030e17b52f1a894baec61b98633a59f, the second topic is the sender and the data will contain the old and new value of the counter. You can inspect the transaction receipt and with it the log entries of the transaction that we have created by typing
web3.eth.getTransactionReceipt("0x35325d4aac18a862380ee6dc4a6b7ed1e8eb9c4035dc7d24b35ad847b19deadf")into the console, where you have to replace the argument with the hash value of the generated transaction. The logs will appear as an array, and each entry consists of the address of the creating contract, the data, and the list of topics.
Why do we need topics? The idea of logs and events is that an application can register for certain events and take action if an event is observed. To make this work, we need an efficient way to scan the chain for specific events. Now going through all transactions and looking at all log entries is of course not an efficient approach, and we need a way to quickly determine whether a certain block has produced log entries which are of interest for us. For that purpose, Ethereum employs a structure known as Bloom filter, which is a data structure designed to quickly figure out whether a data set holds a specific entry. Each block contains the Bloom filter of the addresses and topics of the log entries produced by the transactions in the block, and thus a client can quickly scan all blocks for log entries that are associated with specific topics. The JSON RPC API allows you to define filters for new log entries, specifying the contract address, the block range and the topics, so that you can retrieve only those logs which are of interest for your application.
Today, we have actually written, compiled and executed our first smart contract, and we have managed to understood a bit how this works and what happens during contract execution. In the next post, I will show you how to do the same thing with an editor of your choice and the Brownie development environment.

1 Comment