
In the last two posts, we have installed geth and implemented our NFT contract in Solidity according to the ERC-721 standard. Today, we will start to dive into the implementation of a React front-end serving as a simple wallet for our NFT.
Overall architecture and components
First, let us pause for a moment and think about which components our application will have overall. Of course, there will be the actual front-end, running in the browser and written in JavaScript using React. If you have not worked with React before, do not worry – this is not a series about JS frameworks but about the Ethereum blockchain, and we will explain what you need to know when we get into the implementation. For today, simply think of React as a framework that allows you to implement components that can render themselves into a DOM tree and react upon changes of the state that they represent.
To store the state of our front-end, like accounts, token and balances, we will use the Redux framework, along with its React binding react-redux. Routing (i.e. choosing which page or component to display) is done using react-router.
But there is more – we need to be able to connect to an Ethereum node in order to talk to our smart contract, and, in order to retrieve token metadata, we also need a JSON request library. I have chosen to use web3.js to connect to the Ethereum node. If you have read my previous posts in this series, the structure and API of that framework should be familiar, simply because the Python library web3.py that we have used before is modelled after web3.js. As a JSON request library, I have picked Axios.
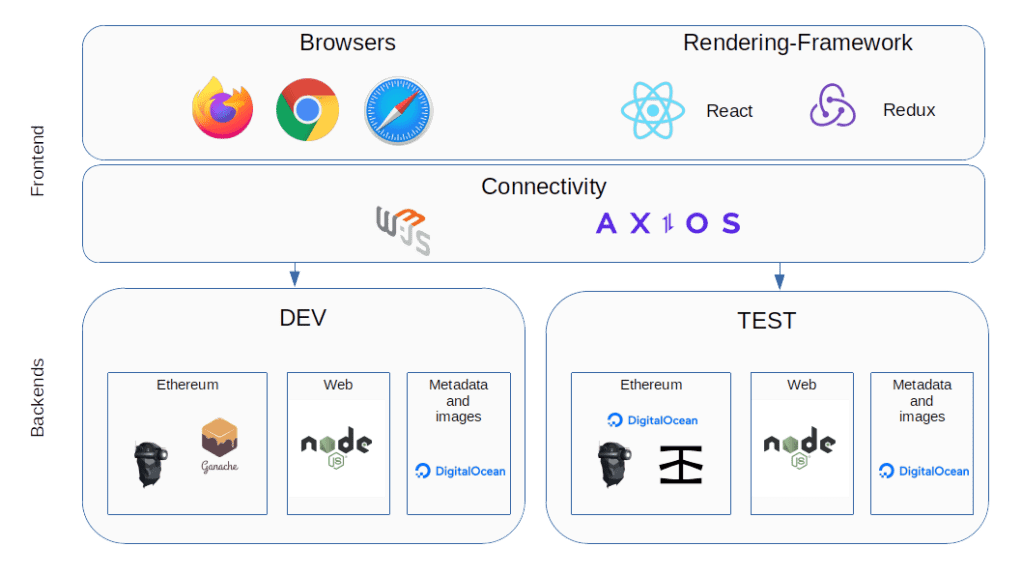
To actually run the Ethereum backend, we have several options. As long as we are in our isolated, private test environment, any of the clients used so far (Go-Ethereum or Ganache) will do. Later, we will learn how to run a client connecting to the Rinkeby test network, or, as an alternative, how to use a provider like Infura. We will also need a web server to server our front-end code (we will use NPM and Node.js to keep things simple, but you could also deploy the web page to a server like NGINX). Finally, I have opted to use DigitalOcean Spaces to host token metadata and the actual images.
Frontend components
Next, let us dive into the components of the actual frontend, as summarized in the diagram below. In this section, we will discuss the screens and React components, leaving the state for the next section.
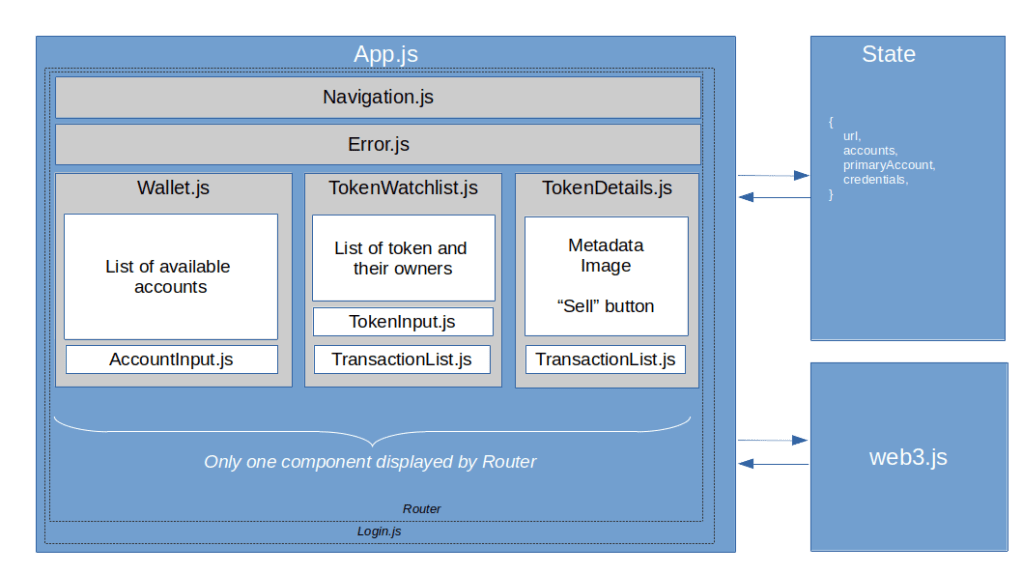
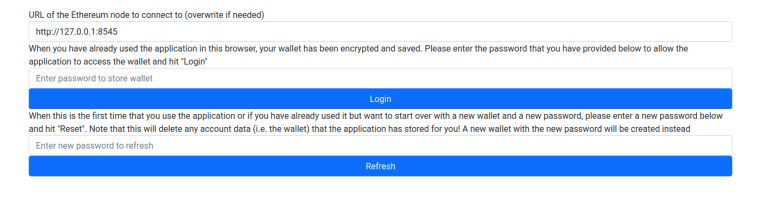
The first page that will be displayed when a user starts the application is the Login page. Our application will store a few pieces of data in the browser local storage, including the URL of the geth backend and a wallet. To protect this data, the user is required to enter a password. If using the front-end for the first time or if the user has forgotten the password, it can be reset, but then all existing data will be erased. In addition, the user will be prompted to enter or confirm the geth URL on this page.
Once the login is successful, the main screen is displayed. At the top of the screen, there is a navigation bar, followed by a (usually invisible) component that displays errors that have occurred in a previous action. Below this, there are the the following pages.
The first page that the user gets to to see is the wallet. This is simply a list of accounts that the application is aware of. To add an account, the user needs to enter the private key, and the application will import the account and display the corresponding address. A user can also remove accounts from the list if they are no longer relevant and select an account which will then be used to sign transactions.
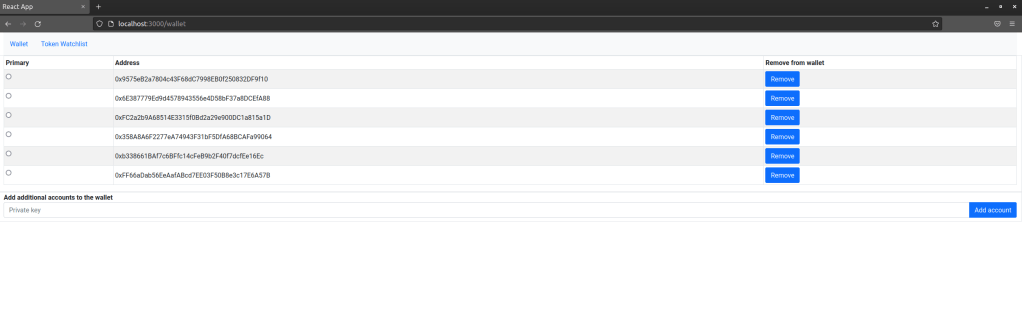
At this point we have to make a decision – where do we store this data? Of course, having private keys in a JS application is inherently a risk – no matter how solid your application is, there is a certain, non-zero possibility that data stored even in memory can be stolen by a malicious script, maybe running in a different tab. In particular, using local storage makes the application vulnerable to XSS attacks. So in a real world application, you might want to store only the public keys and prompt the user to enter the private key when a transaction is made. For our purposes, however, we are not dealing with real money anyway (did I mention that this application is not meant to be used in production already?), so the risk of having the private keys in local storage is probably acceptable.
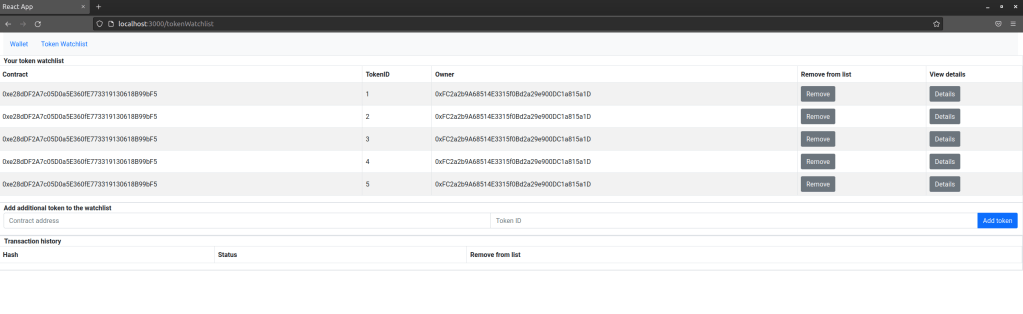
The next screen is the token watchlist. This is very similar to the wallet and is simply a list of token (i.e. contract address and token ID) that the user wants to monitor. A user can add a token to this list and remove a token. In addition, a user can navigate to the details page for an individual token. At the bottom of the page, there is also a list displaying transactions that have been made along with their status. This transaction history is actually a separate component which is used for the token detail page as well.
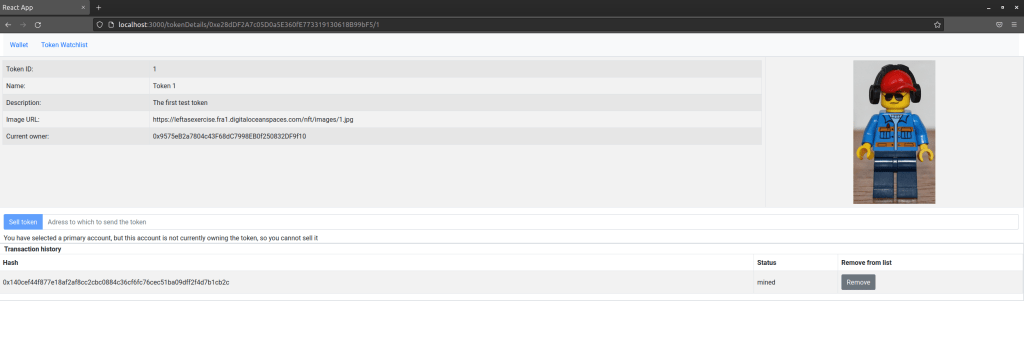
Finally, there is token details page that displays data for an individual token and allows the current owner to sell the token. This page shows the token metadata and the token image, and at the bottom of the page, we again display the transaction history.
State
Let us now see which data we need to store in order to realize all these pages. First, we need the login data, namely the user password and the URL of the Ethereum node that we will connect to. We also need a list of accounts, which correspond to the accounts displayed on the wallet screen. For the token watchlist, we also need to maintain an array of token that should be displayed on this page.
To realize the transaction history, we need to remember transactions that we have triggered, i.e. we have an array of transactions in our state as well. In addition, there are some flags that turn out to be useful to display status and error information, namely the last error that occurred (and that we will display on the error page), and flags that allow us to render a loading indicator if a request to populate a page is in progress. In addition, I have added a simple counter chainEvents that is increased by one whenever a change of the blockchain state is detected and which serves as a trigger to re-render. Thus our initial state looks as follows.
const initialState = {
    url: "http://127.0.0.1:8545",
    accounts: [],
    primaryAccount: "",
    credentials: {
        haveSecret: false,
        password: ""
    },
    tokenWatchlist: [],
    transactions: [],
    chainEvents: 0,
    error: "",
    walletLoaded: false,
    watchlistLoaded: false
}
Most updates to the state will be done asynchronously, typically by web3 requests that are running in the background and are waiting for the Ethereum node to respond. A typical sequence of events would be as follows.
- The user hits a button, for instance to transfer a token
- The event handler invokes a web3 function to submit a transaction to the Ethereum network
- web3 returns a promise and the execution continues – so the rendering is not blocked
- when the promise resolves, an update to the state is made
- Redux recognizes the state change and triggers a re-rendering of the components
We will see how exactly this works in the next post, in which we will start to discuss the implementation. See you there!

2 Comments