In this post, we will install a Kafka cluster with three nodes on our lab PC, using KVM, Vagrant and Ansible.
The setup
Of course it is possible (and actually easy, see the instructions in the quickstart section of the excellent Apache Kafka documentation) to run Kafka as a single-node cluster on your PC. The standard distribution of Kafka contains all you need for this, even an embedded ZooKeeper and a default configuration that should work out-of-the-box. Some of the more advanced topics that we want to try it in the course of this series, like replication and failover scenarios, do however only make sense if you have a clustered setup.
Fortunately, creating such a setup is comparatively easy using KVM virtual machines and tools like Vagrant and Ansible. If you have never used these tools before – do not worry, I will show you in the last section of this post how to download and run my samples. Still, you might want to take a look at some of the previous posts that I have written to get a basic understanding of Ansible and Vagrant with libvirt.
In our test setup, we will be creating three virtual machines, each sized with two vCPUs and 2 GB of memory. On each of the three nodes, we will be running a ZooKeeper instance and a Kafka broker. Note that in a real-world setup, you would probably use dedicated nodes for the ZooKeeper ensemble, but we co-locate these components to keep the number of involved virtual machines reasonable.
Our machines will be KVM machines running Debian Buster. I have chosen this distribution primarily because it is small (less than 300 MB download for the libvirt vagrant box) and boots up blazingly fast – once the initial has initially been downloaded to your machine, creating the machines from scratch takes only a bit less than a minute.
To simulate a more realistic setup, each machine has two network interfaces. One interface is the default interface that Vagrant will attach to a “public” network and that we will use to SSH into the machine. On this interface, we will expose a Kafka listener secured using TLS, and the network will be connected to the internet using NATing. A second interface will connect to a “private” network (which, however, will still be reachable from the lab PC). On this network, we will run an unsecured listener and Kafka will use this interface for inter-broker communication and connecting to the ZooKeeper instances.
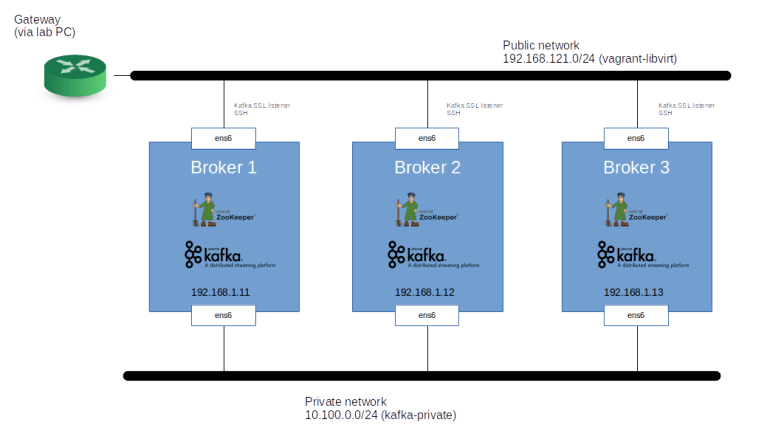
Using the public interface, we will be able to connect to the Kafka brokers via the TLS secured listener and run our sample programs. This setup could easily be migrated to your favored public cloud provider.
Installation steps
The installation is mostly straightforward. First, we setup networking on each machine, i.e. we bring up the interfaces, assign IP addresses and add the host names to /etc/hosts on each node, so that the hostname will resolve to the private interface IP address. We then install ZooKeeper from the official Debian packages (which, at the time of writing, is version 3.4.13).
The ZooKeeper configuration can basically be taken over from the packaged configuration, with one change – we need to define the ensemble by listing all ZooKeeper nodes, i.e. by adding the section
server.1=broker1:2888:3888
server.2=broker2:2888:3888
server.3=broker3:2888:3888
to /etc/zookeeper/conf/zoo.cfg. On each node, we also have to create a file called myid in /etc/zookeeper/conf/ (which is symlinked to /var/lib/zookeeper/myid) containing the unique ZooKeeper ID – here we just use the last character of the server name, i.e. “1” for broker1 and so forth.
Once ZooKeeper is up and running, we can install Kafka. First, as we want to use TLS to secure one of the listeners, we need to create a few keys and certificates. Specifically, we need
- A self-signed CA certificate and a matching key pair
- A key-pair and matching server certificate for each broker, signed by the CA
- A client key-pair and a client certificate, signed by the same CA (though we could of course use a different CA for the client certificates, but let us keep things simple)
Creating these certificates with OpenSSL is straighforward (if you have never worked with OpenSSL certificates before, you might want to take a look at my previous post on this). We also need to bundle keys and certificates into a key store and a trust store for the server and similarly a key store and a trust store for the client (where the keystore holds the credentials, i.e. keys and certificates, presented by the server respectively client, whereas the trust store holds the CA certificate). For the server, I was able to use a PKCS12 key store created by OpenSSL. For the client, however, this did not work, and I had to use the Java keytool to convert the PKCS12 keystore to the JKS format.
After these preparations, we can now install Kafka. I have used the official tarball from the 2.13-2.4.1 release downloaded from this mirror URL. After unpacking the archive, we first need to adapt the configuration file server.properties. The item we need to change are
- On each broker, we need to set a broker ID – again, I have used the last character of the hostname for this. Note that this implies that broker ID and ZooKeeper ID are the same, which is pure coincidence and not needed
- The default configuration contains an unsecured (“PLAINTEXT”) listener on port 9092, to which we add an SSL listener on port 9093, using the IP of the public interface
- The default configuration places the Kafka logs in /tmp, which is obviously not a good idea for anything but a simple test, as most Linux distributions clean up /tmp when you reboot. So we need to change this to point to a different directory
- As we are running more than one node, it makes sense to change the replication settings for the internal topics
- Finally, we need to adapt the ZooKeeper connection string so that all Kafka brokers connect to our ZooKeeper ensemble (and thus form a cluster, note that more or less by definition, a cluster in Kafka is simply a bunch of brokers that all connect to the same ZooKeeper ensemble).
Finally, it makes sense to add a systemd unit so that Kafka comes up again if you restart the machine.
Trying it out
After all this theory, we can now finally try this out. As mentioned above, I have prepared a set of Ansible scripts to set up virtual machines and install ZooKeeper and Kafka along the lines of the procedure described above. To run them, you will first have to install a few packages on your machine. Specifically, you need to install (if you have not done so yet) libvirt, Vagrant and Ansible, and install the libvirt Vagrant plugin. The instructions below work on Ubuntu Bionic, if you use a different Linux distribution, you might have to use slightly different package names and / or install the Vagrant libvirt plugin directly using the instructions here. Also, some of the packages (especially Java which we only need to be able to use the Java keytool) might already be present on your machine.
sudo apt-get update
sudo apt-get install \
  libvirt-daemon \
  libvirt-clients \
  python3-pip \
  python3-libvirt \
  virt-manager \
  vagrant \
  vagrant-libvirt \
  git \
  openjdk-8-jdk
sudo adduser $(id -un) libvirt
sudo adduser $(id -un) kvm
pip3 install ansible lxml pyopenssl
Note that when installing Ansible as individual user as above, Ansible will be installed in ~/.local/bin, so make sure to add this to your path.
Next, clone my repository, change into the created directory, use virsh and vagrant up to start the network and the virtual machines and then run Ansible to install ZooKeeper and Kafka.
git clone https://github.com/christianb93/kafka.git
cd kafka
virsh net-define kafka-private-network.xml
wget http://mirror.cc.columbia.edu/pub/software/apache/kafka/2.4.1/kafka_2.13-2.4.1.tgz
tar xvf kafka_2.13-2.4.1.tgz
mv kafka_2.13-2.4.1 kafka
vagrant up
ansible-playbook site.yaml
Once the installation completes, it is time to run a few checks. First, let us verify that the ZooKeeper is running correctly on each node. For that purpose, SSH into the first node using vagrant ssh broker1 and run
/usr/share/zookeeper/bin/zkServer.sh status
This should print out the configuration file used by ZooKeeper as well as the mode the node is in (follower or leader).
Now let us see whether Kafka is running on each node. First, of course, you should check the status using systemctl status kafka. Then, we can see whether all brokers have registered themselves with ZooKeeper. To do this, run
sudo /usr/share/zookeeper/bin/zkCli.sh \
  -server broker1:2181 \
  ls /brokers/ids
on any of the broker nodes. You should get a list with the broker ids of the cluster, i.e. “[1,2,3]”. Finally, we can try to create a topic.
/opt/kafka/kafka_2.13-2.4.1/bin/kafka-topics.sh \
  --create \
  --bootstrap-server broker1:9092 \
  --replication-factor 3 \
  --partitions 2 \
  --topic test
Congratulations, you are now proud owner of a working three-node Kafka cluster. Having this in place, we are now ready to dive deeper into producing Kafka data, which will be the topic of our next post.

3 Comments