
If you read technical posts like this one, chances are that you have already had some exposure to TLS certificates, for instance because you have deployed a service that uses TLS and needed to create and deploy certificates for the servers and potentially for clients. Dealing with certificates can be a challenge, and a sound understanding of what certificates actually do is more than helpful for this. In this and the next post, we will play with NGINX and Ansible to learn what certificates are, how they are generated and how they are used.
What is a certificate?
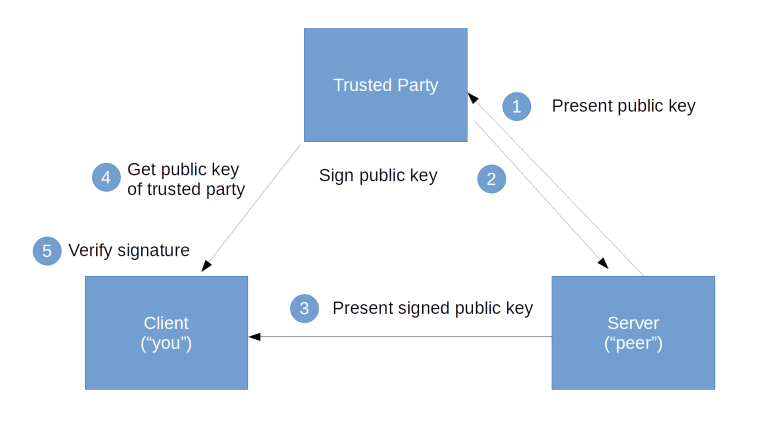
To understand the structure of a certificate, let us first try to understand the problem that certificates try to solve. Suppose you are communicating with some other party over an encrypted channel, using some type of asymmetric cryptosystem like RSA. To send an encrypted message to your peer, you will need the peers public key as a prerequisite. Obviously, you could simply ask the peer to send you the public key before establishing a connection, but then you need to mitigate the risk that someone uses a technique like IP address spoofing to pretend to be the peer you want to connect with, and is sending you a fake public key. Thus you need a way to verify that the public key that is presented to you is actually the public key owned by the party to which you want to establish a connection.
One approach could be to establish a third, trusted and publicly known party and ask that trusted party to digitally sign the public key, using a digital signature algorithm like ECDSA. With that party in place, your peer would then present you the signed public key, you would retrieve the public key of the trusted party, use that key to verify the signature and proceed if this verification is successful.
So what your peer will present you when you establish a secure connection is a signed public key – and this is, in essence, what a certificate really is. More precisely, a certificate according to the X509 v3 standard consists of the following components (see also RFC 52809.
- A version number which refers to a version of the X509 specification, currently version 3 is what is mostly used
- A serial number which the third party (called the issuer) assigns to the certificate
- a valid-from and a valid-to date
- The public key that the certificate is supposed to certify, along with some information on the underlying algorithm, for instance RSA
- The subject, i.e. the party owning the key
- The issuer, i.e. the party – also called certificate authority (CA) – signing the certificate
- Some extensions which are additional, optional pieces of data that a certificate can contain – more on this later
- And finally, a digital signature signing all the data described above
Let us take a look at an example. Here is a certificate from github.com that I have extracted using OpenSSL (we will learn how to do this later), from which I have removed some details and added some line breaks to make the output a bit more readable.
Certificate:
    Data:
        Version: 3 (0x2)
        Serial Number:
            0a:06:30:42:7f:5b:bc:ed:69:57:39:65:93:b6:45:1f
        Signature Algorithm: sha256WithRSAEncryption
        Issuer: C = US, O = DigiCert Inc, OU = www.digicert.com,
                CN = DigiCert SHA2 Extended Validation Server CA
        Validity
            Not Before: May  8 00:00:00 2018 GMT
            Not After : Jun  3 12:00:00 2020 GMT
        Subject: businessCategory = Private Organization,
                jurisdictionC = US,
                jurisdictionST = Delaware,
                serialNumber = 5157550,
                C = US, ST = California, L = San Francisco,
                O = "GitHub, Inc.", CN = github.com
        Subject Public Key Info:
            Public Key Algorithm: rsaEncryption
                RSA Public-Key: (2048 bit)
                Modulus:
                    SNIP --- SNIP
                Exponent: 65537 (0x10001)
        X509v3 extensions:
            SNIP --- SNIP
    Signature Algorithm: sha256WithRSAEncryption
         70:0f:5a:96:a7:58:e5:bf:8a:9d:a8:27:98:2b:00:7f:26:a9:
         SNIP ----- SNIP
         af:ed:7a:29
We clearly recognize the components just discussed. At the top, there are the version number and the serial number (in hex). Then we see the signature algorithm and, at the bottom, the signature, the issuer (DigiCert), the validity, the subject (GitHub Inc.) and, last but not least, the full public key. Note that both, issuer and subject, are identified using distinguished names as you might known them from LDAP and similar directory services.
If we now wanted to verify this certificate, we would need to get the public key of the issuer, DigiCert. Of course, this is a bit of a chicken-egg problem, as we would need another certificate to verify the authenticity of this key as well. So we would need a certificate with subject DigiCert, signed by some other party, and then another certificate signed by yet another certificate authority, and so forth. This chain obviously has to end somewhere, and it does – the last certificate in such a chain (the root CA certificate) is typically a self-signed certificate. These are certificates for which issuer and subject are identical, i.e certificates where no further verification is possible and in which we simply have to trust.
How, then, do we obtain these root certificates? The answer is that root certificates are either distributed inside an organization or are bundled with operating systems and browsers. In our example, the DigiCert certificate that we see here is itself signed by another DigiCert unit called “DigiCert High Assurance EV Root CA”, and a certificate for this CA is part of the Ubuntu distribution that I use and stored in /etc/ssl/certs/DigiCert_High_Assurance_EV_Root_CA.pem which is a self-signed root certificate.
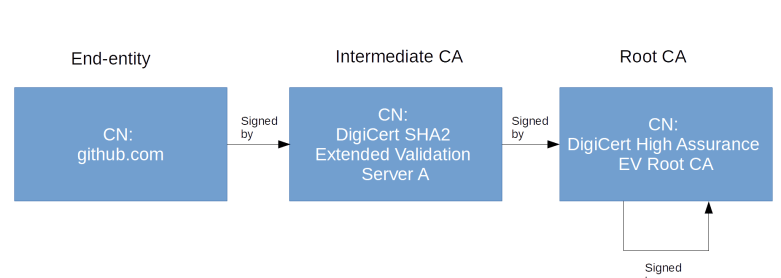
In this situation, the last element of the chain is called the root CA, the first element the end-entity and any element in between an intermediate CA.
To obtain a certificate, the owner of the server github.com would turn to the intermediate CA and submit file, a so-called certificate signing request (CSR), containing the public key to be signed. The format for CSRs is standardized in RFC 2986 which, among things, specifies that a CSR be itself signed with the private key of the requestor, which also proves to the intermediate CA that the requestor possesses the private key corresponding to the public key to be signed. The intermediate CA will then issue a certificate. To establish the intermediate CA, the intermediate CA has, at some point in the past, filed a similar CSR with the root CA and that root CA has issued a corresponding certificate to the intermediate CA.
The TLS handshake
Let us now see how certificates are applied in practice to secure a communication. Our example is the transport layer security protocol TLS, formerly known as SSL, which is underlying the HTTPS protocol (which is nothing but HTTP sitting on top of TLS).
In a very basic scenario, a TLS communication roughly works as follows. First, the clients send a “hello” message to the server, containing information like the version of TLS supported and a list of supported ciphers. The server answers with a similar message, immediately followed by the servers certificate. This certificate contains the name of the server (either as fully-qualified domain name, or including wildcards like *.domain.com in which case the certificate is called a wildcard certificat) and, of course, the public key of the server. Client and server can now use this key to agree on a secret key which is then used to encrypt the further communication. This phase of the protocol which prepares the actual encrypted connection is known as the TLS handshake.
To successfully conclude this handshake, the server therefore needs a certificate called the server certificate which it will present to the client and, of course, the matching private key, called the server private key. The client needs to verify the server certificate and therefore needs access to the certificate of the (intermediate or root) CA that signed the server certificate. This CA certificate is known as the server CA certificate. Instead of just presenting a single certificate, a server can also present an entire chain of certificates which must end with the server CA certificate that the client knowns. In practice, these certificates are often the root certificates distributed with operating systems and browsers to which the client will have access.
Now suppose that you are a system administrator aiming to set up a TLS secured service, say a HTTPS-based reverse proxy with NGINX. How would you obtain the required certificates? First, or course, you would create a key pair for the server. Once you have that, you need to obtain a certificate for the public key. Basically, you have three options to obtain a valid certificate.
First, you could turn to an independent CA and ask the CA to issue a certificate, based on a CSR that you provide. Most professional CAs will charge for this. There are, however, a few providers like let’s encrypt or Cloudflare that offer free certificates.
Alternatively, you could create your own, self-signed CA certificate using OpenSSL or Ansible, this is what we will do today in this post. And finally, as we will see in the next post, you could even build your own “micro-CA” to issue intermediate CA certificates which you can then use to issue end-entity certificates within your organization.
Using NGINX with self-signed certificates
Let us now see how self-signed certificates can be created and used in practice. As an example, we will secure NGINX (running in a Docker container, of course) using self-signed certificates. We will first do this using OpenSSL and the command line, and then see how the entire process can be automated using Ansible.
The setup we are aiming at is NGINX acting as TLS server, i.e. we will ask NGINX to provide content via HTTPS which is based on TLS. We already know that in order to do this, the NGINX server will need an RSA key pair and a valid server certificate.
To create the key pair, we will use OpenSSL. OpenSSL is composed of a variety of different commands. The command that we will use first is the genrsa command that is responsible for creating RSA keys. The man page – available via man genrsa – is quite comprehensive, and we can easily figure out that we need the following command to create a 2048 bit RSA key, stored in the file server.rsa.
openssl genrsa \
  -out server.rsa
As a side note, the created file does not only contain the private key, but also the public key components (i.e. the public exponent), as you can see by using openssl rsa -in server.rsa -noout -text to dump the generated key.
Now we need to create the server certificate. If we wanted to ask a CA to create a certificate for us, we would first create a CSR, and the CA would then create a matching certificate. When we use OpenSSL to create a self-signed certificate, we do this in one step – we use the req command of OpenSSL to create the CSR, and pass the additional switch –x509 which instructs OpenSSL to not create a CSR, but a self-signed certificate.
To be able to do this, OpenSSL will need a few pieces of information from us – the validity, the subject (which will also be the issuer), the public key to be signed, any extensions that we want to include and finally the output file name. Some of these options will be passed on the command line, but other options are usually kept in a configuration file.
OpenSSL configuration files are plain-text files in the INI-format. There is one section for each command, and there can be additional sections which are then referenced in the command-specific section. In addition, there is a default section with settings which apply for all commands. Again, the man page (run man config for the general structure of the configuration file and man req for the part specific to the req command) – is quite good and readable. Here is a minimal configuration file for our purposes.
[req]
prompt = no
distinguished_name = dn
x509_extensions = v3_ext

[dn]
CN = Leftasexercise
emailAddress = me@leftasexercise.com
O = Leftasexercise blog
L = Big city
C = DE

[v3_ext]
subjectAltName=DNS:*.leftasexercise.local,DNS:leftasexercise.local
We see that the file has three sections. The first section is specific for the req command. It contains a setting that instructs OpenSSL to not prompt us for information, and then two references to other sections. The first of these sections contains the distinguished name of the subject, the second section contains the extensions that we want to include.
There are many different extensions that were introduced with version 3 of the X509 format, and this is not the right place to discuss all of them. The one that we use for now is the subject alternative name extension which allows us to specify a couple of alias names for the subject. Often, these are DNS names for servers for which the certificate should be valid, and browsers will typically check these DNS names and try to match them with the name of the server. As shown here, we can either use a fully-qualified domain name, or we can use a wildcard – these certificates are often called wildcard certificates (which are disputed as they give rise to security concerns, see for instance this discussion). This extension is typical for server certificates.
Let us assume that we have saved this configuration file as server.cnf in the current working directory. We can now invoke OpenSSL to actually create a certificate for us. Here is the command to do this and to print out the resulting certificate.
openssl req \
  -new \
  -config server.cnf \
  -x509 \
  -days 365 \
  -key server.rsa \
  -out server.crt
# Take a look at the certificate
openssl x509 \
  -text \
  -in server.crt -noout
If you scroll through the output, you will be able to identify all components of a certificate discussed so far. You will also find that the subject and the issuer of the certificate are identical, as we expect it from a self-signed certificate.
Let us now turn to the configuration of NGINX needed to serve HTTPS requests presenting our newly created certificate as server certificate. Recall that an NGINX configuration file contains a context called server which contains the configuration for a specific virtual server. To instruct NGINX to use TLS for this server, we need to add a few lines to this section. Here is a full configuration file containing these lines.
server {
    listen               443 ssl;
    ssl_certificate      /etc/nginx/certs/server.crt;
    ssl_certificate_key  /etc/nginx/certs/server.rsa;

    location / {
        root   /usr/share/nginx/html;
        index  index.html index.htm;
    }
}
In the line starting with listen, specifically the ssl keyword, we ask NGINX to use TLS for port 443, which is the default HTTPS port. In the next line, we tell NGINX which file it should use as a server certificate, presented to a client during the TLS handshake. And finally, in the third line, we point NGINX to the location of the key matching this certificate.
To try this out, let us bring up an an NGINX container with that configuration. Ẃe will mount two directories into this container – one directory containing our certificates, and one directory containing the configuration file. So create the following directories in your current working directory.
mkdir ./etc
mkdir ./etc/conf.d
mkdir ./etc/certs
Then place a configuration file default.conf with the content shown above in ./etc/conf.d and the server certificate and server private key that we have created in the directory ./etc/certs.d. Now we start the container and map these directories into the container.
docker run -d --rm \
       -p 443:443 \
       -v $(pwd)/etc/conf.d:/etc/nginx/conf.d \
       -v $(pwd)/etc/certs:/etc/nginx/certs \
       nginx
Note that we map port 443 inside the container into the same port number on the host, so this will only work if you do not yet have a server running on this port, in this case, pick a different port. Once the container is up, we can test our connection using the s_client command of the OpenSSL package.
openssl s_client --connect 127.0.0.1:443
This will produce a lengthy output that details the TLS handshake protocol and will then stop. Now enter a HTTP GET request like
GET /index.html HTTP/1.0
The HTML code for the standard NGINX welcome page should now be printed, demonstrating that the setup works.
When you go through the output produced by OpenSSL, you will see that the client displays the full certificate chain from the certificate presented by the server up to the root CA. In our case, this chain has only one element, as we are using a self-signed certificate (which the client detects and reports as error – we will see how to get rid of this in the next post).
Automating certificate generation with Ansible
So far, we have created keys and certificates manually. Let us now see how this can be automated using Ansible. Fortunately, Ansible comes with modules to manage TLS certificates.
The first module that we will need is the openssl_csr module. With this module, we will create a CSR which we will then, in a second step, present to the module openssl_certificate to perform the actual signing process. A third module, openssl_privatekey, will be used to create a key pair.
Let us start with the key generation. Here, the only parameters that we need are the length of the key (we again use 2048 bits) and the path to the location of the generated key. The algorithm will be RSA, which is the default, and the key file will by default be created with the permissions 0600, i.e. only readable and writable by the owner.
- name: Create key pair for the server
  openssl_privatekey:
    path: "{{playbook_dir}}/etc/certs/server.rsa"
    size: 2048
Next, we create the certificate signing request. To use the openssl_csr module to do this, we need to specificy the following parameters:
- The components of the distinguished name of the subject, i.e. common name, organization, locality, e-mail address and country
- Again the path of the file into which the generated CSR will be written
- The parameters for the requested subject alternative name extension
- And, of course, the path to the private key used to sign the request
- name: Create certificate signing request
  openssl_csr:
    common_name: "Leftasexercise"
    country_name: "DE"
    email_address: "me@leftasexercise.com"
    locality_name: "Big city"
    organization_name: "Leftasexercise blog"
    path: "{{playbook_dir}}/server.csr"
    subject_alt_name:
      - "DNS:*.leftasexercise.local"
      - "DNS:leftasexercise.local"
    privatekey_path: "{{playbook_dir}}/etc/certs/server.rsa"
Finally, we can now invoke the openssl_certificate module to create a certificate from the CSR. This module is able to operate using different backends, the so-called provider. The provider that we will use for the time being is the self-signed provider which generates self-signed certificates. Apart from the path to the CSR and the path to the created certificate, we therefore need to specify this provider and the private key to use (which, of course, should be that of the server), and can otherwise rely on the default values.
- name: Create self-signed certificate
  openssl_certificate:
    csr_path: "{{playbook_dir}}/server.csr"
    path: "{{playbook_dir}}/etc/certs/server.crt"
    provider: selfsigned
    privatekey_path: "{{playbook_dir}}/etc/certs/server.rsa"
Once this task completes, we are now ready to start our Docker container. This can again be done using Ansible, of course, which has a Docker module for that purpose. To see and run the full code, you might want to clone my GitHub repository.
git clone http://github.com/christianb93/tls-certificates
cd tls-certificates/lab1
ansible-playbook site.yaml
This completes our post for today. In the next post, we will look into more complex setups involving our own local certificate authority and learn how to generate and use client certificates.

Excellent explanation, thank you!
LikeLike