
Not all cloud instances are born equal. When a cloud instance boots, it is usually necessary to customize the instance to some extent, for instance by adding specific SSH keys or by running startup scripts. Most cloud platforms offer a mechanism called instance metadata, and the implementation of this feature in OpenStack is our topic today.
The EC2 metadata and userdata protocol
Before describing how instance metadata works, let us first try to understand the problem which this mechanism solves. Suppose you want to run a large number of Ubuntu Linux instances in a cloud environment. Most of the configuration that an instance needs will be part of the image that you use. A few configuration items, however, are typically specific for a certain machine. Standard data use cases are
- Getting the exact version of the image running
- SSH keys which need to be injected into the instances at boot time so that an administrator (or a tool like Ansible) can work with the machine
- correctly setting the hostname of the instance
- retrieving information of the IP address of the instance to be able to properly configure the network stack
- Defining scripts and command that are executed at boot time
In 2009, AWS introduced a metadata service for its EC2 platform which was able to provide this data to a running instance. The idea is simple – an instance can query metadata by making a HTTP GET request to a special URL. Since then, all major cloud providers have come up with a similar mechanism. All these mechanisms differ in details and use different URLs, but follow the same basic principles. As it has evolved into a de-facto standard which is also used by OpenStack, we will discuss the EC2 metadata service here.
The special URL that EC2 (and OpenStack) use is http://169.254.169.254. Note that this is in the address range which has been reserved in RFC3927 for link-local addresses, i.e. addresses which are only valid with one broadcast domain. When an instance connects to this address, it is presented with a list of version numbers and subsequently with a list of items retrievable under this address.
Let us try this out. Head over to the AWS console, bring up an instance, wait until it has booted, SSH into it and then type
curl http://169.254.169.254/
The result should be a list of version numbers, with 1.0 typically being the first version number. So let us repeat our request, but add 1.0 to the URL
curl http://169.254.169.254/1.0
This time we get again a list of relative URLs to which we can navigate from here. Typically there are only two entries: meta-data and user-data. So let us follow this path.
curl http://169.254.169.254/1.0/meta-data
We now get a list of items that we could retrieve. To get, for instance, the public SSH key that the owner of the machine has specified when starting the instance, use a query like
curl http://169.254.169.254/1.0/meta-data/public-keys/0/openssh-key
In contrast to metadata, userdata is data that a user has defined when starting the machine. To see an example, go back to the EC2 console, stop your instance, select Actions –> Instance settings –> View/change user data, enter some text and restart the instance again. When you connect back to it and enter
curl http://169.254.169.254/1.0/user-data
you will see exactly the text that you typed.
Who is consuming the metadata? Most OS images that are meant to run in a cloud contain a piece of software called cloud-init which will run certain initialization steps at boot-time (as a sequence of systemd services). Meta-data and user-data can be used to configure this process, up to the point that arbitrary commands can be executed at start-up. Cloud-init comes with a large number of modules that can be used to tailor the boot process and has evolved into a de-facto standard which is present in most cloud images (with cirros being an interesting exception which uses a custom init mechanism)
Metadata implementation in OpenStack
Let us now try to understand how the metadata service of OpenStack works. To do this, let us run an example configuration (we will use the configuration of Lab 10) and SSH into one of the demo instances in our VXLAN network (this is an important detail, the behavior for instances on the flat network is different, see below).
git clone https://github.com/christianb93/openstack-labs
cd openstack-labs/Lab10
vagrant up
ansible-playbook -i hosts.ini site.yaml
ansible-playbook -i hosts.ini demo.yaml
vagrant ssh network
source demo-openrc
openstack server ssh \
   --identity demo-key  \
   --public \
   --login cirros \
   demo-instance-1
curl http://169.254.169.254/1.0/meta-data
This should give you an output very similar to the one that you have seen on EC2, and in fact, OpenStack implements the EC2 metadata protocol (it also implements its own protocol, more on this in a later section).
At this point, we could just accept that this works, be happy and relax, but if you have followed my posts, you will know that simply accepting that it works is not the idea of this blog – why does it work?
The first thing that comes to ones mind when trying to understand how this request leaves the instance and where it is answered is to check the routing on the instance by running route -n. We find that there is in fact a static route to the IP address 160.254.169.254 which points to the gateway address 172.18.0.1, i.e. to our virtual router. In fact, this route is provided by the DHCP service, as you will easily be able to confirm when you have read my recent post on this topic.
So the request goes to the router. We know that in OpenStack, a router is realized as a namespace on the node on which the L3 agent is running, i.e. on the network node in our case. Let us now peep inside this namespace and try to see which processes are running within it and how its network is configured. Back on the network node, run
router_id=$(openstack router show \
  demo-router  \
  -f value\
   -c id)
ns_id="qrouter-$router_id"
sudo ip netns exec $ns_id  iptables -S -t nat
pid=$(sudo ip netns pid $ns_id)
ps fw -p $pid
From the output, we learn two things. First, we find that in the router namespace, there is an iptables rule that redirects traffic targeted towards the IP address 169.254.169.254:80 to port 9697 on the local machine. Second, there is an instance of the HAProxy reverse proxy running in this namespace. The command line with which this proxy was started points us to its configuration file, which in turn will tell us that the HAProxy is listening on exactly this port and redirecting the request to a Unix domain socket /var/lib/neutron/metadata_proxy.
If we use sudo netstat -a -p to find out who is listening on this socket, we will see that the socket is owned by an instance of the Neutron metadata agent which essentially forwards the request.
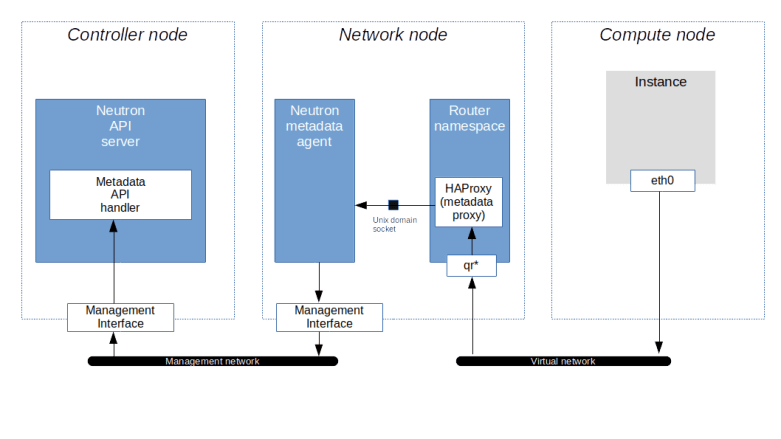
The IP address and port to which the request is forwarded are taken from the configuration file /etc/neutron/metadata_agent.ini of the Neutron metadata agent. When we look up these values, we find, however, that the (default) port 8775 is not the usual API endpoint of the Nova server. which is listening in port 8774. So the request is not yet going to the API. Instead, port 8775 is used by the Nova metadata API handler, which is technically a part of the Nova API server. This service will accept the incoming request, retrieve the instance and its metadata from the database and send the reply, which then goes all the way back to the instance. Thus the following picture emerges from our discussion.
Now clearly there is a part of the story that we have not yet discussed, as some points are still a bit mysterious. How, for instance, does the Nova API server know for which instance the metadata is requested? And how is the request authorized without a Keystone token?
To answer these questions, it is useful to dump a request across the chain using tcpdump sessions on the router interface and the management interface on the controller. For the first session, SSH into the network node and run
source demo-openrc
router_id=$(openstack router show \
  demo-router  \
  -f value\
   -c id)
ns_id="qrouter-$router_id"
interface_id=$(sudo ip netns exec \
  $ns_id tcpdump -D \
  | grep "qr" | awk -F "." '{print $1}')
sudo ip netns \
  exec $ns_id tcpdump \
  -i $interface_id \
  -e -vv port not 22
Then, open a second terminal and SSH into the controller node. On the controller node, start a tcpdump session on the management interface to listen for traffic targeted to the port 8775.
sudo tcpdump -i enp0s8 -e -vv -A port 8775
Finally, connect to the instance demo-instance-1 using SSH, run
curl http://169.254.169.254/1.0/meta-data
and enjoy the output of the tcpdump processes. When you read this output, you will see the original GET request showing up on the router interface. On the interface of the controller, however, you will see that the Neutron agent has added some headers to the request. Specifically, we see the following headers.
- X-Forwarded-For contains the IP address of the instance that made the request and is added to the request by the HAProxy
- X-Instance-ID contains the UUID of the instance and is determined by the Neutron agent by looking up the port to which the IP address belongs
- X-Tenant-ID contains the ID of the project to which the instance belongs
- X-Instance-ID-Signature contains a signature of the instance ID
The instance ID and the project ID in the header are used by the Nova metadata handler to look up the instance in the database and to verify that the instance really belongs to the project in the request header. The signature of the instance ID is used to authorize the request. In fact, the Neutron metadata agent uses a shared secret that is contained in the configuration of the agent and the Nova server as (metadata_proxy_shared_secret) to sign the instance ID (using the HMAC signature specified in RFC 2104) and the Nova server uses the same secret to verify the signature. If this verification fails, the request is rejected. This mechanism replaces the usual token based authorization method used for the main Nova API.
Metadata requests on isolated networks
We can now understand how the metadata request is served. The request leaves the instance via the virtual network, reaches the router, is picked up by the HAProxy, forwarded to the agent and … but wait .. what if there is no router on the network?
Recall that in our test configuration, there are two virtual networks, one flat network (which is connected to the external bridge br-ext on each compute node and the network node) and one VXLAN network.
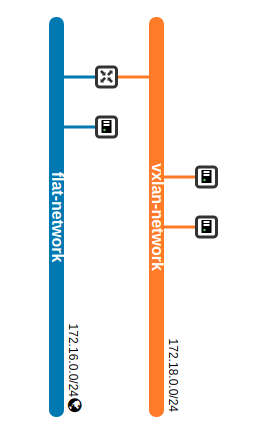
So far, we have been submitting metadata requests from an instance connected to the VXLAN network. On this network, a router exists and serves as a gateway, so the mechanism outlined above works. In the flat network, however, the gateway is an external (from the point of view of Neutron) router and cannot handle metadata requests for us.
To solve this issue, Neutron has the ability to let the DHCP server forward metadata requests. This option is activated with the flag enable_isolated_metadata in the configuration of the DHCP agent. When this flag is set and the agent detects that it is running in an isolated network (i.e. a network whose gateways is not a Neutron provided virtual router), it will do two things. First, it will, as part of a DHCPOFFER message, use the DHCP option 121 to ask the client to set a static route to 169.254.169.254 pointing to its own IP address. Then, it will spawn an instance of HAProxy in its own namespace and add the IP address 169.254.169.254 as second IP address to its own interface (I will not go into the detailed analysis to verify these claims, but if you have followed this post up to this point and read my last post on Neutron DHCP server, you should be able to run the diagnosis to see this yourself). The HAProxy will then again use a Unix domain socket to forward the request to the Neutron metadata agent.

We could even ask the DHCP agent to provide metadata services for all networks by setting the flag force_metadata to true in the configuration of the DHCP agent.
The OpenStack metadata protocol
So far we have made our sample metadata requests using the EC2 protocol. In addition to this protocol, the Nova Metadata handler is also able to serve requests that use the OpenStack specific protocol which is available under the URL http://169.254.169.254/openstack/latest. This offers you several data structures, one of them being the entire instance metadata as a JSON structure. To test this, SSH into an arbitrary test instance and run
curl http://169.254.169.254/openstack/latest/meta_data.json
Here is a redacted version of the output, piped through jq to increase readability.
{
  "uuid": "74e3dc71-1acc-4a38-82dc-a268cf5f8f41",
  "public_keys": {
    "demo-key": "ssh-rsa REDACTED"
  },
  "keys": [
    {
      "name": "demo-key",
      "type": "ssh",
      "data": "ssh-rsa REDACTED"
    }
  ],
  "hostname": "demo-instance-3.novalocal",
  "name": "demo-instance-3",
  "launch_index": 0,
  "availability_zone": "nova",
  "random_seed": "IS3w...",
  "project_id": "5ce6e231b4cd483f9c35cd6f90ba5fa8",
  "devices": []
}
We see that the data includes the SSH keys associated with the instance, the hostname, availability zone and the ID of the project to which the instance belongs. Another interesting structure is obtained if we replace meta_data.json by network_data.json
{
  "links": [
    {
      "id": "tapb21a530c-59",
      "vif_id": "b21a530c-599c-4275-bda2-6644cf55ed23",
      "type": "ovs",
      "mtu": 1450,
      "ethernet_mac_address": "fa:16:3e:c0:a9:89"
    }
  ],
  "networks": [
    {
      "id": "network0",
      "type": "ipv4_dhcp",
      "link": "tapb21a530c-59",
      "network_id": "78440978-9f8f-4c59-a254-99289dad3c81"
    }
  ],
  "services": []
}
We see that we get a list of network interfaces and networks attached to the machine, which contains useful information like the MAC addresses, the MTU and even the interface type (OVS internal device in our case).
Working with user data
So far we have discussed instance metadata, i.e. data provided by OpenStack. In addition, like most other cloud platforms, OpenStack allows you to attach user data to an instance, i.e. user defined data which can then be retrieved from inside the instance using exactly the same way. To see this in action, let us first delete our demo instance and re-create it (OpenStack allows you to specify user data at instance creation time). Log into the network node and run the following commands.
source demo-openrc
echo "test" > test.data
openstack server delete demo-instance-3
openstack server create \
   --network flat-network \
   --key demo-key \
   --image cirros \
   --flavor m1.nano \
   --user-data test.data demo-instance-3
status=""
until [ "$status" == "ACTIVE" ]; do
  status=$(openstack server show \
    demo-instance-3  \
    -f shell \
    | awk -F "=" '/status/ { print $2}' \
    | sed s/\"//g)
  sleep 3
done
sleep 3
openstack server ssh \
   --login cirros\
   --private \
   --option StrictHostKeyChecking=no \
   --identity demo-key demo-instance-3
Here we first create a file with some test content. Then, we delete the server demo-instance-3 and re-create it, this time passing the file that we have just created as user data. We then wait until the instance is active, wait for a few seconds to allow the SSH daemon in the instance to come up, and then SSH into the server. When you now run
curl 169.254.169.254/1.0/user-data
inside the instance, you should see the contents of the file test.data.
This is nice, but to be really useful, we need some process in the instance which reads and processes the user data. Enter cloud-init. As already mentioned above, the cirros image that we have used so far does not contain cloud-init. So to play with it, download and install the Ubuntu cloud image as described in my earlier post on Glance. As the size of the image exceeds the resources of the flavor that we have used so far, we also have to create a new flavor as admin user.
source admin-openrc
openstack flavor create \
  --disk 5 \
  --ram 1024 \
  --vcpus 1 m1.tiny
Next, we will create a file holding the user data in a format that cloud-init is able to process. This could be a file starting with
#!/bin/bash
to indicate that this is a shell script that should be run via bash, or a cloud-init configuration file starting with
#cloud-config
Let us try the latter. Using the editor of your choice, create a file called cloud-init-config on the network node with the following content which will instruct cloud-init to create a file called /tmp/foo with content bar.
#cloud-config
write_files:
-   content: bar
    path: /tmp/foo
    permissions: '0644'
Note the indentation – this needs to be valid YAML syntax. Once done, let us recreate our instance using the new image.
source demo-openrc
openstack server delete demo-instance-3
openstack server create \
   --network flat-network \
   --key demo-key \
   --image ubuntu-bionic \
   --flavor m1.tiny \
   --user-data cloud-init-config demo-instance-3
status=""
until [ "$status" == "ACTIVE" ]; do
  status=$(openstack server show \
    demo-instance-3  \
    -f shell \
    | awk -F "=" '/status/ { print $2}' \
    | sed s/\"//g)
  sleep 3
done
sleep 120
openstack server ssh \
   --login ubuntu\
   --private \
   --option StrictHostKeyChecking=no \
   --identity demo-key demo-instance-3
When using this image in our environment with nested virtualization, it can take as long as one or two minutes until the SSH daemon is ready and we can log into our instance. When you are logged in, you should see a new file /tmp/foo which contains the string bar, as expected.
Of course this is still a trivial example, and there is much more that you can do with cloud-init: creating new users (be careful, this will overwrite the standard user – add the default user to avoid this), installing packages, running arbitrary scripts, configuring the network and so forth. But this is a post on the metadata mechanism provided by OpenStack, and not on cloud-init, so we will leave that topic for now.
This post also concludes – at least for the time being – our series focussing on Neutron. We will now turn to block storage – how block storage is provisioned and used on the OpenStack platform, how Cinder is installed and works under the hood and how all this relates to standards like iSCSI and the Linux logical volume manager LVM.

2 Comments