
Apart from Keystone, Glance and Placement are two additional infrastructure services that are part of every OpenStack installation. While Glance is responsible for storing and maintaining disk images, Placement (formerly part of Nova) is keeping track of resources and allocation in a cluster.
Glance installation
Before we get into the actual installation process, let us take a short look at the Glance runtime environment. Different from Keystone, but similar to most other OpenStack services, Glance is not running inside Apache, but is an independent process using a standalone WSGI server.
To understand the startup process, let us start with the setup.cfg file. This file contains an entry point glance-api which, via the usual mechanism provided by Pythons setuptools, will provide a Python executable which runs glance/cmd/api.py. This in turn uses the simple WSGI server implemented in glance/common/wsgi.py. This server is then started in the line
server.start(config.load_paste_app('glance-api'), default_port=9292)
Here we see that the actual WSGI app is created and passed to the server using the PasteDeploy Python library. If you have read my previous post on WSGI and WSGI middleware, you will know that this is a library which uses configuration data to plumb together a WSGI application and middleware. The actual call of the PasteDeploy library is delegated to a helper library in glance/common and happens in the function load_past_app defined here.
Armed with this understanding, let us now dive right into the installation process. We will spend a bit more time with this process, as it contains some recurring elements which are relevant for most of the OpenStack services that we will install and use. Here is a graphical overview of the various steps that we will go through.
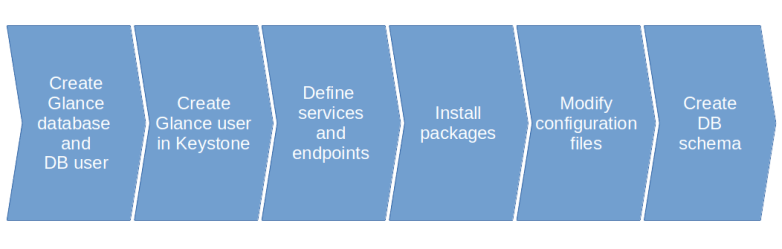
The first thing we have to take care of is the database. Almost all OpenStack services require some sort of database access, thus we have to create one or more databases in our MariaDB database server. In the case of Glance, we create a database called glance. To allow Glance to access this database, we also need to set up a corresponding MariaDB user and grant the necessary access rights on our newly created database.
Next, Glance of course needs access to Keystone to authenticate users and authorize API requests. For that purpose, we create a new user glance in Keystone. Following the recommended installation process, we will in fact create one Keystone user for every OpenStack service, which is of course not strictly necessary.
With this, we have set up the necessary identities in Keystone. However, recall that Keystone is also used as a service catalog to decouple services from endpoints. An API user will typically not access Glance directly, but first get a list of service endpoints from Keystone, select an appropriate endpoint and then use this endpoint. To support this pattern, we need to register Glance with the Keystone service catalog. Thus, we create a Keystone service and API endpoints. Note that the port provided needs to match the actual port on which the Glance service is listening (using the default unless overridden explicitly in the configuration).
OpenStack services typically expose more than one endpoint – a public endpoint, an internal endpoint and an admin endpoint. As described here, there does not seem to be fully consistent configuration scheme that allows an administrator to easily define which endpoint type the services will use. Following the installation guideline, we will install all our services with all three endpoint types.
Next, we can install Glance by simply installing the corresponding APT package. Similar to Keystone, this package comes with a set of configuration files that we now have to adapt.
The first change which is again standard across all OpenStack components is to change the database connection string so that Glance is able to find our previously created database. Note that this string needs to contain the credentials for the Glance database user that we have created.
Next, we need to configure the Glance WSGI middleware chain. As discussed above, Glance uses the PasteDeploy mechanism to create a WSGI application. When you take a look at the corresponding configuration, however, you will see that it contains a variety of different pipeline definitions. To select the pipeline that will actually be deployed, Glance has a configuration option called deployment flavor. This is a short form for the name of the pipeline to be selected, and when the actual pipeline is assembled here, the name of the pipeline is put together by combining the flavor with the string “glance-api”. We use the flavor “keystone” which will result in the pipeline “glance-api-keystone” being loaded.
This pipeline contains the Keystone auth token middleware which (as discussed in our deep dive into tokens and policies) extracts and validates the token data in a request. This middleware components needs access to the Keystone API, and therefore we need to add the required credentials to our configuration in the section [keystone_authtoken].
To complete the installation, we still have to create the actual database schema that Glance expects. Like most other OpenStack services, Glance is able to automatically create this schema and to synchronize an existing database with the current version of the existing schema by automatically running the necessary migration routines. This is done by the helper script glance-manage.
The actual installation process is now completed, and we can restart the Glance service so that the changes in our configuration files are picked up.
Note that the current version of the OpenStack install guide for Stein will instruct you to start two Glance services – glance-api and glance-registry. We only start the glance-api service, for the following reason.
Internally, Glance is structured into a database access layer and the actual Glance API server, plus of course a couple of other components like common services. Historically, Glance used the first of todays three access layers called the Glance registry. Essentially, the Glance registry is a service sitting between the Glance API service and the database, and contains the code for the actual database layer which uses SQLAlchemy. In this setup, the Glance API service is reachable via the REST API, whereas the Glance registry server is only reachable via RPC calls (using the RabbitMQ message queue). This will add an additional layer of security, as the database credentials need to be stored in the configuration of the Glance registry service only, and makes it easier to scale Glance across several nodes. Later, the Glance registry service was deprecated, and the actual configuration instructs Glance to access the database directly (this is the data_api parameter in the Glance configuration file).
As in my previous posts, I will not replicate the exact commands to do all this manually (you can find them in the well-written OpenStack installation guide), but have put together a set of Ansible scripts doing all this. To run them, enter the following commands
git clone https://github.com/christianb93/openstack-labs
cd Lab3
vagrant up
ansible-playbook -i hosts.ini site.yaml
This playbook will not only install and configure the Glance service, but will also download the CirrOS image (which I have mirrored in an S3 bucket as the original location is sometimes a bit slow) and import it into Glance.
Working with Glance images
Let us now play a bit with Glance. The following commands need to be run from the controller node, and we have to source the credentials that we need to connect to the API. So SSH into the controller node and source the credentials by running
vagrant ssh controller
source admin-openrc
First, let us use the CLI to display all existing images.
openstack image list
As we have only loaded one image so far – the CirrOS image – the output will be similar to the following sample output.
+--------------------------------------+--------+--------+
| ID                                   | Name   | Status |
+--------------------------------------+--------+--------+
| f019b225-de62-4782-9206-ed793fbb789f | cirros | active |
+--------------------------------------+--------+--------+
Let us now get some more information on this image. For better readability, we display the output in JSON format.
openstack image show cirros -f json
The output is a bit longer, and we will only discuss a few of the returned attributes. First, there is the file attribute. If you look at this and compare this to the contents of the directory /var/lib/glance/images/, you will see that this is a reference to the actual image stored on the hard disk. Glance delegates the actual storage to a storage backend. Storage backends are provided by the separate glance_store library and include a file store (which simply stores files on the disk as we have observed and is the default), a HTTP store which uses a HTTP GET to retrieve an image, an interface to the RADOS distribute object store and interfaces to Cinder, Swift and VMWare data store.
We also see from the output that images can be active or inactive, belong to a project (the owner field refers to a project), can be tagged and can either be visible for the public (i.e. outside the project to which they belong) or private (i.e. only visible within the project). It is also possible to share images with individual projects by adding these projects as members.
Note that Glance stores image metadata, like visibility, hash values, owner and so forth in the database, while the actual image is stored in one of the storage backends.
Let us now go through the process of adding an additional image. The OpenStack Virtual Machine Image guide contains a few public sources for OpenStack images and explains how adminstrators can create their own images based on the most commonly used Linux distributions. As an example, here are the commands needed to download the latest Ubuntu Bionic cloud image and import it into Glance.
wget http://cloud-images.ubuntu.com/bionic/current/bionic-server-cloudimg-amd64.img
openstack image create \
    --disk-format qcow2 \
    --file bionic-server-cloudimg-amd64.img \
    --public \
    --project admin \
    ubuntu-bionic
We will later see how we need to reference an image when creating a virtual machine.
Installing the placement service
Having discussed the installation process for the Glance service in a bit more detail, let us now quickly go over the steps to install Placement. Structurally, these steps are almost identical to those to install Glance, and we will not go into them in detail.

Also the changes in the configuration file are very similar to those that we had to apply for Glance. Placement again uses the Keystone authtoken plugin, so that we have to supply credentials for Keystone in the keystone_authtoken section of the configuration file. We also have to supply a database connection string. Apart from that, we can take over the default values in the configuration file without any further changes.
Placement overview
Let us now investigate the essential terms and objects that the Placement API uses. As the openstack client does not yet contain full support for placement, we will directly use the API using curl. With each request, we need to include two header parameters.
- X-Auth-Token needs to contain a valid token that we need to retrieve from Keystone first
- OpenStack-API-Version needs to be included to define the version of the API (this is the so-called microversion).
Here is an example. We will SSH into the controller, source the credentials, get a token from Keystone and submit a GET request on the URL /resource_classes that we feed into jq for better readability.
vagrant ssh controller
source admin-openrc
sudo apt-get install jq
token=$(openstack token issue -f json | jq -r ".id")
curl \
  -H "X-Auth-Token: $token" \
  -H "OpenStack-API-Version: placement 1.31"\
  "http://controller:8778/resource_classes" | jq
The resulting list is a list of all resource classes known to Placement. Resource classes are types of resources that Placement manages, like IP addresses, vCPUs, disk space or memory. In a fully installed system, OpenStack services can register as resource providers. Each provider offers a certain set of resource classes, which is called an inventory. A compute node, for instance, would typically provide CPUs, disk space and memory. In our current installation, we cannot yet test this, but in a system with compute nodes, the inventory for a compute node would typically look as follows.
{
  "resource_provider_generation": 3,
  "inventories": {
    "VCPU": {
      "total": 2,
      "reserved": 0,
      "min_unit": 1,
      "max_unit": 2,
      "step_size": 1,
      "allocation_ratio": 16
    },
    "MEMORY_MB": {
      "total": 3944,
      "reserved": 512,
      "min_unit": 1,
      "max_unit": 3944,
      "step_size": 1,
      "allocation_ratio": 1.5
    },
    "DISK_GB": {
      "total": 9,
      "reserved": 0,
      "min_unit": 1,
      "max_unit": 9,
      "step_size": 1,
      "allocation_ratio": 1
    }
  }
}
Here we see that the compute node has two virtual CPUs, roughly 4 GB of memory and 9 GB of disk space available. For each resource provider, Placement also maintains usage data which keeps track of the current usage of the resources. Here is a JSON representation of the usage for a compute node.
{
  "resource_provider_generation": 3,
  "usages": {
    "VCPU": 1,
    "MEMORY_MB": 128,
    "DISK_GB": 1
  }
}
So in this example, one vCPU, 128 MB RAM and 1 GB disk of the compute node are in use. To link consumers and usage information, Placement uses allocations. An allocation represents a usage of resources by a specific consumer, like in the following example.
{
  "allocations": {
    "aaa957ac-c12c-4010-8faf-55520200ed55": {
      "resources": {
        "DISK_GB": 1,
        "MEMORY_MB": 128,
        "VCPU": 1
      },
      "consumer_generation": 1
    }
  },
  "resource_provider_generation": 3
}
In this case, the consumer (represented by the UUID aaa957ac-c12c-4010-8faf-55520200ed55) is actually a compute instance which consumes 1 vCPU, 128 MB memory and 1 GB disk space. Here is a diagram that represents a simplified version of the Placement data model.
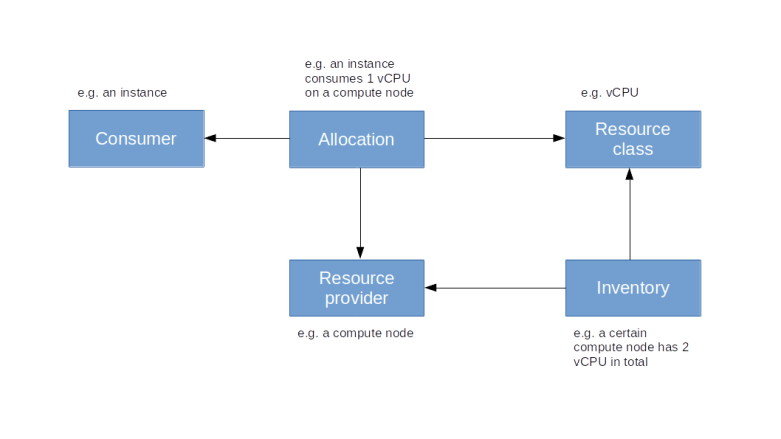
Placement offers a few additional features like Traits, which define qualitative properties of resource providers, or aggregates which are groups of resource providers, or the ability to make reservations.
Let us close this post by briefly discussing the relation between Nova and Placement. As we have mentioned above, compute nodes represent resource providers in Placement, so Nova needs to register resource provider records for the compute nodes it manages and providing the inventory information. When a new instance is created, the Nova scheduler will request information on inventories and current usage from Placement to determine the compute node on which the instance will be placed, and will subsequently update the allocations to register itself as a consumer for the resources consumed by the newly created instance.
With this, the installation of Glance and Placement is complete and we have all the ingredients in place to start installing the Nova services in the next post.

2 Comments