
In the previous post, we have seen how Vagrant can be used to define, create and destroy KVM virtual machines. Today, we will dig a bit deeper into the objects managed by the libvirt library and learn how to create virtual machines using the libvirt toolkit directly
Creating a volume
When creating a virtual machine, you need to supply a volume which will be attached to the machine, either as a bootable root partition or as an additional device. In the libvirt object model, volumes are objects with a lifecycle independent of a virtual machine. Let us take a closer look at how volumes are defined and managed by libvirt.
At the end of the day, a volume which is attached to a virtual machine is linked to some physical storage – usually a file, i.e. a disk image – on the host on which KVM is running. These physical file locations are called target in the libvirt terminology. To organize the storage available for volume targets, libvirt uses the concept of a storage pool. Essentially, a storage pool is some physical disk space which is reserved for libvirt and used to create and store volumes.

Libvirt is able to manage different types of storage pools. The most straightforward type of storage pool is a directory pool. In this case, the storage available for the pool is simply a directory, and each volume in the pool is a disk image stored in this directory. Other, more advanced pool types include pools that utilize storage provided by an NFS server or an iSCSI server, LVM volume groups, entire physical disks or IP storage like Ceph and Gluster.
When libvirt is initially installed, a default storage pool is automatically created. To list all available storage pools and get some information on the default pool, use the commands
virsh pool-list
virsh pool-info default
virsh pool-dumpxml default
Here we see that the default pool is of type “directory” and its target (i.e. location on the host file system) is /var/lib/libvirt/images
Let us now create an image in this pool. There are several ways to do this. In our case, we will first download a disk image and then upload this image into the pool, which will essentially create a copy of the image inside the pool directory and thus under libvirts control. For our tests, we will use the Cirros image, as it has a password enabled by default and is very small. To obtain a copy, run the commands
wget http://download.cirros-cloud.net/0.4.0/cirros-0.4.0-x86_64-disk.img
mv cirros-0.4.0-x86_64-disk.img cirros-0.4.0-x86_64-disk.qcow2
It happened to me several times that the download was corrupted, so it is a good idea to check the integrity of the image using the MD5 checksums provided here. For our image, the MD5 checksum (which you can verify using md5sum cirros-0.4.0-x86_64-disk.qcow2) should be 443b7623e27ecf03dc9e01ee93f67afe.
Now let us import this image into the default pool. First, we use the qemu-img tool to figure out the size of the image, and then we use virsh vol-create-as to create a volume in the default pool which is large enough to hold our image.
qemu-img info cirros-0.4.0-x86_64-disk.qcow2
virsh vol-create-as \
  default \
  cirros-image.qcow2 \
  128M \
  --format qcow2
When this command completes, we can verify that a new disk image has been created in /var/lib/libvirt/images.
ls -l /var/lib/libvirt/images
virsh vol-list --pool=default
sudo qemu-img info /var/lib/libvirt/images/cirros-image.qcow2
virsh vol-dumpxml cirros-image.qcow2 --pool=default
This image is now logically still empty, but we can now perform the actual upload which will copy the contents of our downloaded image into the libvirt volume
virsh vol-upload \
  cirros-image.qcow2 \
  cirros-0.4.0-x86_64-disk.qcow2 \
  --pool default
Create a network
The next thing that we need to spin up a useful virtual machine is a network. To create a network, we use a slightly different approach. In libvirt, every object is defined and represented by an XML structure (placed in a subdirectory of /etc/libvirt). We have already seen some of these XML structures in this and the previous post. If you want full control over each attribute of a libvirt managed object, you can also create them directly from a corresponding XML structure. Let us see how this works for a network. First, we create an XML file with a network definition – use this link for a full description of the structure of the XML file.
This file contains hidden or bidirectional Unicode text that may be interpreted or compiled differently than what appears below. To review, open the file in an editor that reveals hidden Unicode characters.
Learn more about bidirectional Unicode characters
| <network> | |
| <name>test-network</name> | |
| <forward mode='nat'> | |
| <nat> | |
| <port start='1024' end='65535'/> | |
| </nat> | |
| </forward> | |
| <bridge name='virbr-test' stp='on' delay='0'/> | |
| <ip address='192.168.200.1' netmask='255.255.255.0'> | |
| <dhcp> | |
| <range start='192.168.200.2' end='192.168.200.254'/> | |
| </dhcp> | |
| </ip> | |
| </network> | |
Here we define a new virtual network called test-network. This network has NAT’ing enabled, which implies that libvirt will create iptables rules to masquerade outgoing traffic so that any VM that we attach to this network later will be able to reach the public network. We also instruct libvirt to bring up a virtual Linux bridge virbr-test to implement this network on the host. Finally, we specify a CIDR for our network and ask libvirt to start a DHCP server listening on this network that will hand out leases for a specific range of IP address.
Store this XML structure in a file /tmp/test-network.xml and then use it to create a network as follows.
virsh net-define /tmp/test-network.xml
virsh net-start test-network
You can now inspect the created bridge, iptables rule and DNS processes by running
sudo iptables -S -t nat
brctl show virbr-test
ip addr show dev virbr-test
ps ax | grep "dnsmasq"
sudo cat /var/lib/libvirt/dnsmasq/test-network.conf
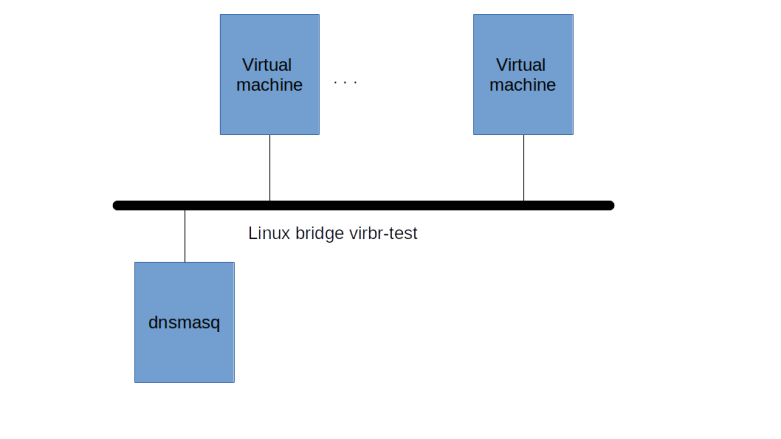
Looking at all this, we find that libvirt will start a dnsmasq process which is listening on the virbr-test bridge and managing the IP range that we specify. When we start a virtual machine later on, this machine will also be attached to the bridge using a TUN device, so that we have the following picture.
Note that the IP range assigned to the network should not overlap with the IP range of any other libvirt virtual network (or any other virtual network on your host created by e.g. Docker or VirtualBox)
Bring up a machine
We are now ready to start a machine which is attached to our previously defined network and volume (and actually booting from this volume). To create a virtual machine – called a domain in libvirt – we again have several options. We could use the graphical virt-manager or, similar to a network, could prepare an XML file with a domain definition and use virsh create to create a domain from that. A slightly more convenient method is to use the virt-install tool which is part of the virt-manager project. Here is the command that we need to create a new domain called test-instance using our previously created image and network.
virt-install \
  --name test-instance \
  --memory 512 \
  --vcpus 1 \
  --import \
  --disk vol=default/cirros-image.qcow2,format=qcow2,bus=virtio \
  --network network=test-network \
  --graphics vnc,keymap=local --noautoconsole
Let us quickly go through some of the parameters that we use. First, we give the instance a name, define the amount of RAM that we allocate and the number of vCPUs that the machine will have. With the import flag, we instruct virt-install to boot from the first provided disk (alternatively, virt-install has an option to boot from an image defined using the –location directive, which can point to a disk image or a remote location).
In the next line, we specify the first (and only) disk that we want to attach. Note that we refer to the logical name of the volume, in the form pool/volume name. We also tell libvirt which format our image has and that it should use the virtio driver to set up the virtual storage controller in our machine.
In the next line, we attach our machine to the test network. The CirrOS image that we use contains a startup script which will use DHCP to get a lease, so it will get a lease from the DHCP server that libvirt has attached to this network. Finally, in the last line, we ask libvirt to start a VNC server which will reflect the virtual graphics device, mouse and keyboard of the machine, using the same keymap as on the local machine, and to not start a VNC console automatically.
To verify the startup process, you have several options. First, you can use the virt-viewer tool which will display a list of all running machines and allow you to connect via VNC. Alternatively, you can use virt-manager as we have done it in the last post, or use
virt console test-instance
to connect to a text console and log in from there (the user is cirros, the password is gocubsgo). Once the machine is up, you can also SSH into it:
ip=$(virsh domifaddr test-instance \
  | grep "ipv4"  \
  | awk '{print $4}'\
  | sed 's/\/24//')
ssh cirros@$ip
When playing with this, you will find that it takes a long time for the machine to boot. The reason is that the image we use is meant to be used as a lean test image in a cloud platform and therefore tries to query metadata from a metadata server which, in our case, is not present. There are ways to handle this, we get back to this in a later post.
Using backing stores
In the setup we have used so far, every machine has a disk image serving as its virtual hard disk, and all these disk images are maintained independently. Obviously, if you are running a larger number of guests on a physical host, this tends to consume a lot of disk space. To optimize this setup, libvirt allows us to use overlay images. An overlay image is an image which is backed by another images and uses a copy-on-write approach so that we only have to store the data which is actually changed compared to the underlying image.
To try this out, let us first delete our machine again.
virsh destroy test-instance
virsh undefine test-instance
Now we create a new volume which is an overlay volume backed by our CirrOS image.
virsh vol-create-as default test-image.qcow2 20G \
  --format qcow2 \
  --backing-vol /var/lib/libvirt/images/cirros-image.qcow2 \
  --backing-vol-format qcow2
Here we create a new image test-image.qcow2 (second parameter) of size 20 GB (third parameter in the default pool (first parameter) in qcow2 format (fourth parameter). The additional parameters instruct libvirt to set this image up as an overlay image, backed by our existing CirrOS image. When you now inspect the created image using
sudo ls -l /var/lib/libvirt/images/test-image.qcow2
sudo qemu-img info /var/lib/libvirt/images/test-image.qcow2
you will see a reference to the backing image in the output as well. Make sure that the format of the backing image is correct (apparently libvirt cannot autodetect this, and I had problem when not specifying the format explicitly). Also note that the physical file behind the image is still very small, as it only needs to capture some metadata and changed blocks, and we have not made any changes yet. We can now again bring up a virtual machine, this time using the newly created overlay image.
virt-install \
--name test-instance \
--memory 512 \
--vcpus 1 \
--import \
--disk vol=default/test-image.qcow2,format=qcow2,bus=virtio \
--network network=test-network \
--graphics vnc --noautoconsole
This completes our short tour through the libvirt toolset and related tools. There are a couple of features that libvirt offers that we have not yet looked at (including things like network filters or snapshots), but I hope that with the overview given in this and the previous post, you will find your way through the available documentation on libvirt.org.
We have seen that to create virtual machines, we have several options, including CLI tools like virsh and virt-install suitable for scripting. Thus libvirt is a good candidate if you want to automate the setup of virtual environments. Being a huge fan of Ansible, I did of course also play with Ansible to see how we can use it to manage virtual machines, which will be the content of my next post.

2 Comments