
When you first install and play with Vagrant, chances are that you will be using the VirtualBox VM provider initially, which is supported out-of-the-box by Vagrant and open source. However, in some situations, VirtualBox might not be your preferred hypervisor. Luckily, with the help of a plugin, Vagrant can also be used with KVM. In this and the next post, we will learn how this works and take the opportunity to also learn a bit on KVM, libvirt and all that.
KVM and libvirt
KVM (Kernel Virtual Machine) is a Linux kernel module which turns Linux into a hypervisor, making use of the hardware support for virtualization that is built into all modern x86 CPUs (this feature is called VT-X on Intel CPUs and AMD-V on AMD CPUs). Typically, KVM is not used directly, but is being managed by libvirt, which is a collection of software components like an API, a daemon for remote access and the virsh command line utility to control virtual machines.
Libvirt, in turn, can be used with clients in most major programming languages (including C, Java, Python and Go), and is employed by many virtualization tools like the graphical virtual machine manager virt-manager or OpenStack Nova to create, manage and destroy virtual machines. There is also a Ruby client for the libvirt API, which makes it accessible from Vagrant.
In addition to KVM, libvirt is actually able to leverage many other virtualization providers, including LXC, VMWare and HyperV. The following diagram summarizes how the components discussed so far are related, the components that we will see in action today are marked.

Creating virtual machines with Vagrant
The above diagram indicates that we have a choice between several methods to create virtual machines. I personally like to use Vagrant for that purpose. As libvirt is not one of the standard providers built into Vagrant, we will have to install a plugin first. Assuming that you have not yet installed Vagrant at all, here are the steps needed to install and set up Vagrant, KVM and the required plugin on a standard Ubuntu 18.04 install. First, we install the libvirt library, the virt-manager and vagrant, and add the current user to the groups libvirt and KVM.
sudo apt-get update
sudo apt-get install \
  libvirt-daemon \
  libvirt-clients \
  virt-manager \
  python3-libvirt \
  vagrant \
  vagrant-libvirt
sudo adduser $(id -un) libvirt
sudo adduser $(id -un) kvm
At this point, you will have to log out (or run su -l) and in again to make sure that the new group assignments become effective. Note that we install the libvirt Vagrant plugin from the Ubuntu package and not directly, for other Linux distributions, you might want to install using vagrant plugin install vagrant-libvirt. For this post, I have used Vagrant 2.0.2 and version 0.0.43 of the plugin. Finally we download a Debian Jessie image (called a box in Vagrant terminology)
vagrant box add \
  debian/jessie64 \
  --provider=libvirt
Now we are ready to bring up our first machine. Obviously, we need a Vagrant file for that purpose. Here is a minimum Vagrant file
ENV['VAGRANT_DEFAULT_PROVIDER'] = 'libvirt'
Vagrant.configure("2") do |config|
  config.vm.box = "debian/jessie64"
  config.vm.hostname = "test"
  config.vm.provider :libvirt do |v|
    v.cpus=1
    v.memory=1024
    v.default_prefix="test"
  end
end
In the first line, we set an environment variable which instructs Vagrant to use the libvirt provider (instead of the default provider VirtualBox). In the next few lines, we define a virtual machine as usual. In the provider specific block, we define the number of vCPUs for the machine and the amount of RAM and set the prefix that Vagrant is going to use to build a libvirt domain name for the VM.
Now you should be able to bring up the machine using vagrant up in the directory where the file is located.
Once this command completes, it is time to analyze the resulting configuration a bit. Basically, as explained here, the plugin will go through the following steps to bring up the machine.
- Upload the image which is part of the box that we use to /var/lib/libvirt/images/, into a libvirt storage pool. This is important to understand in case you change the box, as in this case, you will have to remove the image manually again to force a refresh. We will learn more about storage pools in the next post
- create a virtual machine, called a domain in the libvirt terminology
- Create a virtual network and attach it to the machine – we get back to this point later. In addition, a “public IP” will be allocated for this IP address, using the built-in DHCP server
- Create an SSH key and inject it into the machine
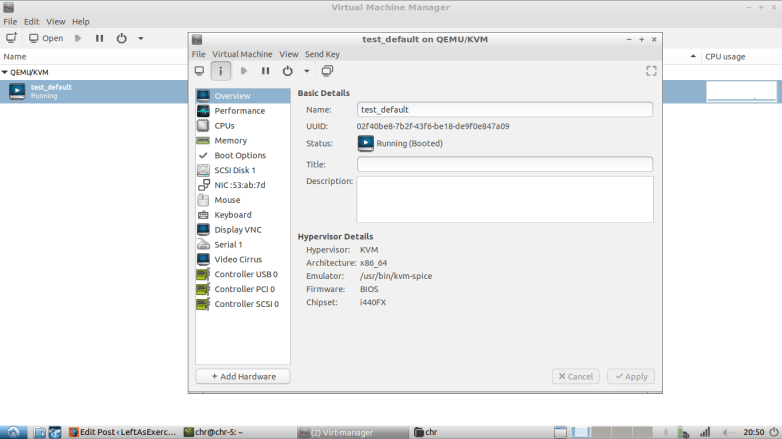
Let us try to learn more about the configuration that Vagrant has created for us. First, run virt-manager to start the graphical machine manager. You should now see a new virtual machine in the overview, and when doubleclicking on the machine, a terminal should open. As the Debian image that we use has a passwordless root account, you should actually be able to log in as root.
By clicking on the “Info” icon or via “View –> Details”, you should also be able to see the configuration of the machine, including things like the attached virtual disks and network interfaces.
Of course we can also get this – and even more – information using the command line client virsh. First, run virsh list to see a list of all domains (i.e. virtual machines). Assuming that you have no other libvirt-managed virtual machines running, this will give you only one line corresponding to the domain test_default which we have already seen in the virtual machine manager. You can retrieve the basic facts about this domain using
virsh dominfo test_default
The virsh utility has a wide variety of options, the best way to learn it is to type virsh help and simply try out a few of the commands. A few notable examples are
# List all block devices attached to our VM
virsh domblkinfo test_default
# List all storage pools
virsh pool-list
# List all images in the default pool
virsh vol-list default
# List all virtual network interfaces attached to the VM
virsh domiflist test_default
# List all networks
virsh net-list
Internally, libvirt uses XML configuration files to maintain the state of the virtual machines, networks and storage objects. To see, for instance, the full XML configuration of our test machine, run
virsh dumpxml test_default
In the output, we now see all objects – CPU, disks and disk controller, network interfaces, graphics card, keyboard etc. – attached to the machine. We can now dump further XML structures and data to deep dive into the configuration. For instance, the XML output for the machine tells us that the machine is connected to the network vagrant-libvirt, corresponding to the virtual Linux bridge virbr1 (of course, libvirt uses bridges to model networks). To get more information on this, run
virsh net-dumpxml vagrant-libvirt
virsh net-dhcp-leases vagrant-libvirt
ifconfig virbr1
brctl show virbr1
It is instructive to play a bit with that, maybe add a second virtual machine using virt-manager and see how it is reflected in the virsh tool and the network configuration and so forth.
Advanced features
Let us now look at some of the more advanced options you have with the libvirt Vagrant plugin. The first option I would like to mention is to use custom networking. For that purpose, assume that you have created a libvirt network outside of Vagrant. As an example, create a file /tmp/my-network.xml with the following content.
This file contains hidden or bidirectional Unicode text that may be interpreted or compiled differently than what appears below. To review, open the file in an editor that reveals hidden Unicode characters.
Learn more about bidirectional Unicode characters
| <network> | |
| <name>my-network</name> | |
| <bridge name='my-bridge' stp='on' delay='0'/> | |
| <ip address='10.100.0.1' netmask='255.255.255.0'/> | |
| </network> |
Then run the following commands to create and start a custom network from this definition using virsh.
virsh net-define /tmp/my-network.xml
virsh net-start my-network
This will create a simple network supported by a Linux bridge my-bridge (which libvirt will create for us). As there is no forward block, the network will be isolated and machines attached to it will not be able to connect to the outside world, so this is the equivalent of a private network. To connect a machine to this network, use the following Vagrant file (make sure to delete our first machine again using vagrant destroy first).
ENV['VAGRANT_DEFAULT_PROVIDER'] = 'libvirt'
Vagrant.configure("2") do |config|
  config.vm.box = "debian/jessie64"
  config.vm.hostname = "test"
  config.vm.network :private_network,
      :ip => "10.100.0.11",
      :libvirt__network_name => "my-network"
  config.vm.provider :libvirt do |v|
    v.cpus=1
    v.memory=1024
    v.default_prefix="test"
  end
end
Note the line starting with config.vm.network, in which we add our custom network as private network, with a static IP address. When you now run vagrant up again, and repeat the analysis above, you will see that Vagrant has actually attached our machine to two networks – the private network and, in addition, a “public” network which Vagrant will always create to reach the machines via SSH and to enable access to the Internet from the machine.
At this point, it is important that we create the network before we run Vagrant. In fact, if we refer to a network in a Vagrantfile that does not exist yet, Vagrant will be happy to create the network for us, but will use default settings – for instance it will attach a DHCP server to our network and allow access to the internet. This is most likely not what you want, so make sure to create the network using virsh net-define before running vagrant up.
Next let us try to understand how we can use Vagrant to attach additional disks to our virtual machine. Thanks to the libvirt plugin, this is again very easy. Simply add a line like
v.storage :file, :size => '5G', :type => 'raw', :bus => 'scsi'
to the customization section (i.e. to the section which also contains the settings for the number of virtual CPUs and the memory). This will attach a virtual SCSI device to our machine, with a size of 5 GB and image type “raw”. Vagrant will then take care of creating this image, setting it up as a volume in libvirt and attaching it to the virtual machine.
Note that the plugin is also able to automatically synchronize folders in the virtual machine with folders on the host, using for instance rsync. Please refer to the excellent documentation for this and more options.
This completes our short tour through the Vagrant libvirt plugin. You might have realized that libvirt and virsh are powerful tools with a rich data model – we have seen objects like domains, networks, volumes and storage devices. In the next post, we will dig a bit deeper into the inner structure of libvirt and learn how to create virtual machines from scratch, without using a tool like Vagrant.

Nice post man, really helpful
LikeLike