
After provisioning our first load balancer in the previous post using Octavia, we will now add listeners and a pool of members to our load balancer to capture and route actual traffic through it.
Creating a listener
The first thing which we will add is called a listener in the load balancer terminology. Essentially, a listener is an endpoint on a load balancer reachable from the outside, i.e. a port exposed by the load balancer. To see this in action, I assume that you have followed the steps in my previous post, i.e. you have installed OpenStack and Octavia in our playground and have already created a load balancer. To add a listener to this configuration, let us SSH into the network node again and use the OpenStack CLI to set up our listener.
vagrant ssh network
source demo-openrc
openstack loadbalancer listener create \
  --name demo-listener \
  --protocol HTTP\
  --protocol-port 80 \
  --enable \
  demo-loadbalancer
openstack loadbalancer listener list
openstack loadbalancer listener show demo-listener
These commands will create a listener on port 80 of our load balancer and display the resulting setup. Let us now again log into the amphora to see what has changed.
amphora_ip=$(openstack loadbalancer amphora list \
  -c lb_network_ip -f value)
ssh -i amphora-key ubuntu@$amphora_ip
pids=$(sudo ip netns pids amphora-haproxy)
sudo ps wf -p $pids
sudo ip netns exec amphora-haproxy netstat -l -p -n -t
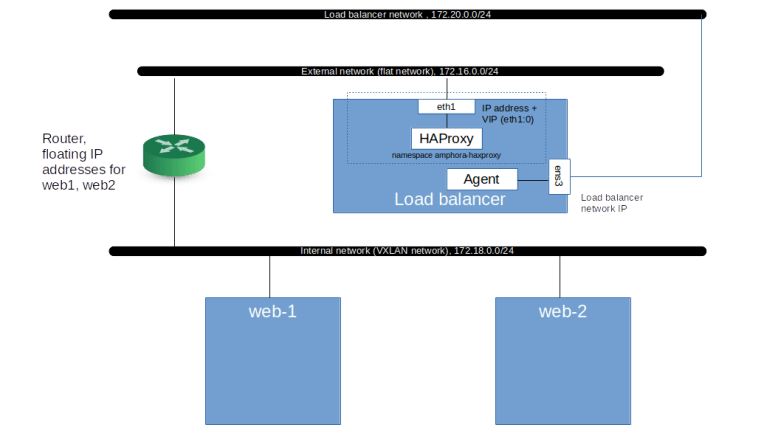
We now see a HAProxy inside the amphora-haproxy namespace which is listening on the VIP address on port 80. The HAProxy instance is using a configuration file in /var/lib/octavia/. If we display this configuration file, we see something like this.
# Configuration for loadbalancer bc0156a3-7d6f-4a08-9f01-f5c4a37cb6d2
global
    daemon
    user nobody
    log /dev/log local0
    log /dev/log local1 notice
    stats socket /var/lib/octavia/bc0156a3-7d6f-4a08-9f01-f5c4a37cb6d2.sock mode 0666 level user
    maxconn 1000000

defaults
    log global
    retries 3
    option redispatch
    option splice-request
    option splice-response
    option http-keep-alive

frontend 34ed8dd1-11db-47ee-a682-24a84d879d58
    option httplog
    maxconn 1000000
    bind 172.16.0.82:80
    mode http
    timeout client 50000
So we see that our listener shows up as a HAProxy frontend (identified by the UUID of the listener) which is bound to the load balancer VIP and listening on port 80. No forwarding rule has been created for this port yet, so traffic arriving there does not go anywhere at the moment (which makes sense, as we have not yet added any members). Octavia will, however, add our ports to the security group of the VIP to make sure that our traffic can reach the amphora. So at this point, our configuration looks as follows.
Adding members
Next we will add members, i.e. backends to which our load balancer will distribute traffic. Of course, the tiny CirrOS image that we use does not easily allow us to run a web server. We can, however, use netcat to create a “fake webserver” which will simply answer to each request with the same fixed string (I have first seen this nice little trick somewhere on StackExchange, but unfortunately I have not been able to dig out the post again, so I cannot provide a link and proper credits here). To make this work we first need to log out of the amphora again and, back on the network node, open port 80 on our internal network (to which our test instances are attached) so that traffic from the external network can reach our instances on port 80.
project_id=$(openstack project show \
  demo \
  -f value -c id)
security_group_id=$(openstack security group list \
  --project $project_id \
  -c ID -f value)
openstack security group rule create \
  --remote-ip 0.0.0.0/0 \
  --dst-port 80 \
  --protocol tcp \
  $security_group_id
Now let us create our “mini web server” on the first instance. The best approach is to use a terminal multiplexer like tmux to run this, as it will block the terminal we are using.
openstack server ssh \
  --identity demo-key \
  --login cirros --public web-1
# Inside the instance, enter:
while true; do
  echo -e "HTTP/1.1 200 OK\r\n\r\n$(hostname)" | sudo nc -l -p 80
done
Then, do the same on web-2 in a new session on the network node
source demo-openrc
openstack server ssh \
  --identity demo-key \
  --login cirros --public web-2
while true; do
  echo -e "HTTP/1.1 200 OK\r\n\r\n$(hostname)" | sudo nc -l -p 80
done
Now we have two “web server” running. Open another session on the network node and verify that you can reach both instances separately.
source demo-openrc
# Get floating IP addresses
web_1_fip=$(openstack server show \
  web-1 \
  -c addresses -f value | awk '{ print $2}')
web_2_fip=$(openstack server show \
  web-2 \
  -c addresses -f value | awk '{ print $2}')
curl $web_1_fip
curl $web_2_fip
So at this point, our web servers can be reached individually via the external network and the router (this is why we had to add the security group rule above, as the source IP of the requests will be an IP on the external network and thus would by default not be able to reach the instance on the internal network). Now let us add a pool, i.e. a set of backends (the members) between which the load balancer will distribute the traffic.
pool_id=$(openstack loadbalancer pool create \
  --protocol HTTP \
  --lb-algorithm ROUND_ROBIN \
  --enable \
  --listener demo-listener \
  -c id -f value)
When we now log into the loadbalancer again, we see that a backend configuration has been added to the HAProxy configuration, which will look similar to this sample.
backend af116765-3357-451c-8bf8-4aa2d3f77ca9:34ed8dd1-11db-47ee-a682-24a84d879d58
    mode http
    http-reuse safe
    balance roundrobin
    fullconn 1000000
    option allbackups
    timeout connect 5000
    timeout server 50000
However, there are still no real targets added to the backend, as the load balancer does not yet know about our web servers. As a last step, we now add these servers to the pool. At this point, it is important to understand which IP address we use. One option would be to use the floating IP addresses of the servers. Then, the target IP addresses would be on the same network as the VIP, leading to a setup which is known as “one armed load balancer”. Octavia can of course do this, but we will create a slightly more advanced setup in which the load balancer will also serve as a router, i.e. it will talk to the web servers on the internal network. On the network node, run
pool_id=$(openstack loadbalancer pool list \
  --loadbalancer demo-loadbalancer \
  -c id -f value)
for server in web-1 web-2; do
  ip=$(openstack server show $server \
       -c addresses -f value \
       | awk '{print $1'} \
       | sed 's/internal-network=//' \
       | sed 's/,//')
  openstack loadbalancer member create \
    --address $ip \
    --protocol-port 80 \
    --subnet-id internal-subnet \
    $pool_id
done
openstack loadbalancer member list $pool_id
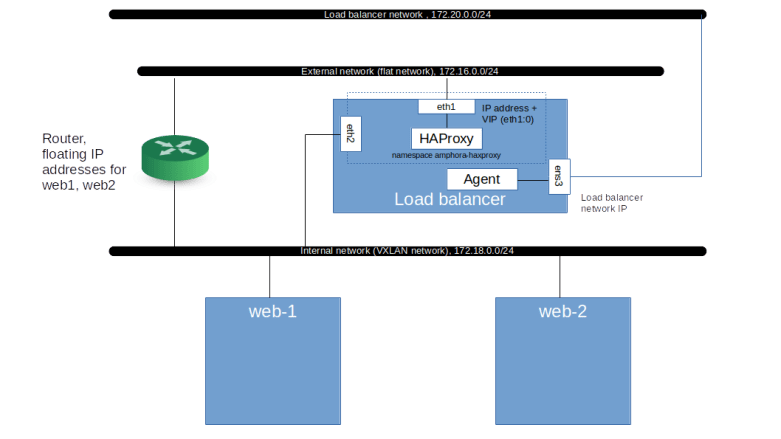
Note that to make this setup work, we have to pass the additional parameter –subnet-id to the creation command for the members pointing to the internal network on which the specified IP addresses live, so that Octavia knows that this subnet needs to be attached to the amphora as well. In fact, we can see here that Octavia will add ports for all subnets which are specified via this parameter if the amphora is not yet connected to this subnet. Inside the amphora, the interface connected to this subnet will be added inside the amphora-haproxy namespace, resulting in the following setup.
If we now look at the HAProxy configuration file inside the amphora, we find that Octavia has added two server entries, corresponding to our two web servers. Thus we expect that traffic is load balanced to these two servers. Let us try this out by making requests to the VIP from the network node.
vip=$(openstack loadbalancer show \
  -c vip_address -f value \
   demo-loadbalancer)
for i in {1..10}; do
  curl $vip;
  sleep 1
done
We see nicely that every second requests goes to the first server and every other request goes to the second server (we need a short delay between the requests, as the loop in our “fake” web servers needs time to start over).
Health monitors
This is nice, but there is an important ingredient which is still missing in our setup. A load balancer is supposed to monitor the health of the pool members and to remove members from the round-robin procedure if a member seems to be unhealthy. To allow Octavia to do this, we still need to add a health monitor, i.e. a health check rule, to our setup.
openstack loadbalancer healthmonitor create \
  --delay 10 \
  --timeout 10 \
  --max-retries 2 \
  --type HTTP \
  --http-method GET \
  --url-path "/" $pool_id
After running this, it is instructive to take a short look at the terminal in which our fake web servers are running. We will see additional requests, which are the health checks that are executed against our endpoints.
Now go back into the terminal on web-2 and kill the loop. Then let us display the status of the pool members.
openstack loadbalancer status show demo-loadbalancer
After a few seconds, the “operating_status” of the member changes to “ERROR”, and when we repeat the curl, we only get a response from the healthy server.
How does this work? In fact, Octavia uses the health check functionality that HAProxy offers. HAProxy will expose the results of this check via a Unix domain socket. The health daemon built into the amphora agent connects to this socket, collects the status information and adds it to the UDP heartbeat messages that it sends to the Octavia control plane via UDP port 5555. There, it is written into the various Octavia tables and finally collected again from the API server when we make our request via the OpenStack CLI.
This completes our last post on Octavia. Obviously, there is much more that could be said about load balancers, using a HA setup with VRRP for instance or adding L7 policies and rules. The Octavia documentation contains a number of cookbooks (like the layer 7 cookbook or the basic load balancing cookbook) that contain a lot of additional information on how to use these advanced features.
