
In the last post, we did go through the installation process and the high-level architecture of Nova, talking about the Nova API server, the Nova scheduler and the Nova agent. Today, we will make this a bit more tangible by observing how a typical request to provision an instance flows through this architecture.
The use case we are going to consider is the creation of a virtual server, triggered by a POST request to the /servers/ API endpoint. This is a long and complicated process, and we try to focus on the main path through the code without diving into every possible detail. This implies that we will skim over some points very briefly, but the understanding of the overall process should put us in a position to dig into other parts of the code if needed.
Roughly speaking, the processing of the request will start in the Nova API server which will perform validations and enrichments and populate the database. Then, the request is forwarded to the Nova conductor which will invoke the scheduler and eventually the Nova compute agent on the compute nodes. We will go through each of these phases in a bit more detail in the following sections.
Part I – the Nova API server
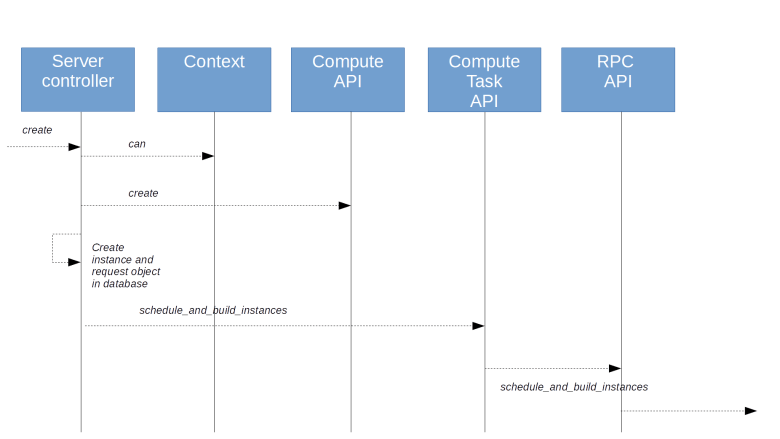
Being triggered by an API request, the process of course starts in the Nova API server. We have already seen in the previous post that the request is dispatched to a controller based on a set of hard-wired routes. For the endpoint in question, we find that the request is routed to the method create of the server controller.
This method first assembles some information like the user data which needs to be passed to the instance or the name of the SSH key to be placed in the instance. Then, authorization is carried out be calling the can method on the context (which, behind the scenes, will eventually invoke the Oslo policy rule engine that we have studied in our previous deep dive). Then the request data for networks, block devices and the requested image is processed before we eventually call the create method of the compute API. Finally, we parse the result and use a view builder to assemble a response.
Let us now see follow the call into the compute API. Here, all input parameters are validated and normalized, for instance by adding defaults. Then the method _provision_instances is invoked, which builds a request specification and the actual instance object and stores these objects in the database.
At this point, the Nova API server is almost done. We now call the method schedule_and_build_instances of the compute task API. From here, the call will simply be delegated to the corresponding method of the client side of the conductor RPC API which will send a corresponding RPC message to the conductor. At this point, we leave the Nova API server and enter the conductor. The flow through the code up to this point is summarized in the diagram below.
Part II – the conductor
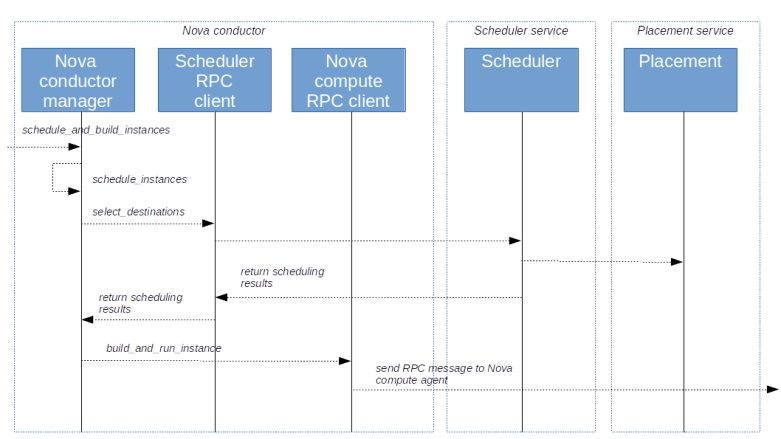
In the last post, we have already seen that RPC calls are accepted by the Nova conductor service and are passed on to the Nova conductor manager. The corresponding method is schedule_and_build_instances
This method first retrieves the UUIDs of the instances from the request. Then, for each instance, the private method self._schedule_instances is called. Here, the class SchedulerQueryClient is used to submit an RPC call to the scheduler, which is being processed by the schedulers select_destinations method.
We will not go into the details of the scheduling process here, but simply note that this will in turn make a call to the placement service to retrieve allocation candidates and then calls the scheduler driver to actually select a target host.
Back in the conductor, we check whether the scheduling was successful. It not, the instance is moved into the cell0. If yes, we determine the cell in which the selected host is living, update some status information and eventually, at the end of the method, invoke the method build_and_run_instance of the RPC client for the Nova compute service. At this point, we leave the Nova conductor service and the processing continues in the Nova compute service running on the selected host.
Part III – the processing on the compute node
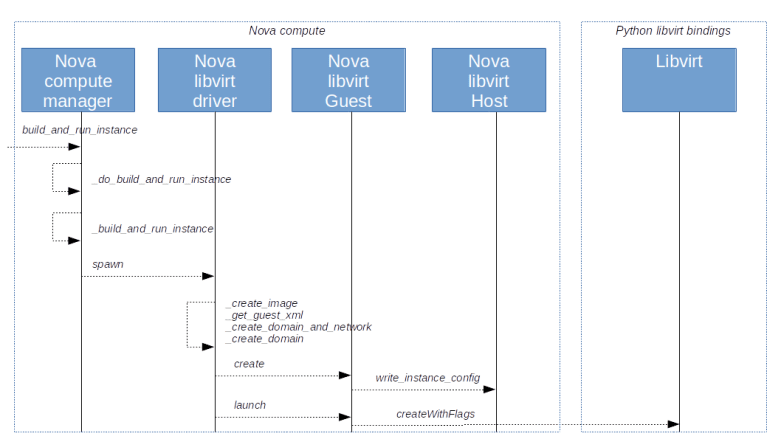
We have now reached the Nova compute agent running on the selected compute node, more precisely the method build_and_run_instance of the Nova compute manager. Here we spawn a separate worker thread which runs the private method _do_build_and_run_instance.
This method updates the VM state to BUILDING and calls _build_and_run_instance. Within this method, we first invoke _build_resources which triggers the creation of resources like networks and storage devices, and then move on to the spawn method of the compute driver from nova.virt. Note that this is again a pluggable driver mechanism – in fact the compute driver class is an abstract class, and needs to be implemented by each compute driver.
Now let us see how the processing works in our specific case of the libvirt driver library. First, we create an image for the VM by calling the private method _create_image. Next, we create the XML descriptor for the guest, i.e. we retrieve the required configuration data and turn it into the XML structure that libvirt expects. Finally, we call _create_domain_and_network and finally set a timer to periodically check the state of the instance until the boot process is complete.
In _create_domain_and_network, we plug in the virtual network interfaces, set up the firewall (in our installation, this is the point where we use the No-OP firewall driver as firewall functionality is taken over by Neutron) and then call _create_domain which creates the actual guest (called a domain in libvirt).
This delegates the call to nova.virt.libvirt.Guest.create()and then powers on the guest using the launch method on the newly created guest. Let us take a short look at each of these methods in turn.
In nova.virt.libvirt.Guest.create(), we use the write_instance_config method of the host class to create the libvirt guest without starting it.
In the launch method in nova/virt/libvirt/guest.py, we now call createWithFlags on the domain. This is actually a call into the libvirt library itself and will launch the previously defined guest.
At this point, our newly created instance will start to boot. The timer which we have created earlier will check in periodic intervalls whether the boot process is complete and update the status of the instance in the database accordingly.
This completes our short tour through the instance creation process. There are a few points which we have deliberately skipped, for instance the details of the scheduling process, the image creation and image caching on the compute nodes or the network configuration, but the information in this post might be a good starting point for further deep dives.

Excellent blog. Best one I have seen which covers the high level code flow very clearly.
LikeLike