
In this post, we will look into Nova, the cloud fabric component of OpenStack. We will see how Nova is installed and go briefly through the individual components and Nova services.
Overview
Before getting into the installation process, let us briefly discuss the various components of Nova on the controller and compute nodes.
First, there is the Nova API server which runs on the controller node. The Nova service will register itself as a systemd service with entry point /usr/bin/nova-api. Similar to Glance, invoking this script will bring up an WSGI server which uses PasteDeploy to build a pipeline with the actual Nova API endpoint (an instance of nova.api.openstack.compute.APIRouterV21) being the last element of the pipeline. This component will then distribute incoming API requests to various controllers which are part of the nova.api.openstack.compute module. The routing rules themselves are actually hardcoded in the ROUTE_LIST which is part of the Router class and maps request paths to controller objects and their methods.
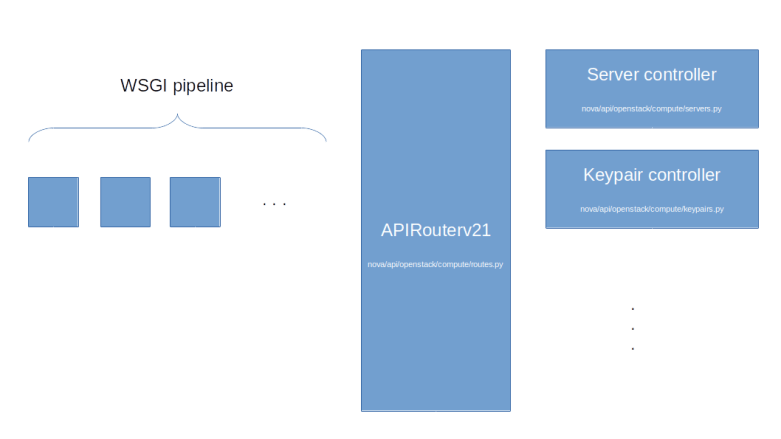
When you browse the source code, you will find that Nova offers some APIs like the image API or the bare metal API which are simply proxies to other OpenStack services like Glance or Ironic. These APIs are deprecated, but still present for backwards compatibility. Nova also has a network API which, depending on the value of the configuration item use_neutron will either acts as proxy to Neutron or will present the legacy Nova networking API.
The second Nova component on the controller node is the Nova conductor. The Nova conductor does not expose a REST API, but communicates with the other Nova components via RPC calls (based on RabbitMQ). The conductor is used to handle long-running tasks like building an instance or performing a live migration.
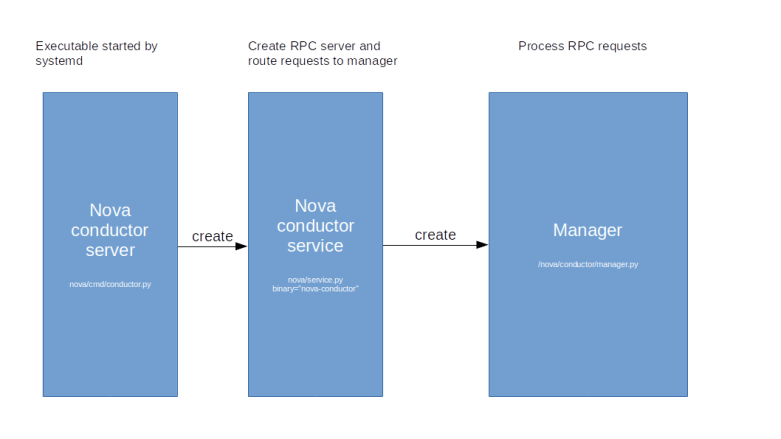
Similar to the Nova API server, the conductor has a tiered architecture. The actual binary which is started by the systemd mechanism creates a so called service object. In Nova, a service objects represents an RPC API endpoint. When a service object is created, it starts up an RPC service that handles the actual communication via RabbitMQ and forwards incoming requests to an associated service manager object.
Again, the mapping between binaries and manager classes is hardcoded and, for the Stein release, is as follows.
SERVICE_MANAGERS = {
  'nova-compute': 'nova.compute.manager.ComputeManager',
  'nova-console': 'nova.console.manager.ConsoleProxyManager',
  'nova-conductor': 'nova.conductor.manager.ConductorManager',
  'nova-metadata': 'nova.api.manager.MetadataManager',
  'nova-scheduler': 'nova.scheduler.manager.SchedulerManager',
}
Apart from the conductor service, this list contains one more component that runs on the controller node and use the same mechanism to handle RPC requests (the nova-console binary is deprecated and we use the noVNC proxy, see the section below, the nova-compute binary is running on the compute node, and the nova-metadata binary is the old metadata service used with the legacy Nova networking API). This is the the Nova scheduler.
The scheduler receives and maintains information on the instances running on the individual hosts and, upon request, uses the Placement API that we have looked at in the previous post to take a decision where a new instance should be placed. The actual scheduling is carried out by a pluggable instance of the nova.scheduler.Scheduler base class. The default scheduler is the filter scheduler which first applies a set of filters to filter out individual hosts which are candidates for hosting the instance, and then computes a score using a set of weights to take a final decision. Details on the scheduling algorithm are described here.
The last service which we have not yet discussed is Nova compute. One instance of the Nova compute service runs on each compute node. The manager class behind this service is the ComputeManager which itself invokes various APIs like the networking API or the Cinder API to manage the instances on this node. The compute service interacts with the underlying hypervisor via a compute driver. Nova comes with compute driver for the most commonly used hypervisors, including KVM (via libvirt), VMWare, HyperV or the Xen hypervisor. In a later post, we will go once through the call chain when provisioning a new instance to see how the Nova API, the Nova conductor service, the Nova compute service and the compute driver interact to bring up the machine.
The Nova compute service itself does not have a connection to the database. However, in some cases, the compute service needs to access information stored in the database, for instance when the Nova compute service initializes on a specific host and needs to retrieve a list of instances running on this host from the database. To make this possible, Nova uses remotable objects provided by the Oslo versioned objects library. This library provides decorators like remotable_classmethod to mark methods of a class or an object as remotable. These decorators point to the conductor API (indirection_api within Oslo) and delegate the actual method invocation to a remote copy via an RPC call to the conductor API. In this way, only the conductor needs access to the database and Nova compute offloads all database access to the conductor.
Nova cells
In a large OpenStack installation, access to the instance data stored in the MariaDB database can easily become a bottleneck. To avoid this, OpenStack provides a sharding mechanism for the database known as cells.
The idea behind this is that the set of your compute nodes are partitioned into cells. Every compute node is part of a cell, and in addition to these regular cells, there is a cell called cell0 (which is usually not used and only holds instances which could not be scheduled to a node). The Nova database schema is split into a global part which is stored in a database called the API database and a cell-local part. This cell-local database is different for each cell, so each cell can use a different database running (potentially) on a different host. A similar sharding applies to message queues. When you set up a compute node, the configuration of the database connection and the connection to the RabbitMQ service determine to which cell the node belongs. The compute node will then use this database connection to register itself with the corresponding cell database, and a special script (nova-manage) needs to be run to make these hosts visible in the API database as well so that they can be used by the scheduler.
Cells themselves are stored in a database table cell_mappings in the API database. Here each cell is set up with a dedicated RabbitMQ connection string (called the transport URL) and a DB connection string. Our setup will have two cells – the special cell0 which is always present and a cell1. Therefore, our installation will required three databases.
| Database | Description |
|---|---|
| nova_api | Nova API database |
| nova_cell0 | Database for cell0 |
| nova | Database for cell1 |
In a deployment with more than one real cell, each cell will have its own Nova conductor service, in addition to a “super conductor” running across cells, as explained here and in diagram below which is part of the OpenStack documentation.

The Nova VNC proxy
Usually, you will use SSH to access your instances. However, sometimes, for instance if the SSHD is not coming up properly or the network configuration is broken, it would be very helpful to have a way to connect to the instance directly. For that purpose, OpenStack offers a VNC console access to running instances. Several VNC clients can be used, but the default is to use the noVNC browser based client embedded directly into the Horizon dashboard.
How exactly does this work? First, there is KVM. The KVM hypervisor has the option to export the content of the emulated graphics card of the instance as a VNC server. Obviously, this VNC server is running on the compute node on which the instance is located. The server for the first instance will listen on port 5900, the server for the second instance will listen on port 5901 and so forth. The server_listen configuration option determines the IP address to which the server will bind.
Now theoretically a VNC client like noVNC could connect directly to the VNC server. However, in most setups, the network interfaces of the compute node are not directly reachable from a browser in which the Horizon GUI is running. To solve this, Nova comes with a dedicated proxy for noVNC. This proxy is typically running on the controller node. The IP address and port number on which this proxy is listening can again be configured using the novncproxy_host and novncproxy_port configuration items. The default port is 6080.
When a client like the Horizon dashboard wants to get access to the proxy, it can use the Nova API path /servers/{server_id}/remote-consoles. This call will be forwarded to the Nova compute method get_vnc_console on the compute node. This method will return an URL, consisting of the base URL (which can again be configured using the novncproxy_base_url configuration item), and a token which is stored in the database as well. When the client uses this URL to connect to the proxy, the token is used to verify that the call is authorized.
The following diagram summarizes the process to connect to the VNC console of an instance from a browser running noVNC.
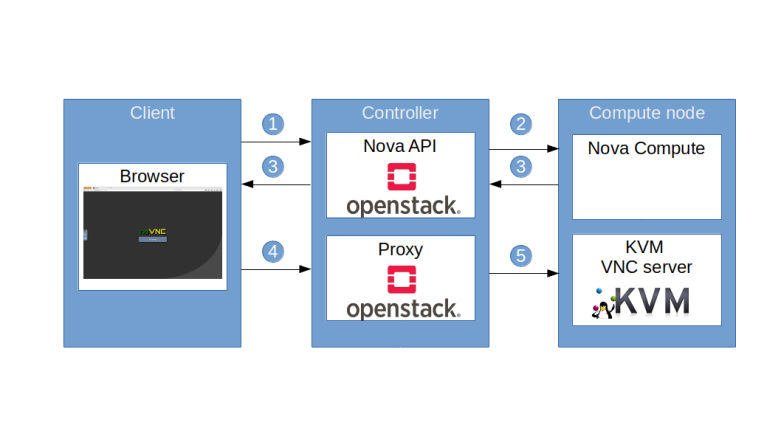
- Client uses Nova API /servers/{server_id}/remote-consoles to retrieve the URL of a proxy
- Nova API delegates the request to Nova Compute on the compute node
- Nova Compute assembles the URL, which points to the proxy, and creates a token, containing the ID of the instance as well as additional information, and the URL including the token is handed out to the client
- Client uses the URL to connect to the proxy
- The proxy validates the token, extracts the target compute node and port information, establishes the connection to the actual VNC server and starts to service the session
Installing Nova on the controller node
Armed with the knowledge from the previous discussions, we can now almost guess what steps we need to take in order to install Nova on the controller node.
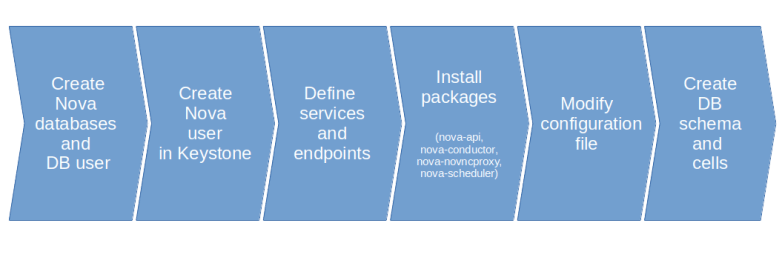
First, we need to create the Nova databases – the Nova API database (nova_api), the Nova database for cell0 (nova_cell0) and the Nova database for our only real cell cell1 (nova). We also need to create a user which has the necessary grants on these databases.
Next, we create a user in Keystone representing the Nova service, register the Nova API service with Keystone and define endpoints.
We then install the Ubuntu packages corresponding to the four components that we will install on the controller node – the Nova API service, the Nova conductor, the Nova scheduler and the VNC proxy.
Finally, we adapt the configuration file /etc/nova/nova.conf. The first change is easy – we set the value my_ip to the IP of the controller management interface.
We then need to set up the networking part. To enforce the use of Neutron instead of the built-in legacy Nova networking, we set the configuration option use_neutron that we already discussed above to True. We also set the firewall driver to the No-OP driver nova.virt.firewall.NoopFirewallDriver.
The next information we need to provide is the connection information to RabbitMQ and the database. Recall that we need to configure two database connections, one for the API database and one for the database for cell 1 (Nova will automatically append _cell0 to this database name to obtain the database connection for cell 0).
We also need to provide some information that Nova needs to communicate with other Nova services. In the glance section, we need to define the URL to reach the Glance API server. In the neutron section, we need to set up the necessary credentials to connect to Neutron. Here we use a Keystone user neutron which we will set up when installing Neutron in a later post, and we also define some data needed for the metadata proxy that we will discuss in a later post. And finally Nova needs to connect to the Placement service for which we have to provide credentials as well, this time using the placement user created earlier.
To set up the communication with Keystone, we need to set the authorization strategy to Keystone (which will also select the PasteDeploy Pipeline containing the Keystone authtoken middleware) and provide the credentials that the authtoken middleware needs. And finally, we set the path that the Oslo concurrency library will use to create temporary files.
Once all this has been done, we need to prepare the database for use. As with the other services, we need to sync the database schema to the latest version which, in our case, will simply create the database schema from scratch. We also need to establish our cell 1 in the database using the nova-manage utility.
Installing Nova on the compute nodes
Let us now turn to the installation of Nova on the compute nodes. Recall that on the compute nodes, only nova-compute needs to be running. There is no database connection needed, so the only installation step is to install the nova-compute package and to adapt the configuration file.
The configuration file nova.conf on the compute node is very similar to the configuration file on the controller node, with a few differences.
As there is no database connection, we can comment out the DB connection string. In the light of our above discussion of the VNC proxy mechanism, we also need to provide some configuration items for the proxy mechanism.
- The configuration item server_proxyclient_address is evaluated by the get_vnc_console of the compute driver and used to return the IP and port number on which the actual VNC server is running and can be reached from the controller node (this is the address to which the proxy will connect)
- The server_listen configuration item is the IP address to which the KVM VNC server will bind on the compute host and should be reachable via the server_proxyclient_address from the controller node
- the novncproxy_base_url is the URL which is handed out by the compute node for use by the proxy
Finally, there is a second configuration file nova-compute.conf specific to the compute nodes. This file determines the compute driver used (in our case, we use libvirt) and the virtualization type. With libvirt, we can either use KVM or QEMU. KVM will only work if the CPU supports virtualization (i.e. offers the VT-X extension for Intel or AMD-V for AMD). In our setup, the virtual machines will run on top of another virtual machine (Virtualbox), which does only pass through these features for AMD CPUs. We will therefore set the virtualization type to QEMU.
Finally, after installing Nova on all compute nodes, we need to run the nova-manage tool once more to make these nodes known and move them into the correct cells.
Run and verify the installation
Let us now run the installation and verify that is has succeeded. Here are the commands to bring up the environment and to obtain and execute the needed playbooks.
git clone https://www.github.com/christianb93/openstack-labs
cd openstack-labs/Lab4
vagrant up
ansible-playbook -i hosts.ini site.yaml
This will run a few minutes, depending on the network connection and the resources available on your machine. Once the installation completes, log into the controller and source the admin credentials.
vagrant ssh controller
source admin-openrc
First, we verify that all components are running on the controller. To do this, enter
systemctl | grep "nova"
The output should contain four lines, corresponding to the four services nova-api, nova-conductor, nova-scheduler and nova-novncproxy running on the controller node. Next, let us inspect the Nova database to see which compute services have registered with Nova.
openstack compute service list
The output should be similar to the sample output below, listing the scheduler, the conductor and two compute instances, corresponding to the two compute nodes that our installation has.
+----+----------------+------------+----------+---------+-------+----------------------------+
| ID | Binary         | Host       | Zone     | Status  | State | Updated At                 |
+----+----------------+------------+----------+---------+-------+----------------------------+
|  1 | nova-scheduler | controller | internal | enabled | up    | 2019-11-18T08:35:04.000000 |
|  6 | nova-conductor | controller | internal | enabled | up    | 2019-11-18T08:34:56.000000 |
|  7 | nova-compute   | compute1   | nova     | enabled | up    | 2019-11-18T08:34:56.000000 |
|  8 | nova-compute   | compute2   | nova     | enabled | up    | 2019-11-18T08:34:57.000000 |
+----+----------------+------------+----------+---------+-------+----------------------------+
Finally, the command sudo nova-status upgrade check will run some checks meant to be executed after an update that can be used to further verify the installation.

2 Comments