Kubernetes controllers are tightly integrated with the Kubernetes API – they are invoked if the state of the cluster changes, and they act by invoking the API in turn. This tight dependency turns testing into a challenge, and we need a smart testing strategy to be able to run unit and integration tests efficiently.
The Go testing framework
As a starting point, let us recall some facts about the standard Go testing framework and see what this means for the organization of our code.
A Go standard installation comes with the package testing which provides some basic functions to define and execute unit tests. When using this framework, a unit test is a function with a signature
func TestXXX(t *testing.T)
where XXX is the name of your testcase (which, ideally, should of course reflect the purpose of the test). Once defined, you can easily run all your tests with the command
$ go test ./...
from the top-level directory of your project. This command will scan all packages for functions following this naming convention and invoke each of the test functions. Within each function, you can use the testing.T object that can be used to indicate failure and log error messages. At the end of a test execution, a short summary of passed and failed tests will be printed.
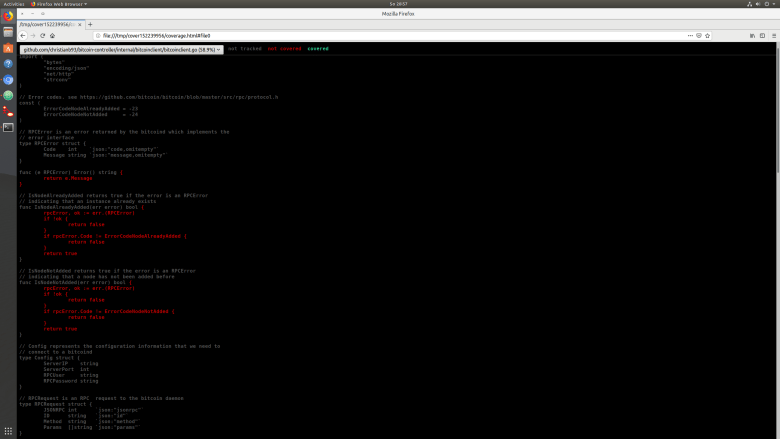
It is also possible to use go test to create and display a coverage analysis. To do this, run
$ go test ./... -coverprofile /tmp/cp.out
$ go tool cover -html=/tmp/cp.out
The first command will execute the tests and write coverage information into /tmp/cp.out. The second command will turn the contents of this file into HTML output and display this nicely in a browser, resulting in a layout as below (and yes, I understand that test coverage is a flawed metric, but still it is useful….)
How do we utilize this framework in our controller framework? First, we have to decide in which packages we place the test functions. The Go documentation recommends to place the test code in the same package as the code under test, but I am not a big fan of this approach, because this will allow you to access private methods and attributes of the objects under test and not to test against contracts, but against implementation. Therefore I have decided to put the code for unit testing a package XYZ into a dedicated package XYZ_test (more on integration tests below).
This approach has its advantages, but requires that you take testability into account when designing your code (which, of course, is a good idea anyway). In particular, it is good practice to use interfaces to allow for injection of test code. Let us take the code for the bitcoin RPC client as an example. Here, we use an interface HTTPClient to model the dependency of the RPC client from a HTTP clent. This interface is implemented by the client from the HTTP package, but for testing purposes, we can use a mock implementation and inject it when creating a bitcoin RPC client.
We also have to think about separation of unit tests which will typically use mock objects from integration tests that require a running Kubernetes cluster or a bitcoin daemon. There are different ways to do this, but the approach that I have chosen is as follows.
- Unit tests are placed in the same directory as the code that they test
- A unit test functions has a name that ends with “Unit”
- Integration tests – which typically test the system as a whole and thus are not clearly linked to an individual package – are placed in a global subdirectory test
- Integration test function names end on “Integration”
With this approach, we can run all unit tests by executing
go test ./... -run "Unit"
from the top-level directory, and can use the command
go test -run "Integration"
from within the test directory to run all integration tests.
The Kubernetes testing package
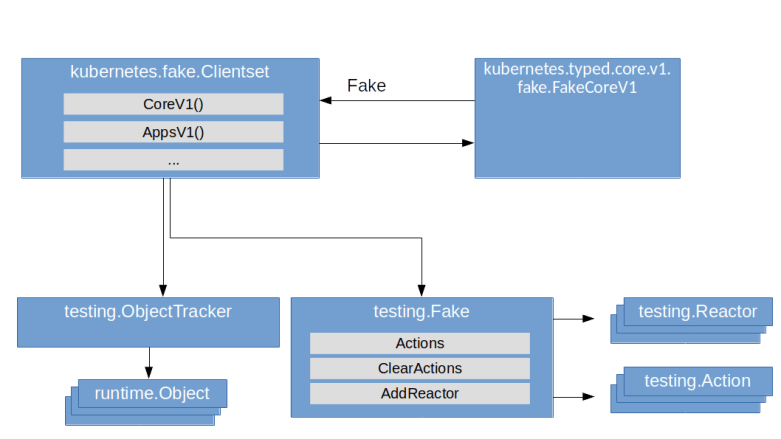
To run useful unit tests in our context, we typically need to simulate access to a Kubernetes API. We could of course our own mock objects, but fortunately, the Kubernetes client go package comes with a set of ready-to-use helper objects to do this. The core of this is the package client-go/testing. The key objects and concepts used in this package are
- An action describes an API call, i.e. a HTTP request against the Kubernetes API, by defining the namespace, the HTTP verb and the resource and subresource that is addressed
- A Reactor describes how a mock object should react to a particular action. We can ask a Reactor whether it is ready to handle a specific action and then invoke its React action to actually do this
- A Fake object is essentially a collection of actions recording the actions that have been taken on the mock object and reactors that react upon these actions. The core of the Fake object is its Invoke method. This method will first record the action and then walk the registered reactors, invoking the first reactor that indicates that it will handle this action and returning its result
This is of course rather a framework than a functional mock object, but the client-go library offers more – it has a generated set of fake client objects that build on this logic. In fact, there is a fake clientset in the package client-go/kubernetes/fake which implements the kubernetes.Interface interface that makes up a Kubernetes API client. If you take a look at the source code, you will find that the implementation is rather straightforward – a fake clientset embeds a testing.Fake object and a testing.ObjectTracker which is essentially a simple object store. To link those two elements, it installs reactors for the various HTTP verbs like GET, UPDATE, … that simply carry out the respective action on the object tracker. When you ask such a fake clientset for, say, a Nodes object, you will receive an object that delegates the various methods like Get to the invoke method of the underlying fake object which in turn uses the reactors to get the result from the object tracker. And, of course, you can add your own reactors to simulate more specific responses.
Using the Kubernetes testing package to test our bitcoin controller
Let us now discuss how we can use that testing infrastructure provided by the Kubernetes packages to test our bitcoin controller. To operate our controller, we will need the following objects.
- Two clientsets – one for the standard Kubernetes API and one for our custom API – here we can utilize the machinery described above. Note that the Kubernetes code generators that we use also creates a fake clientset for our bitcoin API
- Informer factories – again there will be two factories, one for the Kubernetes API and one for our custom API. In a fully integrated environment these informers would invoke the event handlers of the controller and maintain the cache. In our setup, we do not actually run the controller, but only use the cache that they contain, and maintain the cache ourselves. This gives us more control about the contents of the cache, the timing and the invocations of the event handlers.
- A fake bitcoin client that we inject into the controller to simulate the bitcoin RPC server
Its turns out to be useful to collect all components that make up this test bed in a Go structure testFixture. We can then implement some recurring functionality like the basic setup or starting and stopping the controller as methods of this object.

In this approach, there is a couple of pitfalls. First, it is important to keep the informer caches and the state stored in the fake client objects in sync. If, for example, we let the controller add a new stateful set, it will do this via the API, i.e. in the fake clientset, and we need to push this stateful set into the cache so that during the next iteration, the controller can find it there.
Another challenge is that our controller uses go routines to do the actual work. Thus, whenever we invoke an event handler, we have to wait until the worker thread has picked up the resulting queued event before we can validate the results. We could do this by simply waiting for some time, however, this is of course not really reliable and can lead to long execution times. Instead, it is a better approach to add a method to the controller which allows us to wait until the controller internal queue is empty and makes the tests deterministic. Finally, it is good practice to put independent tests into independent functions, so that each unit test function starts from scratch and does not rely on the state left over by the previous function. This is especially important because go test will cache test results and therefore not necessarily execute all test cases every time we run the tests.
Integration testing
Integration testing does of course require a running Kubernetes cluster, ideally a cluster that can be brought up quickly and can be put into a defined state before each test run. There are several options to achieve this. Of course, you could make use of your preferred cloud provider to bring up a cluster automatically (see e.g. this post for instructions on how to do this in Python), run your tests, evaluate the results and delete the cluster again.
If you prefer a local execution, there are by now several good candidates for doing this. I have initially executed integration tests using minikube, but found that even though this does of course provide perfect isolation, it has the disadvantage that starting a new minikube cluster takes some time, which can slow down the integration tests considerably. I have therefore switched to kind which runs Kubernetes locally in a Docker container. With kind, a cluster can be started in approximately 30 seconds (depending, of course, on your machine). In addition, kind offers an easy way to pre-load docker images into the nodes, so that no download from Docker hub is needed (which can be very slow). With kind, the choreography of a integration test run is roughly as follows.
- Bring up a local bitcoin daemon in Docker which will be used to test the Bitcoin RPC client which is part of the bitcoin controller
- Bring up a local Kubernetes cluster using kind
- Install the bitcoin network CRD, the RBAC profile and the default secret
- Build the bitcoin controller and a new Docker image and tag it in the local Docker repository
- Pre-load the image into the nodes
- Start a pod running the controller
- Pre-pull the docker image for the bitcoin daemon
- Run the integration tests using go test
- Tear down the cluster and the bitcoin daemon again
I have created a shell script that runs these steps automatically. Currently, going through all these steps takes about two minutes (where roughly 90 seconds are needed for the actual tests and 30 seconds for setup and tear-down). For the future, I plan to add support for microk8s as well. Of course, this could be automated further using a CI/CD pipeline like Jenkins or Travis CI, with proper error handling, a clean re-build from a freshly cloned repo and more reporting functionality – this is a topic that I plan to pick up in a later post.
