
When you want to try out Kubernetes, you have several choices. You can install Kubernetes in a cluster, install it locally using Minikube, or use one of the Kubernets offerings of the major cloud providers like AWS, GCP or Azure. In this post, we set up a Kubernetes cluster on Amazons EKS platform. As I love Python, we will do this in two steps. First, we will go through the steps manually, as described in the AWS documentation, using the AWS console. Then, we will learn how to use the AWS Python SDK to automate the recurring steps using Python.
A word of caution before we continue: when you follow these instructions, Amazon will charge you for the cluster as well as for the nodes that the cluster uses! So make sure that you stop all nodes and delete the cluster if you are done to avoid high charges! At the time of writing, Amazon charges 20 cents per hour per cluster plus the EC2 instances underlying the cluster, so if you play with this for one our two hours it will not cost you a fortune, but if you forget to shut everything down and let it run, it can easily add up!
What is EKS?
Before we get our hands dirty, let us quickly discuss what EKS actually is. Essentially, EKS offers you the option to set up a Kubernetes cluster in the Amazon cloud. You can connect to this cluster using the standard Kubernetes API and the standard Kubernetes tools. The cluster will manage worker nodes that are running on Amazons EC2 platform, using your EC2 account. The management nodes on which Kubernetes itself is running are not running on your EC2 instances, but are provided by Amazon.
When you set up an EKS cluster, the cluster and your worker nodes will be running in a virtual private network (VPC). You can add load balancers to make your services reachable from the internet. In addition, EKS is integrated with Amazons IAM.
This tutorial assumes that you own an AWS account and that you have followed the instructions in the IAM getting started guide to set up an IAM user with administrator privileges. Please make sure that you are logged into the AWS console with this IAM user, not your root account.
To set up an EKS cluster, several preparational steps are required. First, you will need to set up an IAM role that EKS will use to control EC2 nodes on your behalf. Next, you will need a VPC in which your cluster will run. After these one time preparation steps have been completed, you can create a Kubernetes cluster, add worker nodes and start deployments. In the following, we will go through most of these steps one by one.
One time preparational steps
Before you can use EKS, you will need to add an IAM role. To do this, navigate to the EKS console (note that this link will automatically take you to your home region). As described on the Getting started with EKS page, open the IAM management console. In the menu on the left, chose “Roles” and then hit the button “Create role”. Choose “EKS” from the list of services and hit “Next: permissions” and then immediately “Next: tags” and “Next: Review”. As the role name, enter “EKSEC2UserRole” (you could of course choose any name you want, but to make the scripts that we will establish further below work, choose this name for this tutorial). At this point, your screen should look as follows.
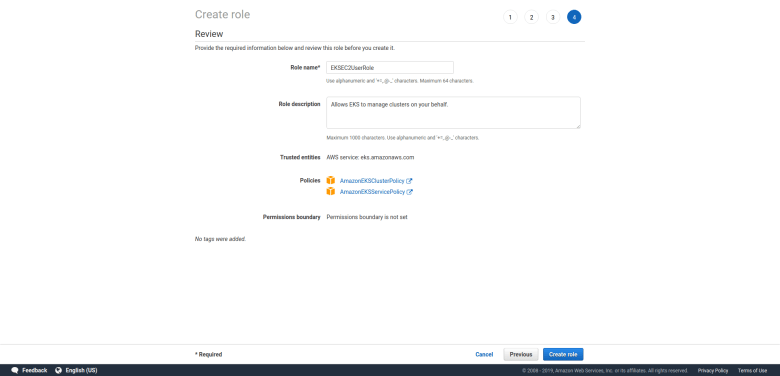
Now confirm the setup of the new role with “Create role” and observe how the new role appears in the list in your IAM console.
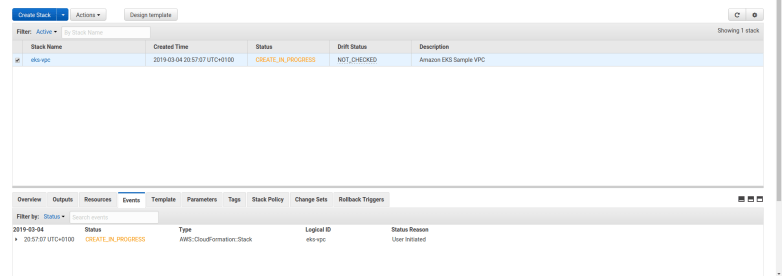
The next ingredient that we need is the VPC in which the cluster will be running. To set this up, navigate to the CloudFormation page. Hit the button “Create new stack”. Select “Specify an Amazon S3 template URL” and enter https://amazon-eks.s3-us-west-2.amazonaws.com/cloudformation/2019-02-11/amazon-eks-vpc-sample.yaml. Then hit “Next”.
On the next page, you will have to choose a stack name. Again, this can be any name, but let us follow the standard suggestion and call it “eks-vpc”. Then hit “Next” twice and then “Create”. AWS will now create the VPC for you, which might take a few minutes, you should see a screen as below while this is in progress.
Once the stack has been created, open the “Outputs” tab and record the value of SecurityGroups, VpcID and SubnetIds. . In my case, the values are
| Key | Value |
|---|---|
| SecurityGroups | sg-005cf103994878f27 |
| VpcId | vpc-060469b2a294de8bd |
| SubnetIds | subnet-06088e09ce07546b9, subnet-0e4a8fd662faadab6, subnet-0d88f92baecced563 |
Next, there is some software that you need on your PC. Please follows the instructions on the Getting started with EKS page to download and install kubectl, the aws-iam-authenticator and the aws CLI your your platform. On my Ubuntu Linux PC, this was done using the steps below.
$ sudo snap install kubectl --classic
$ curl -o aws-iam-authenticator https://amazon-eks.s3-us-west-2.amazonaws.com/1.11.5/2018-12-06/bin/linux/amd64/aws-iam-authenticator
$ curl -o aws-iam-authenticator.sha256 https://amazon-eks.s3-us-west-2.amazonaws.com/1.11.5/2018-12-06/bin/linux/amd64/aws-iam-authenticator.sha256
$ openssl sha1 -sha256 aws-iam-authenticator
$ cat aws-iam-authenticator.sha256 # compare checksums!
$ chmod +x ./aws-iam-authenticator
$ mv aws-iam-authenticator $HOME/Local/bin # replace by your local bin directory
$ pip3 install awscli --upgrade --user
Note that pip will install the AWS CLI in $HOME/.local/bin, so make sure to add this directory to your path. We can now test that all tools have been installed by entering
$ kubectl help
$ aws --version
At this point, the aws tool is not yet hooked up with your credentials. To do this, make sure that you have access to the IAM access key ID and access secret key (that you can generate at the IAM console) for your IAM admin user. Then run
$ aws configure
Enter the keys and the required configuration information. When done, enter
$ aws sts get-caller-identity
to confirm that you now access the AWS API with the admin user.
Creating a cluster and adding worker nodes using the AWS console
After all these preparations – which we of course have to go through only once – we are now in a position to create our first EKS cluster. For that purpose, go to the EKS console and look for the box called “Create EKS cluster”. Enter a cluster name – I have chosen “myCluster” (yes, I am very creative) – and hit the button “Next step”.
This will take you to a configuration page. On this page, you will have to select an IAM role that the cluster will use to operate EC2, a VPC and a security group. Make sure to select those entities that we have set up above! Then hit “Create”.
Your cluster will now be created, and you should be taken to the EKS cluster overview page that lists all your clusters along with their status.
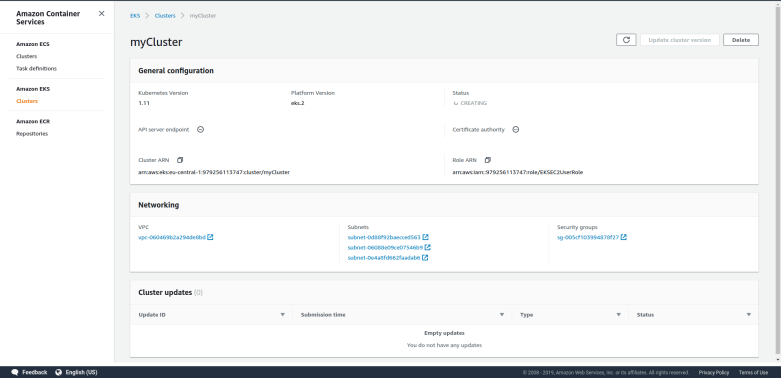
Creation of a cluster can take a few minutes, be patient. At some point, the status of your cluster should switch to active. Congratulations, you are now proud owner of a running Kubernetes cluster!
However, this Kubernetes cluster is pretty useless – there are no worker nodes yet, and you are not yet able to communicate with your cluster using kubectl. We will create worker nodes and run services in the next post. To fix the second problem, we will have to hook up the IAM credential chain used by the AWS CLI tool with kubectl. To do this, enter
$ aws eks --region eu-central-1 update-kubeconfig --name myCluster
Once this has completed, you should now be able to user kubectl to connect to your cluster. As an example, run
$ kubectl get svc
NAME         TYPE        CLUSTER-IP   EXTERNAL-IP   PORT(S)   AGE
kubernetes   ClusterIP   10.100.0.1           443/TCP   6m
Creating a cluster automatically using the Python SDK
Creating a cluster using the EKS console is a bit time consuming, and given the fact that Amazon will charge you for a running cluster, you will want to delete your cluster when you are done and recreate it easily when you need it again. For that purpose, it is very useful to be able to create a cluster using Python.
To do this, let us first delete the cluster again (on the cluster overview page in the EKS console) that we have just created, and compose a Python script that recreates the cluster for us.
First, of course, we need to install the Python SDK Boto3. This is as easy as
$ pip3 install boto3
Note that the SDK uses the same credentials as the AWS CLI, so you still need to go through the steps above to install and configure the AWS CLI.
Our script will accept the name of a cluster (which was myCluster in the example above). It will then need to determine the IAM role, the VPC and subnets and the security group as we did it for the manual setup.
To determine the IAM role, we need an IAM client and use its method get_role to get role details and obtain the role ARN.
iam = boto3.client('iam')
r = iam.get_role(RoleName=eksRoleName)
roleArn = r['Role']['Arn']
Here we assume that the Python variable eksRoleName contains the name of the role that we have created as part of our one time setup.
Getting the VPC ID, the subnet IDs and the security group is a bit more tricky. For that purpose, we will refer back to the CloudFormation stack that we have created as part of our one-time setup. To get the VPC ID and the security group, we can use the following code snippet.
cloudFormation = boto3.client('cloudformation')
r = cloudFormation.describe_stack_resources(
       StackName = "eks-vpc",
       LogicalResourceId="VPC")
vpcId = r['StackResources'][0]['PhysicalResourceId']
r = cloudFormation.describe_stack_resources(
       StackName = "eks-vpc",
       LogicalResourceId="ControlPlaneSecurityGroup")
secGroupId = r['StackResources'][0]['PhysicalResourceId']
Once we have this, we can easily obtain the subnet IDs using the EC2 interface.
ec2 = boto3.resource('ec2')
vpc = ec2.Vpc(vpcId)
subnets = [subnet.id for subnet in vpc.subnets.all()]
We now have all the configuration data that we need to trigger the actual cluster setup. For that purpose, we will create an EKS client and call its method create_cluster, passing the information that we have collected so far as arguments. We then create a waiter object that is polling until the cluster status changes to “Active”.
eks = boto3.client("eks")
response = eks.create_cluster(
               name="myCluster",
               version="1.13",
               roleArn = roleArn,
               resourcesVpcConfig = {
                 'subnetIds' : subnets,
                 'securityGroupIds' : [secGroupId]})
waiter = eks.get_waiter("cluster_active")
waiter.wait(name="myCluster")
When this call completes, our cluster is created. However, we still have to update our Kubernetes configuration file. Of course, we could simply call the AWS CLI, but doing this in Python is more fun. The configuration file that the AWS CLI creates is stored in your home directory, in a subdirectory called kube, and formatted in the simplified markup language known as YAML. Inspecting this file, it is not difficult to translate this into a structure of Python dictionaries and lists, which contains four cluster-specific pieces of data.
- The cluster endpoint – this is the URL used by kubectl to submit an API call
- The Amazon resource name of your cluster (ARN)
- the cluster name
- a certificate used by kubectl to authorize requests
This information can be retrieved using the method describe_cluster of the EKS client and assembled into a Python data structure. We can then use the Python module yaml to turn this into a string in YAML format, which we can then write to disk. I will not go into detail, but you might want to take a look at the complete script to create a cluster on my GitHub page.
We are now able to automatically create a Kubernetes cluster and connect to it using kubectl. In the next post, we will add the meat – we will learn how to spin up worker nodes and deploy our first pods.

4 Comments