Today, all major cloud providers have established impressive machine learning capabilities on their respective platforms – Amazon has AWS SageMaker, Google has VertexAI and Microsoft has Azure Machine Learning. Being tired of spinning up and shutting down GPU-enabled virtual machines manually, I started to explore one of them a couple of months ago – Googles VertexAI. In this short series, I will guide you through the most important features of the platform in depth and explain how you can use them and how they work.
What is VertexAI?
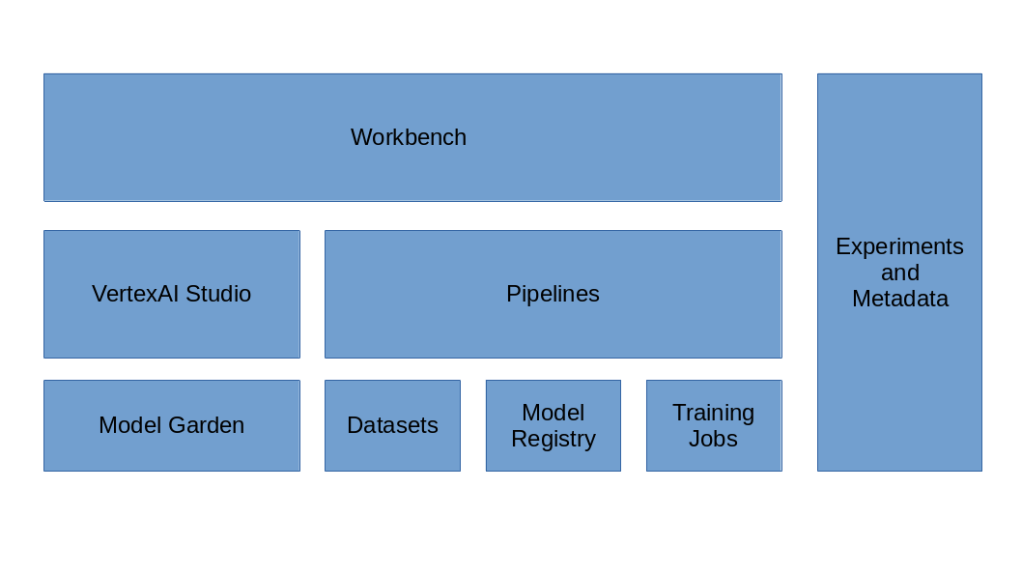
VertexAI is a collection of Google services centered around machine learning on the Google cloud. The platform was introduced in 2021 and received a major update in 2023 when support for GenAI models was added. At its heart, the platform lets you define and manage datasets, train and version models, deploy them to prediction endpoints and track metadata along the way so that you can trace model versions back to training runs and to the used data. In addition, the Model Garden makes Googles own GenAI models available but also allows you to access various open source models like Llama2 or Mistral-7B, and the VertexAI studio allows you to test and version your prompts and play with the models. And of course VertexAI lets you launch and manage Jupyter notebook instances.
Let us now take a closer look at some of the most relevant components. First there are models. As we will see later, a model is essentially a versioned archive containing your model artefacts stored in a model registry for easy access. Next, there are prediction endpoints which, at the end of the day, are containers that you deploy to run your models so that you can query them either online or in batch mode, running on Google provided infrastructure.
To schedule training runs, you have several options. You can either compose and submit a job which again is essentially a container running either a pre-built model or your custom python code. Alternatively, you can combine jobs into pipelines and let Google manage the dependencies between individual jobs in the pipeline and the input and output data of each job for you.
When you define and run a pipeline, you consume and create artifacts like datasets or model versions. Experiments let you bundle training runs, and metadata allows you to track these artifacts, including a visualization of data lineage so that you can reconstruct for each artifact during which pipeline run it has been generated.
Finally, VertexAI also allows you to define managed datasets that the platform will store for you. You can even use AutoML which means that given some data, you can select a prebuilt model for standard tasks like classification or sentiment analysis and train this model on your data. Theoretically, this allows you to simply upload a tabular dataset, start a training run for a classification model, deploy the trained model and run a prediction without having to write a single line of code (I have to admit, however, that I was not convinced when I tried this – even on a small dataset, the runtime was much longer than what I did locally, and the training runs are really expensive as you pay much more than you would pay if you would simply run a custom model in a container or virtual machine).
In this series, we will dive into most of these features.
- First, we will learn how to work with models. We will train a model locally and see how we can package this model for upload into the model registry.
- We will then see how the creation of endpoints and the deployment of models works
- Having mastered this, we will build a simple training job that allows us to train our model on the VertexAI platform
- Next, we will study experiments and metadata and see how we can use the tensor boards integrated into VertexAI to log metrics
- We will then take a look at VertexAI pipelines that combine several jobs and learn how to compose and run pipelines covering the full ML life cycle
- Then we will talk about networks and connectivity and see how you can connect pipelines and prediction endpoints to applications running in one of your VPCs.
- Finally, we will take a short look at managed datasets and how they can be imported, used and exported
Initial setup
As always, this will be a hands-on exercise. To follow along, however, there are of course some preparations and some initial setup.
First, you will obviously need a Google account. I also assume some basic familiarity with the Google cloud platform i.e. the console and gcloud (you should also be able to follow the examples if you have not worked on Google cloud before, but I will not explain things like virtual machines, IAM, networks and so forth). You should also make sure that you have gcloud and gsutil installed.
Next, you should decide on a region and a project that you will use. Make sure that you stick to this region as data transfer between regions can be costly. Throughout this series, I will assume that you have two environment variables set that I will refer to at several points in the code.
export GOOGLE_PROJECT_ID=<the alphanumerical ID of your project>
export GOOGLE_REGION=<the region, like us-central1 or europe-west4>
The next few setup steps involve creating a dedicated GCS bucket for this series and two service accounts with the necessary access rights. You can either follow the instructions below step by step or simply clone my repository and run the script in the setup folder. Before you do any of this, please make sure that your gcloud client is authorized (verify with gcloud auth list).
VertexAI uses Google Cloud Storage buckets extensively for storing data and models. I recommend to create a decicated bucket to use it with Vertex AI in the region where you will also schedule training runs and models.
gcloud storage buckets create \
    gs://vertex-ai-$GOOGLE_PROJECT_ID \
    --location=$GOOGLE_REGION
Next, we will create two service accounts. Our first service account vertex-ai-run is the account that we will use to run jobs and containers on the platform. The second account vertex-ai-build is used when we assemble or submit jobs or upload models. In our setup, these service accounts have the same access rights, but in a more production-like setup you would of course separate those two accounts more carefully.
gcloud iam service-accounts create \
    vertex-ai-run \
    --display-name=vertex-ai-run \
    --description="A service account to run jobs and endpoints"

gcloud iam service-accounts create \
    vertex-ai-build \
    --display-name=vertex-ai-build \
    --description="A service account to assemble and submit jobs"
We will also need a docker repository in Artifact Registry to store our custom docker images.
gcloud artifacts repositories create \
    vertex-ai-docker-repo  \
    --repository-format=docker \
    --location=$GOOGLE_REGION \
    --description="Vertex AI custom images"
Now let us create the necessary policy bindings. For each of the service accounts, we will grant the role aiplatform.user that contains the necessary permissions to create, modify, read and delete the objects that we will work with. In addition, we will give both accounts the storage.legacyBucketOwner and storage.objectAdmin roles so that they can create and access objects in our buckets, as well as the reader role on our repository.
accounts=(
    vertex-ai-run
    vertex-ai-build
)
project_roles=(
    aiplatform.user
    artifactregistry.reader
)
bucket_roles=(
    storage.objectAdmin
    storage.legacyBucketOwner
)
for account in ${accounts[@]}
do
    sa="$account@$GOOGLE_PROJECT_ID.iam.gserviceaccount.com"
    bucket="gs://vertex-ai-$GOOGLE_PROJECT_ID"
    for role in ${project_roles[@]}
    do
        gcloud projects add-iam-policy-binding \
            $GOOGLE_PROJECT_ID \
            --member="serviceAccount:$sa" \
            --role="roles/$role"
    done
    for role in ${bucket_roles[@]}
    do
        gcloud projects add-iam-policy-binding \
            $bucket \
            --member="serviceAccount:$sa" \
            --role="roles/$role"
    done
done
Finally, as our build user will submit job using the run user, it needs the role serviceAccountUser on the run service account.
sa="vertex-ai-build@$GOOGLE_PROJECT_ID.iam.gserviceaccount.com"
gcloud iam service-accounts add-iam-policy-binding \
        vertex-ai-run@$GOOGLE_PROJECT_ID.iam.gserviceaccount.com  \
        --member="serviceAccount:$sa" \
        --role="roles/iam.serviceAccountUser"
As we will be using the build account locally, we need a JSON key for this account. So head over to the Service Accounts tab in the Google Cloud IAM console, select the project you will be using, find the service account vertex-ai-build that we have just created, select the tab “Keys” and add a service account key in JSON format. Store the key in a safe location and set the environment variable GOOGLE_APPLICATION_CREDENTIALS to point to the file, for instance
export GOOGLE_APPLICATION_CREDENTIALS=$HOME/.keys/vertex-ai-build.json
Setting up our Python environment
If you have read a few of my previous posts, you will not be surprised that the language of choice for this is Python (even though Google has of course SDKs for many other languages as well). There is a couple of packages that we will need, and I recommend to set them up in a virtual environment specifically for this. So run the following commands in the root of the repository (if not done yet, this is the time to clone it using git clone https://github.com/christianb93/Vertex-AI)
python3 -m venv venv
source venv/bin/activate
pip3 install -r requirements.txt
Building the docker base container
On our journey through VertexAI, we will need various docker containers. I have organized these containers such that they are derived from a base container that contains a Python runtime and the dependencies that we will need. First, make sure that you have installed docker (if not done yet, here are the commands to do this on Ubuntu 22.04, for other distributions this might vary):
sudo apt install docker.io
sudo usermod -aG docker $USER
newgrp docker
To build the container and push it into the registry that we have created, first make sure that the environment variables for the Google project ID and the Google location are set as described above and that you have run
gcloud auth configure-docker $GOOGLE_REGION-docker.pkg.dev
to add gcloud as a credential helper to your local docker installation. Then switch to the corresponding subdirectory of this repository, run the build script and trigger the push.
cd docker/base
./build.sh
docker push $GOOGLE_REGION-docker.pkg.dev/$GOOGLE_PROJECT_ID/vertex-ai-docker-repo/base:latest
Of course this will take some time as you have to download all dependencies once and then push the container to the registry. You might even want to do this in a VM in the respective region to speed up things (but we will sooner or later still need the image locally as well).
Cost considerations
A few words on cost. Of course, we will have to consume Google resources in this series and that will create some cost. Basically there are three major types of cost. First, Google will charge for data that we store in the platform. We will use GCS buckets but the data sets that we have to store that small, so that should not be an issue – in my region, standard regional storage is about 2 cents per GB and month. We will also store images in the Artifact Registry. At the time of writing, Google charges 10 cents per GB and month. Our images will have around 10 GB, so that would be 1 USD per month – still not dramatic, but you might want to clean up the images at some point. There is also metadata involved that we will create which is considerably more expensive (10 USD per GB and month), but again our volumes will be small.
Second, there is a charge for data transfer – both out of the platform and across regions. Be careful at this point and avoid traffic between regions or continents – transferring large images in the GB range can quickly become costly (this is the reason why we hold all our data in one region). For transfers out, like downloading an image, there is a free tier for up to 200 GB / month which should be more than enough for our purposes.
Finally, there is a cost for all machines that we will need when running endpoints or batch jobs. We will usually use small machines for these purposes like n1-standard-2 which will cost you roughly 10 cents per hour plus a few cents for disks. If you are careful and clean up quickly that cost should be manageable.
There is a couple of things, however, that you should avoid. One of the most expensive operations on the platform is the AutoML feature as Google will charge a flat fee of 20 USD per run, regardless of the machine types that you use. Do not do this as for our purposes, this is clearly far beyond the cost for the actually consumed compute resources. There is also a flat fee of 3 cents per pipeline run in addition to the compute resources, so you want to test your code locally before submitting it to avoid cost for failed runs.
With that our preparations are complete. In the next post, we will start to get our hands dirty and learn how to package and upload a model into the Vertex AI model registry.

1 Comment