
In the previous post, we have installed Keystone and provided an overview of its functionality. Today, we will dive in detail into a typical authorization handshake and take you through the Keystone source code to see how it works under the hood.
The overall workflow
Let us first take a look at the overall process before we start to dig into details. As an example, we will use the openstack CLI to list all existing projects. To better see what is going on behind the scenes, we run the openstack client with the -v command line switch which creates a bit more output than usual.
So, log into the controller node and run
source admin-demorc
openstack -vv project list
This will give a rather lengthy output, so let us focus on those lines that signal that a requests to the API is made. The first API is a GET request to the URL
http://controller:5000/v3
This request will return a list of available API versions, marked with a status. In our case, the result indicates that the stable version is version v3. Next, the clients submits a POST request to the URL
http://controller:5000/v3/auth/tokens
If we look up this API endpoint in the Keystone Identity API reference, we find that this method is used to create and return a token. When making this request, the client will use the data provided in the environment variables set by our admin-openrc script to authenticate with Keystone, and Keystone will assemble and return a token.
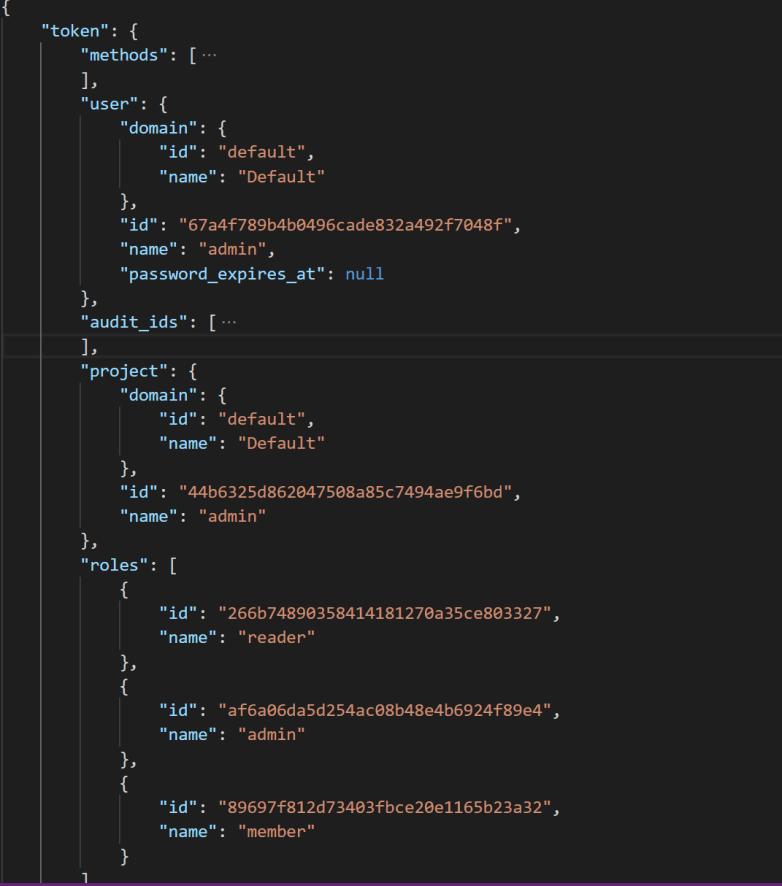
The returned data has actually two parts. First, there is the actual Fernet token, which is provided in the HTTP header instead of the HTTP body. Second, there is a token structure which is returned in the response body. This structure contains the user that owns the token, the date when the token expires and the data when the token has been issued, the project for which the token is valid (for a project scoped token) and the roles that the user has for this project. In addition, it contains a service catalog. Here is an example, where I have collapsed the catalog part for better readibility.
Finally, at the bottom of the output, we see that the actual API call to get a list of projects is made, using our newly acquired token and the endpoint
http://controller:5000/v3/projects
So our overall flow looks like this, ignoring some client internal processes like selecting the endpoint (and recovering from failed authorizations, see the last section of this post).
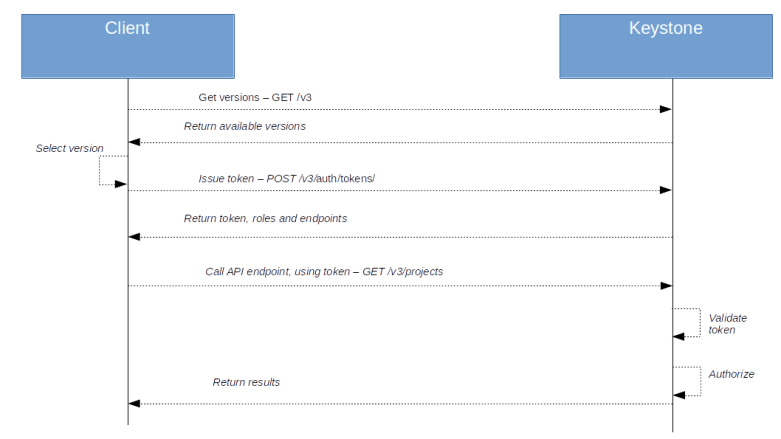
Let us now go through these requests step by step and see how tokens and policies interact.
Creating a token
When we submit the API request to create a token, we end up in the method post in the AuthTokenResource class defined in keystone/api/auth.py. Here we find the code.
token=authentication.authenticate_for_token(auth_data)
resp_data=render_token.render_token_response_from_model(
          token, include_catalog=include_catalog
)
The method authenticate_for_token is defined in keystone/api/_shared/authentication.py. Here, we first authenticate the user, using the auth data provided in the request, in our case this is username, password, domain and project as defined in admin-openrc. Then, the actual token generation is triggered by the call
token=PROVIDERS.token_provider_api.issue_token(
          auth_context['user_id'],
          method_names,
          expires_at=expires_at,
          system=system,
          project_id=project_id,
          domain_id=domain_id,
          auth_context=auth_context,
          trust_id=trust_id,
          app_cred_id=app_cred_id,
         parent_audit_id=token_audit_id)
Here we see an additional layer of indirection in action – the ProviderAPIRegistry as defined in keystone/common/provider_api.py. Without getting into details, here is the idea of this approach which is used in a similar way in other OpenStack services.
Keystone itself consists of several components, each of which provide different methods (aka internal APIs). There is, for instance, the code in keystone/identity handling the core identity features, the code in keystone/assignment handling role assigments, the code in keystone/token handling tokens and so forth. Each of these components contains a class typically called Manager which is derived from the base class Manager in keystone/common/manager.py.
When such a class is instantiated, it registers its methods with the static instance ProviderAPI of the class ProviderAPIRegistry defined in keystone/common/provider_api.py. Technically, registering means that the object is added as attribute to the ProviderAPI object. For the token API, for instance, the the Manager class in keystone/token/provider.py registers itself using the name token_provider_api, so that it is added to the provider registry object as the attribute token_provider_api. Thus a method XXX of this manager class can now be invoked using
from keystone.common import provider_api
provider_api.ProviderAPIs.token_provider_api.XXX()
or by
from keystone.common import provider_api
PROVIDERS = provider_api.ProviderAPIs
PROVIDERS.token_provider_api.XXX()
This is exactly what happens here, and this is why the above line will actually take us to the method issue_token of the Manager class defined in keystone/token/provider.py. Here, we build and populate an instance of the Token class defined in keystone/models/token_model.py and populate it with the available data. We then populate the field token.id where we put the actual token, i.e. the encoded string that will end up in the HTTP header of future requests. This is done in the line
token_id, issued_at =
             self.driver.generate_id_and_issued_at(token)
which calls the actual token provider, for instance the Fernet provider. For a Fernet token, this will eventually end up in the line
token_id=self.token_formatter.create_token(
    token.user_id,
    token.expires_at,
    token.audit_ids,
    token_payload_class,
    methods=token.methods,
    system=token.system,
    domain_id=token.domain_id,
    project_id=token.project_id,
    trust_id=token.trust_id,
    federated_group_ids=token.federated_groups,
    identity_provider_id=token.identity_provider_id,
    protocol_id=token.protocol_id,
    access_token_id=token.access_token_id,
    app_cred_id=token.application_credential_id
)
calling the token formatter which will do the low level work of actually creating and encrypting the token. The token ID will then be added to the token data structure, along with the creation time (a process known as minting) before the token is returned up the call chain.
At this point, the token does not yet contain any role information and no service catalog. To enrich the token by this information, it is rendered by calling render_token defined in keystone/common/render_token.py. Here, a dictionary is built and populated with data including information on role, scope and endpoints.
Note that the role information in the token is dynamic, in fact, in the Token class, the property decoration is used to divert access to the roles property to a method call. Here, we receive the scope information and select and return only these roles which are bound to the respective domain or project if the token is domain scoped or project scoped. When we render the token, we access the roles attribute and retrieve the role information from the method bound to it.
Within this method, an additional piece of logic is implemented which is relevant for the later authorization process. Keystone allows an administrator to define a so-called admin project. Any user who authenticates with a token scoped to this special project is called a cloud admin, a special role which can be referenced in policies. When rendering the token, the project to which the token refers (if it its project scoped) is compared to this special project, and if they match, an additional attribute is_admin_project is added to the token dictionary.
Finally, back in the post method, we build the response body from the token structure and add the actual token to the response header in the line
response.headers['X-Subject-Token'] = token.id
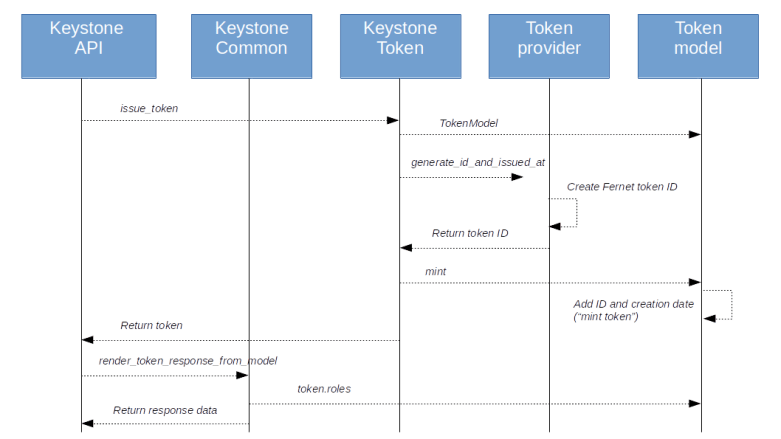
Here is a graphical overview on the process as we have discussed it so far.
The key learnings from the code that we can deduce so far are
- The actual Fernet token contains a minimum of information, like the user for whom the token is issued and – depending on the scope – the Ids of the project or domain to which the token is scoped
- When a token is requested, the actual Fernet token (the token ID) is returned in the response header, and an enriched version of the token is added in the response body
- This enrichment is done dynamically using the Keystone database, and the enrichment will only add the roles to the token data that are relevant for the token scope
- There is a special admin project, and a token scoped to this project implies the cloud administrator role
Using the token to authorize a request
Let us now see what happens when a client uses this token to actually make a request to the API – in our example, this happens when the openstack client makes the actual API call to the endpoint http://controller:5000/v3/projects.
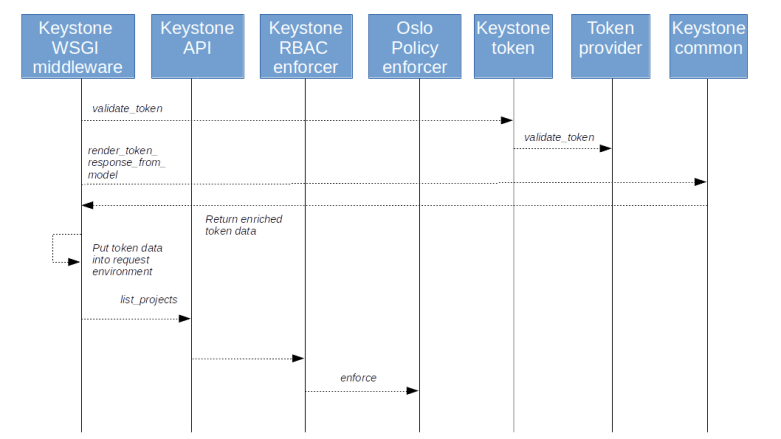
Before this request is actually dispatched to the business logic, it passes through the WSGI middleware. Here, more precisely in the class method AuthContextMiddleware.process_request defined in the file keystone/server/flask/request_processing/middleware/auth_context.py, the token is retrieved from the field X-Auth-Token in the HTTP header of the request (here we also put the marker field is_admin into the context when an admin_token is defined in the configuration and equal to the actual token). Then the process_request method of the superclass is called which invokes fetch_token (of the derived class!). Here, the validate_token method of the token provider is called which performs the actual token validation. Finally, the token is again rendered as above, thereby adding the relevant roles dynamically, and put as token_reference in the request context (this happens in the method fill_context respectively _keystone_specific_values of the middleware class).
At this point, it is instructive to take a closer look at the method that actually selects the relevant roles – the method roles of the token class defined in keystone/models/token_model.py. If you follow the call chain, you will find that, to obtain for instance all project roles, the internal API of the assignment component is used. This API returns the effective roles of the user, i.e. roles that include those roles that the user has due to group membership and roles that are inherited, for instance from the domain-level to the project level or down a tree of subprojects. Effective roles also include implied roles. It is important to understand (and reasonable) that it is the effective roles that enter a token and are therefore evaluated during the authorization process.
Once the entire chain of middleware has been processed, we finally reach the method _list_projects in keystone/api/projects.py. Close to the start of this method, the enforce_call method of the class RBACEnforcer in keystone/common/rbac_enforcer/enforcer.py. When making this call, the action identity:list_projects is passed as a parameter. In addition, a parameter called target is passed, a dictionary which contains some information on the objects to which the API request refers. In our example, as long as we do not specify any filters, this dictionary will be empty. If, however, we specify a domain ID as a filter, it will contain the ID of this domain. As we will see later, this allows us to define policies that allow a user to see projects in a specific domain, but not globally.
The enforce_call method will first make a couple of validations before it checks whether the request context contains the attribute is_admin. If yes, the token validation is skipped and the request is always allowed- this is to support the ADMIN_TOKEN bootstrapping mechanism. Then, close to the bottom of the method, we retrieve the request context, instantiate a new object and calls its _enforce method which essentially delegates the call to the Oslo policy rules engine and its Enforcer class, more precisely to the enforce method of this class.
As input, this method receives the action (identity:list_projects in our case), the target of the action, and the credentials, in the form of the Oslo request context, and the processing of the rules starts.
Again, let us quickly summarize what the key take aways from this discussion should be – these points actually apply to most other OpenStack services as well.
- When a request is received, the WSGI middleware is responsible for validating the token, retrieving the additional information like role data and placing it in the request context
- Again, only those roles are stored in the context which the user has for the scope of the token (i.e. on project level for project-scoped token, on the domain level for domain-scoped token and on the system level for system-scoped token)
- The roles in the token are effective roles, i.e. taking inheritance into account
- The actual check against the policy is done by the Oslo policy rule engine
The Oslo policy rule engine
Before getting into the details of the rule engine, let us quickly summarize what data the rule engine has at its disposal. First, we have seen that it receives the action, which is simply a string, identity:list_projects in our case. Then, it has information on the target, which, generally speaking, is the object on which the action should be performed (this is less relevant in our example, but becomes important when we modify data). Finally, it has the credentials, including the token and role information which was part of the token and is now stored in the request context which the rule engine receives.
The engine will now run this data through all rules which are defined in the policy. Within the engine, a rule (or check) is simply an object with a __call__ method, so that they can be treated and invoked like a function. In the module _checks.py, a few basic checks are defined. There are, for instance, simple checks that always return true or false, and their checks like AndCheck and OrCheck which can be used to build more complex rules from basic building blocks. And there are other checks like the RoleCheck which checks whether a certain role is present in the credentials, which, as we know from the discussion above, is the case if the token use to authorize contains this role, i..e if the user who is owning the token has this role with respect to the scope of the token.
Where do the rules come from that are processed? First, note that the parameter rule to the enforce method does, in our case at least, contain a string, namely the action (identity:list_projects). To load the actual rules, the method enforce will first call load_rules which loads rules from a policy file, at which we will take a look in a second. Loading the policy file will create a new instance of the Rules class, which is a container class to hold a set of rules.
After loading all rules, the following line in enforce identifies the actual rule to be processed.
to_check = self.rules[rule]
This looks a bit confusing, but recall that here, rule actually contains the action identity:list_projects, so we look up the rule associated with this action. Finally, the actual rule checking is done by invoking the _check methods of the _checks module.
Let us now take a closer look at the policy files themselves. These files are typically located in the /etc/XXX subdirectory, where XXX is the OpenStack component in question. Samples files are maintained by the OpenStack team. To see an example, let us take a look at the sample policy file for Keystone which was distributed with the Rocky release. Here, we find a line
identity:list_projects": "rule:cloud_admin or rule:admin_and_matching_domain_id",
This file is in JSON syntax, and this line defines a dictionary entry with the action identity:list_projects and the rule rule:cloud_admin or rule:admin_and_matching_domain_id. The full syntax of the rule is explained nicely here or in the comments at the start of policy.py. In essence, in our example, the rule says that the action is allowed if either the user is a cloud administrator (i.e. an administrator the the special admin project or admin domain which can be configured in the Keystone configuration file) or is an admin for the requested domain.
When I first looked at the policy files in my test installation, however, which uses the Stein release, I was more than confused. Here, the rule for the action identity:list_projects is as follows.
"identity:list_projects": "rule:identity:list_projects"
Here we define a rule called identity:list_projects for the action with the same name, but where is this rule defined?
The answer is that there is a second source of rules, namely software defined rules (which the OpenStack documentation calls policy-in-code) which are registered when the enforcer object is created. This happens in the _enforcer method of the RBACEnforcer when a new enforcer is created. Here we call register_rules which creates a list of rules by calling the function list_rules define in the keystone/common/policies module which returns a list of sofware-defined rules, and registers these rules with the Oslo policy enforcer. The rule we are looking for, for instance, is defined in keystone/common/policies/project.py and looks as follows.
policy.DocumentedRuleDefault(
        name=base.IDENTITY % 'list_projects',
        check_str=SYSTEM_READER_OR_DOMAIN_READER,
        scope_types=['system', 'domain'],
        description='List projects.',
        operations=[{'path': '/v3/projects',
                     'method': 'GET'}],
        deprecated_rule=deprecated_list_projects,
        deprecated_reason=DEPRECATED_REASON,
        deprecated_since=versionutils.deprecated.STEIN),
Here we see that the actual rule (in the attribute check_str) has now changed compared to the Rocky release, and allows access if either the user has the reader role on the system level or has the reader role for the requested domain. In addition, there is a deprecated rule for backwards compatibility which is OR’ed with the actual rule. So the rule that really gets evaluated in our case is
(role:reader and system_scope:all) or (role:reader and domain_id:%(target.domain_id)s) or rule:admin_required
In our case, asking OpenStack to list all projects, there is a further piece of magic involved. This becomes visible if you try a different user. For instance, we can create a new project demo with a user demo who has the reader role for this project. If you now run the OpenStack client again to get all projects, you will only see those projects for which the user has a role. This is again a bit confusing, because by what we have discussed above, the authorization should fail.
In fact, it does, but the client is smart enough to have a plan B. If you look at the output of the OpenStack CLI with the -vvv flag, you will that a first request is made to list all projects which fails, as expected. The client then tries a second request, this time using the URL /users//projects to get all projects for that specific user. This call ends up in the method get of the class UserProjectsResource defined in keystone/api/users.py which will list all projects for which a specifc user has a role. Here, a call is made with a different action called identity:list_user_projects, and the rule for this action allows access if the user making the request (i.e. the user data from the token) is equal to target user (i.e. the user ID specified in the request). Thus this final call succeeds.
These examples are hopefully sufficient to demonstrate that policies can be a tricky topic. It is actually very instructive to add debugging output to the involved classes (the Python source code is on the controller node in /usr/lib/python3/dist-packages, do not forget to restart Apache if you have made changes to the code) to print out the various structures and trace the flow through the code. Happy hacking!

2 Comments