
When you are a Python programmer or study open source software written in Python, you will sooner or later be exposed to the WSGI standard and to related concepts like WSGI middleware. In this post, I will give you a short overview of this technology and point you to some additional references.
What is WSGI?
WSGI stands for “Web Server Gateway Interface” and is a standard that defines how Python applications can run inside a web container (“server”), quite similar to Java servlets running in a servlet container. The WSGI standard is defined in PEP 333 (and, for Python3, in PEP 3333) and describes the interface between the application and the server.
In essence, the standard is quite simple. First, an application needs to provide a callable object (that can be a function, an instance of a class with a __call__ method or a method of a class or object) to the server which accepts two arguments. The first argument, traditionally called environ, is a dictionary that plays the role of a request context. The standard defines a set of fields in that object that a server needs to populate, including
| Field | Description |
|---|---|
| REQUEST_METHOD | The HTTP request method (GET, POST, ..) |
| HTTP_* | Variables corresponding to the various components of the HTTP request header |
| QUERY_STRING | The part of the request strings after the ? |
| wsgi.input | A stream from which the response body can be read, using methods like read(), readline() or __iter__ |
| wsgi.errors | A stream to which the application can write error logs |
The second argument that is passed to the application is actually a function, with the signature
start_response(status, response_headers)
This function is supposed to return a stream-like object implementing the write method. The application can call use this object to write the response into it (which, however, is not the preferred way, in general, the application should simpyl return the response data). The argument status is a HTTP status code along with the respective string, like “200 OK”. The response_headers is a list of tuples of the form (name, value) which are added to the HTTP header of the response. The idea of this function is to give the server a chance to prepare the HTTP header of the response before the actual response body is written.
In fact, there is a third, optional argument to this method, which is an expection information as returned by sys.exc_info, which can be used to ask the server to re-raise an exception caught by the application and which we will ignore here.
The application function is supposed to return the response data, i.e. the data should go into the HTTP response body. Note that with Python3, this is supposed to be a bytes object, so text needs to be converted to bytes first.
Armed with this information, let us now write our first WSGI application. Of course, we need a WSGI server, and for our tests, we will use a very simple embedded WSGI server that comes as part of the wsgiref module. Here is the code.
This file contains hidden or bidirectional Unicode text that may be interpreted or compiled differently than what appears below. To review, open the file in an editor that reveals hidden Unicode characters.
Learn more about bidirectional Unicode characters
| from wsgiref.simple_server import make_server | |
| def application(environ, start_response): | |
| start_response( | |
| '200 OK', | |
| [('Content-type', 'text/html')] | |
| ) | |
| response = "<html><body><p><b>Environment data:</b></p>" | |
| response += "<table><tr><th>Key</th><th>Value</th></tr>" | |
| for key, value in environ.items(): | |
| response += "<tr><td>%s</td><td>%s</td></tr>" % ( key, value) | |
| response = response + "</table></body></html>" | |
| return [bytes(response, 'utf-8')] | |
| print("Starting up") | |
| httpd = make_server('', 8800, application) | |
| httpd.serve_forever() |
Let us see what this application does. First, there is the application function with the signature defined by the standard. We see that we call start_response and then create a response string. The response string contains an HTML table with one entry for each key/value pair in the environ dictionary. Finally we convert this to a byte object and return it to the server.
In the main processing, we create a wsgiref.simple_server that points to our application and start it.
To run the example, simply save the above code as wsgi.py (or whatever name you prefer) and run it with
python3 wsgi.py
When you now point your browser to 127.0.0.1:8800, you should see a table containing your environment values (the simple_server includes all currently defined OS level environment variables, so you will have to scroll down to see the WSGI specific parts).
Let us now try something else. Our application actually returns a sequence of byte objects. The server is supposed to iterate over this sequence and assemble the results to obtain the entire response. Thus the only thing that matters is that our application is something that can be called and returns something that has a method __iter__. Instead of using a function which returns a sequence, we can therefore as well use a class that has an __iter__ method as in the example below.
This file contains hidden or bidirectional Unicode text that may be interpreted or compiled differently than what appears below. To review, open the file in an editor that reveals hidden Unicode characters.
Learn more about bidirectional Unicode characters
| from wsgiref.simple_server import make_server | |
| class Application: | |
| def __init__(self, environ, start_response): | |
| self.environ = environ | |
| self.start_response = start_response | |
| def __iter__(self): | |
| self.start_response( | |
| '200 OK', | |
| [('Content-type', 'text/html')] | |
| ) | |
| yield b'Hello!' | |
| httpd = make_server('', 8800, Application) | |
| httpd.serve_forever() |
When the server receives a request, it will call the “thing called application”, i.e. it will do something like Application(). This will create a new instance of the application object, i.e. call the __init__ method, which simply stores the parameters for later use. Then, the server will iterate over this object, i.e. call __iter__, where the actual result is assembled and returned.
Finally, we could also pass an instance of a class instead of a class to make_server. This instance than needs a __call__ method so that it can be invoked like a function.
WSGI middleware
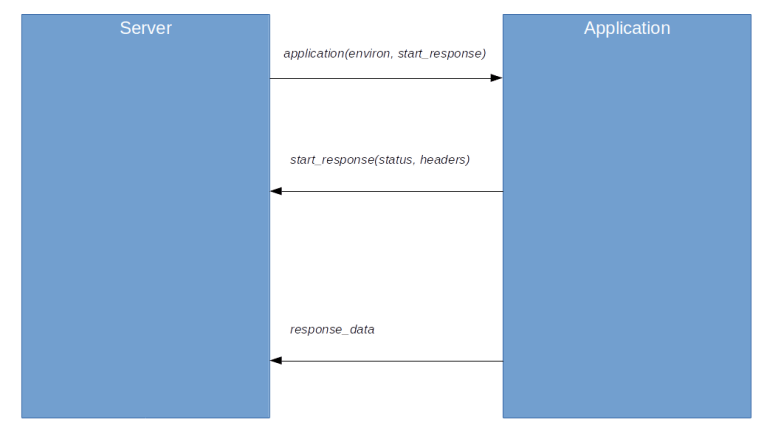
As we have seen, the WSGI specification has two parts. First, it defines how an application should behave (call start_response and return response data) and it defines how a server should behave (call the application), as displayed below.
A WSGI middleware is simply a piece of Python code that implements both behaviours – it can act as a server and as an application. This allows middleware components to be chained: the server calls the middleware, the middleware performs whatever action it wishes, for instance manipulating the environment variable, and then invokes the application, and the application prepares the actual response.
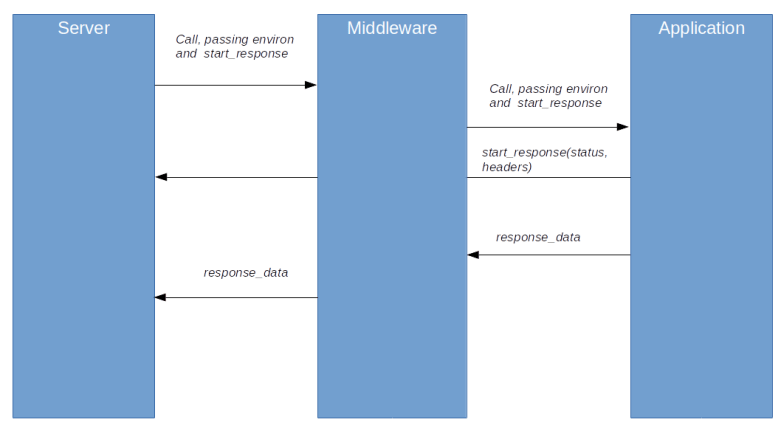
Of course, instead of just passing through the start_response function to the application, a middleware could also pass in a different function and then call the original start_response function itself.
A nice feature of middleware is that it can be chained. You could for instance have a middleware which performs authorization, followed by a middleware to rewrite URLs and so forth, until finally the application is invoked. Here is a simple example.
This file contains hidden or bidirectional Unicode text that may be interpreted or compiled differently than what appears below. To review, open the file in an editor that reveals hidden Unicode characters.
Learn more about bidirectional Unicode characters
| from wsgiref.simple_server import make_server | |
| class Middleware: | |
| def __init__(self, app): | |
| self.app = app | |
| def __call__(self, environ, start_response): | |
| environ['added_by_middleware'] = 1 | |
| return self.app(environ, start_response) | |
| def application(environ, start_response): | |
| start_response( | |
| '200 OK', | |
| [('Content-type', 'text/html')] | |
| ) | |
| response = "<html><body><p><b>Environment data:</b></p>" | |
| response += "<table><tr><th>Key</th><th>Value</th></tr>" | |
| for key, value in environ.items(): | |
| response += "<tr><td>%s</td><td>%s</td></tr>" % ( key, value) | |
| response = response + "</table></body></html>" | |
| return [bytes(response, 'utf-8')] | |
| httpd = make_server('', 8800, Middleware(application)) | |
| httpd.serve_forever() | |
If you run this example as before, you will see that in addition to the environment variables produced by our first example, there is the additional key added_by_middleware which has been added by the middleware. In this example, the full call chain is as follows.
- When the server starts, it creates an instance of the class Middleware that points to the function application
- This instance is passed as argument to make_server
- The server gets the request from the browser
- The server makes a call on the “thing” supplied with make_server, i.e. the middleware instance
- The server calls the middleware instance, i.e. it invokes its __call__ function
- The __call__ function adds the additional key to the environment and then delegates the request to the function application
Building middleware chains with PasteDeploy
So far, we have chained middleware programmatically, but in real life, it is often much more flexible to do this via a configuration. Enter PasteDeploy, a Python module that allows you to build chains of middleware components from a configuration. To make sure that you have this installed, run
pip3 install PasteDeploy
before proceeding.
PasteDeploy is able to parse configuration files and to dynamically pipe together WSGI applications and WSGI middleware. To understand how this works, let us first consider an example. Suppose that in our working directory, we have the following code, stored in a file wsgi.py
This file contains hidden or bidirectional Unicode text that may be interpreted or compiled differently than what appears below. To review, open the file in an editor that reveals hidden Unicode characters.
Learn more about bidirectional Unicode characters
| from paste.deploy import loadapp | |
| from wsgiref.simple_server import make_server | |
| # | |
| # This is our application, as usual | |
| # | |
| def application(environ, start_response): | |
| start_response( | |
| '200 OK', | |
| [('Content-type', 'text/html')] | |
| ) | |
| response = "<html><body><p><b>Environment data:</b></p>" | |
| response += "<table><tr><th>Key</th><th>Value</th></tr>" | |
| for key, value in environ.items(): | |
| response += "<tr><td>%s</td><td>%s</td></tr>" % ( key, value) | |
| response = response + "</table></body></html>" | |
| return [bytes(response, 'utf-8')] | |
| # | |
| # This is the factory which is invoked by PasteDeploy, passing | |
| # additional configuration data from the INI file | |
| # | |
| def app_factory(global_config, **local_conf): | |
| return application | |
| # | |
| # This call evaluates the INI file and builds an application | |
| # | |
| wsgi_app = loadapp('config:paste.ini', relative_to=".") | |
| httpd = make_server('', 8800, wsgi_app) | |
| httpd.serve_forever() | |
In addition, let us create a configuration file paste.ini in the same directory, with the following content.
[app:main]
use = call:wsgi:app_factory
When we now run wsgi.py, we again get the same server as in our first, basic example. But what is happening behind the scenes?
First, we invoke the PasteDeploy API by calling loadapp. This function will evaluate the INI file passed as argument for different types of objects PasteDeploy knows. In our case, the section name app:main implies that we want to define an application and that this is the main entry point for our WSGI server. The argument that PasteDeploy expects here is the the full path to a factory function (i.e. in our case, the function app_factory in wsgi.py). PasteDeploy will then simply call this factory and return the result of this call as an application. We then start a server using this application as before. Note that PasteDeploy can also pass configuration data in the INI file to the factory.
A second basic object in PasteDeploy are filters. Filters are used to create filtered versions of an application, i.e. the application behind a defined middleware (the filter). In the configuration file, filters are specified in a section starting with the keyword filter, and refer to a filter factory. A filter factory is a callable which is called with the configuration in the INI file as argument, and returns a filter. A filter, in turn, is a function which receives an application as an argument and returns a WSGI application wrapping this application. This sounds a bit confusing, so it might be a good idea to look at an example. Our new code looks as follows
This file contains hidden or bidirectional Unicode text that may be interpreted or compiled differently than what appears below. To review, open the file in an editor that reveals hidden Unicode characters.
Learn more about bidirectional Unicode characters
| from paste.deploy import loadapp | |
| from wsgiref.simple_server import make_server | |
| # | |
| # A middleware that adds a key to the environment | |
| # | |
| class Middleware: | |
| def __init__(self, app, key="test", value=1): | |
| self._key = key | |
| self._value = value | |
| self._app = app | |
| def __call__(self, environ, status_response): | |
| environ[self._key] = self._value | |
| return self._app(environ, status_response) | |
| # | |
| # This is our application, as usual | |
| # | |
| def application(environ, start_response): | |
| start_response( | |
| '200 OK', | |
| [('Content-type', 'text/html')] | |
| ) | |
| response = "<html><body><p><b>Environment data:</b></p>" | |
| response += "<table><tr><th>Key</th><th>Value</th></tr>" | |
| for key, value in environ.items(): | |
| response += "<tr><td>%s</td><td>%s</td></tr>" % ( key, value) | |
| response = response + "</table></body></html>" | |
| return [bytes(response, 'utf-8')] | |
| # | |
| # This is the factory which is invoked by PasteDeploy, passing | |
| # additional configuration data from the INI file | |
| # | |
| def app_factory(global_config, **local_conf): | |
| return application | |
| # | |
| # A filter factory. A filter factory returns a filter function | |
| # | |
| def filter_factory(global_conf, key): | |
| # A filter function returns a middleware, wrapping the | |
| # provided app | |
| def filter(app): | |
| return Middleware(app, key) | |
| return filter | |
| # | |
| # This call evaluates the INI file and builds an application | |
| # | |
| wsgi_app = loadapp('config:paste.ini', relative_to=".") | |
| httpd = make_server('', 8800, wsgi_app) | |
| httpd.serve_forever() | |
with the following configuration
[app:main]
use = call:wsgi:app_factory
filter-with = filter1

[filter:filter1]
use = call:wsgi:filter_factory
key = "abc"
What happens if you run the example? First, PasteDeploy will create an application as before, by calling the app_factory function. Then, it will find the configuration option filter-with that tells the library that we wish to wrap the application. Here, we refer to a filter called filter1 which is defined in the section of the INI file.
When evaluating this section, PasteDeploy will call the provided filter factory filter_factory, passing the additional configuration in the section as parameters. The filter factory returns a function, the filter function. PasteDeploy will now take the application and call the filter function with this application as argument. The return value of this call will then be used as the actual application that is returned by loadapp and started using the simple_server (in fact, PasteDeploy will first call the filter factory, then the app factory and then the filter itself).
Of course, you can apply more than one filter to an application. To make this as easy as possible, PasteDeploy offers a third type of objects called pipelines. A pipeline is just a sequence of filters which are applied to an application. The nice thing about pipelines is that they are piped together by PasteDeploy automatically, without any need to write additional factory objects. So our source code remains the same, we only have to change the application.
[pipeline:main]
pipeline = filter1 filter2 myapp

[app:myapp]
use = call:wsgi:app_factory

[filter:filter1]
use = call:wsgi:filter_factory
key = "abc"

[filter:filter2]
use = call:wsgi:filter_factory
key = "def"
Here, we define a pipeline which will first apply filter1, then filter2 and then finally pass control to our app. These three objects are created by the same calls to factory functions as before, and PasteDeploy will automatically load the pipeline and plumb the objects together. The result will be that once the application is reached, both keys (abc and def) will be present in the request context.
This is now what we want. We can, of course, have filters in different Python modules, and thus completely decoupled. PasteDeploy will then happily plumb together the final WSGI application according to the configuration, and we can easily add middleware components to the pipelines and remove them, without having to change our code.
Finally, there is another approach to configure a pipeline which is also the one described in the documentation. Here, we realize a pipeline as a composite object. This object again corresponds to a factory function with a specific signature. Part of this signature is a loader object which we can use to load the individual filters by name and apply them step by step to the application. A nice example where this is implemented is the configuration of the OpenStack Nova compute service, with the factory being implemented here. And yes, it was an effort to understand this example which eventually made me carry out some research and write this blog post – expect to see a bit more on OpenStack soon on this blog!
