
When you are trying to understand virtual networking, container networks, micro segmentation and all this, sooner or later the day will come where you will have to deal with iptables, the built-in Linux firewall mechanism. After evading the confrontation with the full complexity of this remarkable beast for many years, I have recently decided to dive a little deeper into the internals of the Linux networking stack. Today, I will give you an overview of the inner workings of the machinery behind iptables and show you how to use this to build a virtual firewall in a Linux networking namespace.
Netfilter hooks in the Linux kernel
In order to understand how iptables work, we will have to take a short look at a mechanism called netfilter hooks in the Linux networking stack.
Netfilter hooks are points in the Linux networking code at which modules can add their own custom processing. When a packet is travelling up or down through the networking stack and reaches one of these points, it is handed over to the registered modules which can manipulate the packet and, by their return value, can either instruct the core networking code to continue with the processing of the packet or to drop it.
Let us take a closer look at where these netfilter hooks are placed in the kernel. The following diagram is a (simplified) summary of the way that packets take through the Linux IPv4 stack (for those readers who actually want to see this in the Linux kernel code, I have added some of the most relevant Linux kernel functions, referring to v4.2 of the kernel).

A packet coming in from a network device will first reach the pre-routing hook. As the name indicates, this happens before a routing decision is taken. After passing this hook, the kernel will consult its routing tables. If the target IP address is the IP address of a local device, it will flag the packet for local delivery. These packets will now be processed by the input hook before they are handed over to the higher layers, e.g. a socket listening on a port.
If the routing algorithm determines that the packet is not targeted towards a local interface but needs to be forwarded, the path through the kernel is different. These packets will be handled by the forwarding code and pass the forward netfilter hook, followed by the post-routing hook. Then, the packet is sent to the outgoing network interface and leaves the kernel.
Finally, for packets that are locally generated by an application, the kernel first determines the route to the destination. Then, the modules registered for the output hook are invoked, before we also reach the post-routing hook as in the case of forwarding.
Having discussed netfilter hooks in general, let us now turn to iptables. Essentially, iptables is a framework sitting on top of the netfilter hooks which allows you to define rules that are evaluated at each of the hooks and determine the fate of the packet. For each netfilter hook, a set of rules called a chain is processed. Consequently, there is an input chain, an output chain, a pre-routing chain, a post-routing chain and a forward chain. If it also possible to define custom chains to which you can jump from one of the pre-built chains.
Iptables rules are further organized into tables and wired up with the kernel code using netfilter hooks, but not every table registers for every hook, i.e. not every table is represented in every chain. The following diagram shows which chain is present in which table.
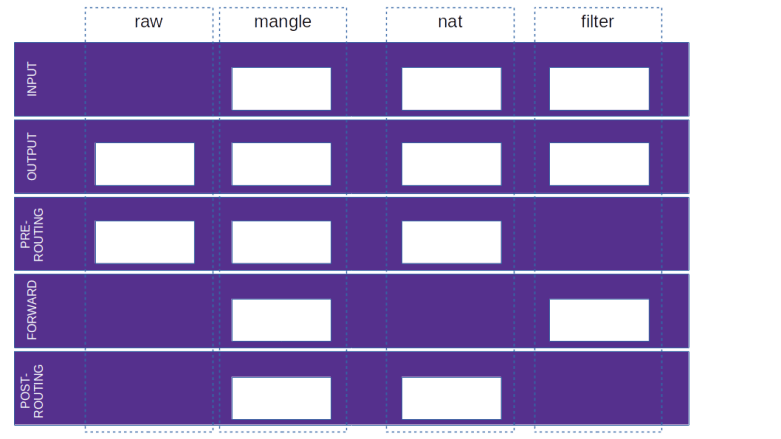
It is sometimes stated that iptables chains are contained in tables, but given the discussion of netfilter hooks above, I prefer to think of this a matrix – there are chains and tables, and rules are sitting at the intersections of chains and tables, so that every rule belongs to a table and a chain. To illustrate this, let us look at the processing steps taken by iptables for a packet for a local destination.
- Process the rules in the raw table in the pre-routing chain
- Process the rules in the mangle table in the pre-routing chain
- Process the rules in the nat table in the pre-routing chain
- Process the rules in the mangle table in the input chain
- Process the rules in the nat table in the input chain
- Process the rules in the filter table in the input chain
Thus, rules are evaluated at every point in the above diagram where a white box indicates a non-empty intersection of tables and chains.
Iptables rules
Let us now see how the actual iptables rules are defined. Each rule consists of a match which determines to which packets the rule applies, and a target which determines the action taken on the packet. Some targets are terminating, meaning that the processing of the packet stops at this point, other targets are non-terminating, meaning that a certain action will be taken and processing continues. Here are a few examples of available targets, see the documentation listed in the last section for the full specification.
| Action | Description |
|---|---|
| ACCEPT | Accept the packet, i.e do not apply any further rules within this combination of chain and table and instruct the kernel to let the packet pass |
| DROP | Drop the packet, i.e. tell the kernel to stop processing of the packet without any further action |
| REJECT | Tell the kernel to stop processing of the packet and send an ICMP reject message back to the origin of the packet |
| SNAT | Perform source NATing on the packet, i.e. change the source IP address of the packet, more on this below |
| DNAT | Destination NATing, i.e. change the destination IP address of the packet, again we will discuss this in a bit more detail below |
| LOG | Log the packet and continue processing |
| MARK | Mark the packet, i.e. attach a number which can again be used for matching in a subsequent rule |
Note, however, that not every action can be used in every chain, but certain actions are restricted to specific tables or chains
Of course, it might happen that no rule matches. In this case, the default target is chosen, which is also known as the policy for a given table and chain.
As already mentioned above, it is also possible to define custom chains. These chains can be used as a target, which implies that processing will continue with the rules in this chain. From this chain, one can either return explicitly to the original table using the RETURN target, or, otherwise, the processing continues in the original table once all rules in the custom chain have been processed, so this is very similar to a function or subroutine in a high-level language.
Setting up our test lab
After all this theory, let us now see iptables in action and add some simple rules. First, we need to set up our lab. We will simulate a situation where two hosts, called boxA and boxB are connected via a router, as indicated in the following diagram.
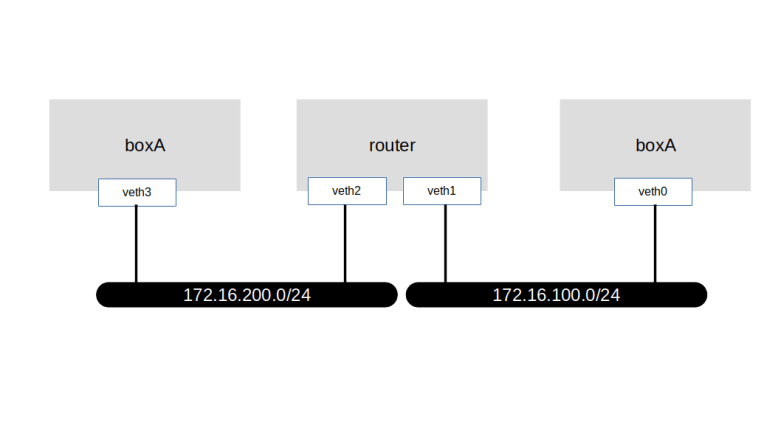
We could of course do this using virtual machines, but as a lightweight alternative, we can also use IP namespaces (it is worth mentioning that similar to routing tables, iptables rules are per namespace). Here is a script that will set up this lab on your local machine.
This file contains hidden or bidirectional Unicode text that may be interpreted or compiled differently than what appears below. To review, open the file in an editor that reveals hidden Unicode characters.
Learn more about bidirectional Unicode characters
| # Create all namespaces | |
| sudo ip netns add boxA | |
| sudo ip netns add router | |
| sudo ip netns add boxB | |
| # Create veth pairs and move them into their respective namespaces | |
| sudo ip link add veth0 type veth peer name veth1 | |
| sudo ip link set veth0 netns boxA | |
| sudo ip link set veth1 netns router | |
| sudo ip link add veth2 type veth peer name veth3 | |
| sudo ip link set veth3 netns boxB | |
| sudo ip link set veth2 netns router | |
| # Assign IP addresses | |
| sudo ip netns exec boxA ip addr add 172.16.100.5/24 dev veth0 | |
| sudo ip netns exec router ip addr add 172.16.100.1/24 dev veth1 | |
| sudo ip netns exec boxB ip addr add 172.16.200.5/24 dev veth3 | |
| sudo ip netns exec router ip addr add 172.16.200.1/24 dev veth2 | |
| # Bring up devices | |
| sudo ip netns exec boxA ip link set dev veth0 up | |
| sudo ip netns exec router ip link set dev veth1 up | |
| sudo ip netns exec router ip link set dev veth2 up | |
| sudo ip netns exec boxB ip link set dev veth3 up | |
| # Enable forwarding globally | |
| echo 1 > /proc/sys/net/ipv4/ip_forward | |
| # Enable logging from within a namespace | |
| echo 1 > /proc/sys/net/netfilter/nf_log_all_netns | |
Let us now start playing with this setup a bit. First, let us see what default policies our setup defines. To do this, we need to run the iptables command within one of the namespaces representing the different virtual hosts. Fortunately, ip netns exec offers a very convenient way to do this – you simply pass a network namespace and an arbitrary command, and this command will be executed within the respective namespace. To list the current content of the mangle table in namespace boxA, for instance, you would run
sudo ip netns exec boxA \
   iptables -t mangle -L
Here, the switch -t selects the table we want to inspect, and -L is the command to list all rules in this table. The output will probably depend on the Linux distribution that you use. Hopefully, the tables are empty, and the default target (i.e. the policy) for all chains is ACCEPT (no worries if this is not the case, we will fix this further below). Also note that the output of this command will not contain every possible combination of tables and chains, but only those which actually are allowed by the diagram above.
To be able to monitor the incoming and outgoing traffic, we now create our first iptables rule. This rule uses a special target LOG which simply logs the packet so that we can trace the flow through the involved hosts. To add such a rule to the filter table in the OUTPUT chain of boxA, enter
sudo ip netns exec boxA \
   iptables -t filter -A OUTPUT \
   -j LOG \
   --log-prefix "boxA:OUTPUT:filter:" \
   --log-level info
Let us briefly through this command to see how it works. First, we use the ip netns exec command to run a command (iptables in our case) inside a network namespace. Within the iptables command, we use the switch -A to add a new rule in the output chain, and the switch -t to indicate that this rule belongs to the filter table (which, actually, is the default if -t is omitted).
The switch -j indicates the target (“jump”). Here, we specify the LOG target. The remaining switches are specific parameters for the LOG target – we define a log prefix which will be added to every log message and the log level with which the messages will appear in the kernel log and the output of dmesg.
Again, I have created a script that you can run (using sudo) to add logging rules to all relevant combinations of chains and tables. In addition, this script will also add logging rules to detect established connections, more on this below, and will make sure that all default policies are ACCEPT and that no other rules are present.
Let us now run try our first ping. We will try to reach boxB from boxA.
sudo ip netns exec boxA \
   ping -c 1 172.16.200.5
This will fail with the error message “Network unreachable”, as expected – we do have a route to the network 172.16.100.0/24 on boxA (which the Linux kernel creates automatically when we bring up the interface) but not for the network 172.16.200.0/24 that we try to reach. To fix this, let us now add a route pointing to our router.
sudo ip netns exec boxA \
   ip route add default via 172.16.100.1
When we now try a ping, we do not get an error message any more, but the ping still does not succeed. Let us use our logs to see why. When you run dmesg, you should see an output similar to the sample output below.
[ 5216.449403] boxA:OUTPUT:raw:IN= OUT=veth0 SRC=172.16.100.5 DST=172.16.200.5 LEN=84 TOS=0x00 PREC=0x00 TTL=64 ID=15263 DF PROTO=ICMP TYPE=8 CODE=0 ID=20237 SEQ=1
[ 5216.449409] boxA:OUTPUT:mangle:IN= OUT=veth0 SRC=172.16.100.5 DST=172.16.200.5 LEN=84 TOS=0x00 PREC=0x00 TTL=64 ID=15263 DF PROTO=ICMP TYPE=8 CODE=0 ID=20237 SEQ=1
[ 5216.449412] boxA:OUTPUT:nat:IN= OUT=veth0 SRC=172.16.100.5 DST=172.16.200.5 LEN=84 TOS=0x00 PREC=0x00 TTL=64 ID=15263 DF PROTO=ICMP TYPE=8 CODE=0 ID=20237 SEQ=1
[ 5216.449415] boxA:OUTPUT:filter:IN= OUT=veth0 SRC=172.16.100.5 DST=172.16.200.5 LEN=84 TOS=0x00 PREC=0x00 TTL=64 ID=15263 DF PROTO=ICMP TYPE=8 CODE=0 ID=20237 SEQ=1
[ 5216.449416] boxA:POSTROUTING:mangle:IN= OUT=veth0 SRC=172.16.100.5 DST=172.16.200.5 LEN=84 TOS=0x00 PREC=0x00 TTL=64 ID=15263 DF PROTO=ICMP TYPE=8 CODE=0 ID=20237 SEQ=1
[ 5216.449418] boxA:POSTROUTING:nat:IN= OUT=veth0 SRC=172.16.100.5 DST=172.16.200.5 LEN=84 TOS=0x00 PREC=0x00 TTL=64 ID=15263 DF PROTO=ICMP TYPE=8 CODE=0 ID=20237 SEQ=1
[ 5216.449437] router:PREROUTING:raw:IN=veth1 OUT= MAC=c6:76:ef:89:cb:ec:96:ad:71:e1:0a:28:08:00 SRC=172.16.100.5 DST=172.16.200.5 LEN=84 TOS=0x00 PREC=0x00 TTL=64 ID=15263 DF PROTO=ICMP TYPE=8 CODE=0 ID=20237 SEQ=1
[ 5216.449441] router:PREROUTING:mangle:IN=veth1 OUT= MAC=c6:76:ef:89:cb:ec:96:ad:71:e1:0a:28:08:00 SRC=172.16.100.5 DST=172.16.200.5 LEN=84 TOS=0x00 PREC=0x00 TTL=64 ID=15263 DF PROTO=ICMP TYPE=8 CODE=0 ID=20237 SEQ=1
[ 5216.449443] router:PREROUTING:nat:IN=veth1 OUT= MAC=c6:76:ef:89:cb:ec:96:ad:71:e1:0a:28:08:00 SRC=172.16.100.5 DST=172.16.200.5 LEN=84 TOS=0x00 PREC=0x00 TTL=64 ID=15263 DF PROTO=ICMP TYPE=8 CODE=0 ID=20237 SEQ=1
[ 5216.449447] router:FORWARD:mangle:IN=veth1 OUT=veth2 MAC=c6:76:ef:89:cb:ec:96:ad:71:e1:0a:28:08:00 SRC=172.16.100.5 DST=172.16.200.5 LEN=84 TOS=0x00 PREC=0x00 TTL=63 ID=15263 DF PROTO=ICMP TYPE=8 CODE=0 ID=20237 SEQ=1
[ 5216.449449] router:FORWARD:filter:IN=veth1 OUT=veth2 MAC=c6:76:ef:89:cb:ec:96:ad:71:e1:0a:28:08:00 SRC=172.16.100.5 DST=172.16.200.5 LEN=84 TOS=0x00 PREC=0x00 TTL=63 ID=15263 DF PROTO=ICMP TYPE=8 CODE=0 ID=20237 SEQ=1
[ 5216.449451] router:POSTROUTING:mangle:IN= OUT=veth2 SRC=172.16.100.5 DST=172.16.200.5 LEN=84 TOS=0x00 PREC=0x00 TTL=63 ID=15263 DF PROTO=ICMP TYPE=8 CODE=0 ID=20237 SEQ=1
[ 5216.449452] router:POSTROUTING:nat:IN= OUT=veth2 SRC=172.16.100.5 DST=172.16.200.5 LEN=84 TOS=0x00 PREC=0x00 TTL=63 ID=15263 DF PROTO=ICMP TYPE=8 CODE=0 ID=20237 SEQ=1
[ 5216.449474] boxB:PREROUTING:raw:IN=veth3 OUT= MAC=2a:12:10:db:37:49:a6:cd:a5:c0:7d:56:08:00 SRC=172.16.100.5 DST=172.16.200.5 LEN=84 TOS=0x00 PREC=0x00 TTL=63 ID=15263 DF PROTO=ICMP TYPE=8 CODE=0 ID=20237 SEQ=1
[ 5216.449477] boxB:PREROUTING:mangle:IN=veth3 OUT= MAC=2a:12:10:db:37:49:a6:cd:a5:c0:7d:56:08:00 SRC=172.16.100.5 DST=172.16.200.5 LEN=84 TOS=0x00 PREC=0x00 TTL=63 ID=15263 DF PROTO=ICMP TYPE=8 CODE=0 ID=20237 SEQ=1
[ 5216.449479] boxB:PREROUTING:nat:IN=veth3 OUT= MAC=2a:12:10:db:37:49:a6:cd:a5:c0:7d:56:08:00 SRC=172.16.100.5 DST=172.16.200.5 LEN=84 TOS=0x00 PREC=0x00 TTL=63 ID=15263 DF PROTO=ICMP TYPE=8 CODE=0 ID=20237 SEQ=1
We see nicely how the various tables are traversed, starting with the four tables in the output chain of boxA. We also see the packet in the POSTROUTING chain of the router, leaving it towards boxB, and are being picked up by boxB. However, no reply is reaching boxA.
To understand why this happens, let us look at the last logging entry that we have from boxB. Here, we see that the request (ICMP type 8) is entering with the source IP address of boxA, i.e. 172.168.100.5. However, there is no route to this host on boxB, as boxB only has one network interface which is connected to 172.16.200.0/24. So boxB cannot generate a reply message, as it does not know how to route this message to boxA.
By the way, you might ask yourself why there are no log entries for the INPUT chain on boxB. The answer is that the Linux kernel has a feature called reverse path filtering. When this filter is enabled (which it seems to be on most Linux distributions by default), then the kernel will silently drop messages coming in from an IP address to which is has no outgoing route as defined in RFC 3704. For documentation on how to turn this off, see this link.
So how can we fix this problem and enable boxB to send an ICMP reply back to boxA? The first idea you might have is to simply add a route on boxB to the network 172.16.100.0/24 with the router as the next hop. This would work in our lab, but there is a problem with this approach in real life.
In a realistic scenario, boxA would typically be a machine in the private network of an organization, using a private IP address from a private address range which is far from being unique, whereas boxB would be a public IP address somewhere on the Internet. Therefore we cannot simply add a route for the IP address of boxA, which is private and should never appear in a public network like the Internet.
What we can do, however, is to add a route to the public interface of our router, as the IP address of this interface typically is a public IP address. But why would this help to make boxA reachable from the Internet?
Somehow we would have to divert reply traffic direct towards boxA to the public interface of our router. In fact, this is possible, and this is where SNAT comes into play.
SNAT (source network address translation) simply means that the router will replace the source IP address of boxA by the IP address of its own outgoing interface (i.e. 172.16.200.1 in our case) before putting the packet on the network. When the packet (for instance an ICMP echo request) reaches boxB, boxB will try to send the answer back to this address which is reachable. So boxB will be able to create a reply, which will be directed towards the router. The router, being smart enough to remember that it has manipulated the IP address, will then apply the reverse mapping and forward the packet to boxA.
To establish this mechanism, we will have to add a corresponding rule with the target SNAT to an appropriate chain of the router. We use the postrouting chain, which is traversed immediately before the packet leaves the router, and put the rule into the NAT table which exists for exactly this purpose.
sudo ip netns exec router \
   iptables -t nat \
   -A POSTROUTING \
   -o veth2 \
   -j SNAT --to 172.16.200.1
Here, we also use our first match – in this case, we apply this rule to all packets leaving the router via veth2, i.e. the public interface of our router.
When we now repeat the ping, this should work, i.e. we should receive a reply on boxA. It is also instructive to again inspect the logging output created by iptables using dmesg where we can observe nicely that the IP destination address of the reply changes to the IP address of boxA after traversing the mangle table of the PREROUTING chain of the router (this change is done before the routing decision is taken, to make sure that the route which is determined is correct). We also see that there are no logging messages from our NAT tables anymore on the router for the reply, because the NAT table is only traversed for the first packet in each stream and the same action is applied to all subsequent packets of this stream.
Adding firewall functionality
All this is nice, but there is still an important feature that we need in a real world scenario. So far, our router acts as a router in both directions – the default policies are ACCEPT, and traffic coming in from the “public” interface veth2 will happily be forwarded to boxA. In real life, of course, this is exactly what you do not want – you want to protect boxB against unwanted incoming traffic to decrease the attack surface.
So let us now try to block unwanted incoming traffic on the public device veth2 of our router. Our first idea could be to simply change the default policy for the filter table on each of the chains INPUT and FORWARD to DROP. As one of these chains is traversed by incoming packets, this should do the trick. So let us try this.
sudo ip netns exec router \
   iptables -t filter \
   -P INPUT DROP
sudo ip netns exec router \
   iptables -t filter \
   -P FORWARD DROP
Of course this was not a really good idea, as we immediately learn when we execute our next ping on boxA. As we have changed the default for the FORWARD chain to drop, our ICMP echo request is dropped before being able to leave the router. To fix this, let us now add an additional rule to the FORWARD table which ACCEPTs all traffic coming from the private network, i.e. veth1.
sudo ip netns exec router \
   iptables -t filter \
   -A FORWARD \
   -i veth1 -j ACCEPT
When we now repeat the ping, we will see that the ICMP request again reaches boxB and a reply is generated. However, there is still a problem – the reply will reach the router via the public interface, and whence will be dropped.
To solve this problem, we would need a mechanism which would allow the router to identify incoming packets as replies to a previously sent outgoing packet and to let them pass. Again, iptables has a good answer to this – connection tracking.
Connection tracking
Iptables is a stateful firewall, meaning that it is able to maintain the state of a connection. During its life, a connection undergoes state transitions between several states, and an iptables rule can refer to this state and match a packet only if the underlying connection is in a certain state.
- When a connection is not yet established, i.e. when a packet is observed that does not seem to relate to an existing connection, the connection is created in the state NEW
- Once the kernel has seen packets in both directions, the connection is moved into the state ESTABLISHED
- There are connections which could be RELATED to an existing connection, for instance for FTP data connections
- Finally, a connection can be INVALID which means that the iptables connection tracking algorithm is not able to handle the connection
To use connection tracking, we have to add the -m conntrack switch to our iptables rule, which instructs iptables to load the connection tracking module, and then the –ctstate switch to refer to one or more states. The following rule will accept incoming traffic which belongs to an established connection, i.e. reply traffic.
sudo ip netns exec router \
   iptables -t filter \
   -A FORWARD \
   -m conntrack --ctstate ESTABLISHED,RELATED -j ACCEPT
After adding this rule, a ping from boxA to boxB should work again, and the log messages should show that the request travels from boxA to boxB across the router and that the reply travels the same way back without being blocked.
Destination NATing
Let us summarize what we have done so far. At this point, our router and firewall is able to
- Allow traffic from the internal network, i.e. boxA, to pass through the router and reach the public network, i.e. boxB
- Conceal the private IP address of boxB by applying source NATing
- Allow reply traffic to pass through the router from the public network back into the private network
- Block all other traffic from the public network from reaching the private network
However, in some cases, there might actually be a good reason to allow incoming traffic to reach boxA on our internal network. Suppose, for instance, we had a web server (which, as far as this lab is concerned, will be a simple Python script) running on boxA which we want to make available from the public network. We would then want to allow incoming traffic to a dedicated port, say 8800.
Of course, we could add a rule that ACCEPTs incoming traffic (even if it is not a reply) when the target port is 8800. But we need a bit more than this. Recall that the IP address of boxA is not visible on the public network, but the IP address of the router (the IP address of the veth2 interface) is. To make our web server port reachable from the public network, we would need to divert traffic targeting port 8800 of the router to port 8800 of boxA, as indicated in the diagram below.
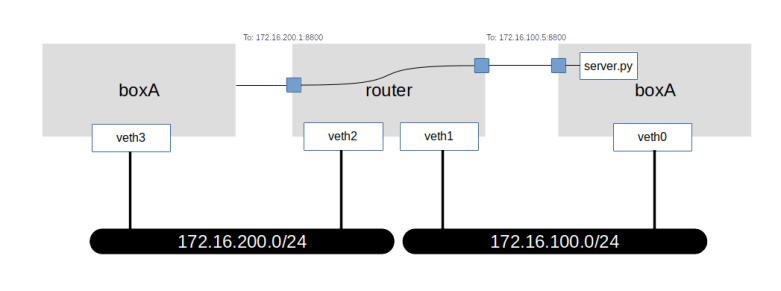
Again, there is a form of NATing that can help – destination NATing. Here, we leave the source IP address of the incoming packet as it is, but instead change the destination IP address. Thus, when a request comes in for port 8800 of the router, we change the target IP address to the IP address of boxA. When we do this in the PREROUTING chain, before a routing decision has been taken, the kernel will recognize that the new IP destination address is not a local address and will forward the packet to boxA.
To try this out, we first need a web server. I have put together a simple WSGI based web server, which will be present in the directory lab13 if you have cloned the corresponding repository. In a separate window, start the web server, making it run in the namespace of boxA.
cd lab13
sudo ip netns exec boxA python3 server.py
Now let us add a destination NATing rule to our router. As mentioned before, the change of the destination address needs to take place before the routing decision is taken, i.e. in the PREROUTING chain.
sudo ip netns exec router \
  iptables -t nat -A PREROUTING \
  -p tcp \
  -i veth2 \
  --destination-port 8800 \
  -j DNAT \
  --to-destination 172.16.100.5:8800
In addition, we need to ACCEPT traffic to this new destination in the FORWARD chain.
sudo ip netns exec router \
  iptables -t filter -A FORWARD \
  -p tcp \
  -i veth2 \
  --destination-port 8800 \
  -d 172.16.100.5 \
  -j ACCEPT
Let us now try to reach our web server from boxB.
sudo ip netns exec boxB \
  curl -w "\n" 172.16.200.1:8800
You should now see a short output (a HTML document with “Hello!” in it) from our web server, indicating that the connection worked. Effectively, we have “peeked a hole” into our firewall, connecting port 8080 of the public network front of our router to port 8800 of boxA. Of course, we could also use any other combination of ports, i.e. instead of mapping 8800 to itself, we could as well map port 80 to 8800 so that we could reach our web server on the public IP address of the router on the standard port.
Of course there is much more that we could say about iptables, but this discussion of the core features should put you in a position to read and interpret most iptable rule sets that you are likely to encounter when working with virtual networks, cloud technology and containers. I highly recommend to browse the references below to learn more, and to look at those chains on your local machine that Docker and libvirt install to get an idea how this is used in practice.
References
- The Netfilter How-to
- The iptables man page
- The excellent book Understanding Linux kernel network internals by C.
Benvenuti - The netfilter packet flow
