
After understanding how an informer can be used to implement a custom controller, we will now learn more about the inner working of an informer.
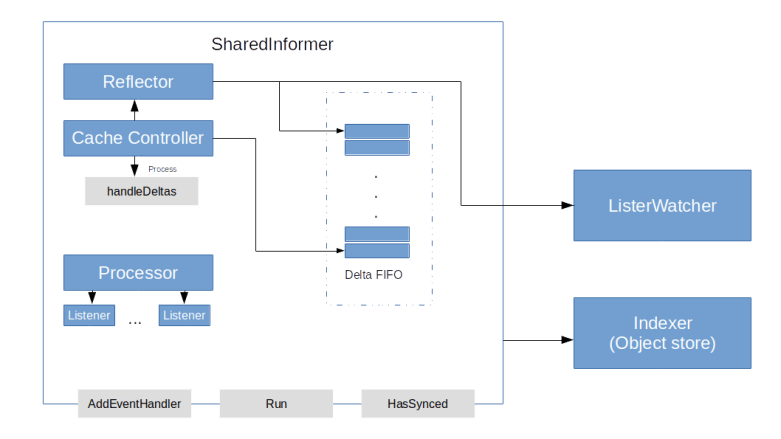
We have seen that essentially, informers use the Kubernetes API to learn about changes in the state of a Kubernetes cluster and use that information to maintain a cache (the indexer) of the current cluster state and to inform clients about the changes by calling handler functions. To achieve this, an informer (more specifically: a shared informer) is again a composition of several components.
- A reflector is the component which is actually talking to the Kubernetes API server
- The reflector stores the information on state changes in a special queue, a Delta FIFO
- A processor is used to distribute the information to all registered event handlers
- Finally, a cache controller is reading from the queue and orchestrating the overall process
In the next few sections, we visit each of these components in turn.
Reflectors and the FIFO queue
In the last post, we have seen that the Kubernetes API offers mechanisms like resource versions and watches to allow a client to keep track of the cluster state. However, these mechanism require some logic – keeping track of the resource version, handling timeouts and so forth. Within the Kubernetes client package, this logic is built into an Reflector.
A reflector uses the API to keep track of changes for one specific type of resources and update an object store accordingly. To talk to the Kubernetes API, it uses an object implementing the ListWatch interface, which is simply a convenience interface with a default implementation
When a reflector is started by invoking its Run method, it will periodically run the ListAndWatch method, which contains the core logic. This function first lists all resources and retrieves the resource version. It then uses the retrieved list to rebuild the object store. It then creates a watch (which is an instance of the watch.Interface interface) and reads from the channel provided by this watch resource in a loop, while keeping the resource version up to date. Depending on the type of the event, it then calls either Add, Update or Delete on the store.
The store that is maintained by the reflector is not just an ordinary store, but a Delta FIFO. This is a special store that maintains deltas, i.e. instances of cache.Delta, which is a structure containing the changed object and the type of change. The store will, for each object that has been subject to at least one change, maintain a list of all changes that have been reported for this object, and perform a certain de-duplication. Thus a reader will get a complete list of all deltas for a specific resource.
The cache controller and the processor
So our reflector is feeding the delta FIFO queue, but who is reading from it? This is done by another component of the shared informer – the cache controller.
When the Run method of a cache controller is invoked, it creates a Reflector, starts the Reflectors Run method in a separate goroutine and starts its own main loop processLoop as a second goroutine. Within that loop, the controller will pop elements off the FIFO queue and invoke the handleDeltas method of the informer once for each element in the queue. This method represents the main loop of the informer that is executed once for each object in the delta store.
This function will do two things. First, it will update the indexer according to the detected change retrieved from the delta FIFO queue. Second, it will build notifications (using the indexer to get old versions of an object if needed) to create notifications and distribute them to all handler functions. This work is delegated to the processor.
Essentially, a processor is an object that maintains a list of listeners. A listeners has an add method to receive notifications. These notifications are then buffered and forwarded to a resource event handler which can be any object that has methods OnAdd, OnUpdate and OnDelete.
We now have a rather complete understanding of what happens in case the state of the Kubernetes cluster changes.
- The reflector picks up the change via the Kubernetes API and enqueues it in the delta FIFO queue, where deduplication is performed and all changes for the same object are consolidated
- The controller is eventually reading the change from the delta FIFO queue
- The controller updates the indexer
- The controller forwards the change to the processor, which in turns calls all handler functions
- The handler functions are methods of the custom controller who can then inspect the delta, use the updated indexer to retrieve additional information and adjust the cluster state if needed
Note that the same informer object can serve many different handler functions, while maintaining only one, shared indexer – as the name suggests. Throughout the code, synchronisation primitives are used to protect the shared data structures to make all this thread-safe.
Creating and using shared informers
Let us now see how we can create and use a shared informer in practice. Suppose we wanted to write a controller that is taking care of pods and, for instance, trigger some action whenever a pod is created. We can do this by creating an informer which will listen for events on pods and call a handler function that we define. Again, the sample controller is guiding us how to do this.
The recommended way to create shared informers is to use an informer factory. This factory maintains a list of informers per resource type, and if a new informer is requested, it first performs a lookup in that list and returns an existing informer if possible (this happens in the function InformerFor). It is this mechanism which actually makes the informers and therefore their caches shared and reduces both memory footprint and the load on the API server.
We can create a factory and use it to get a shared informer listening for pod events as follows.
factory := informers.NewSharedInformerFactory(clientset, 30*time.Second)
podInformer := factory.Core().V1().Pods().Informer()
Here clientset is a Kubernetes clientset that we can create as in our previous examples, and the second argument is the resync period. In our example, we instruct the informer to rebuild its cache every 30 seconds.
Once our informer is created, we need to start its main loop. However, we cannot simply call its Run method, as this informer might be shared and we do not want to call this method twice. Instead, we can again use a convenience function of the factory class – its method Start will start all informers created by the factory and keep track of their status.
We can now register event handlers with the informer. An event handler is an object implementing the ResourceHandler interface. Instead of building a class implementing this interface ourselves, we can use the existing class ResourceHandlerFuncs. Assuming that our handler functions for adding, updating and deleting pods are called onAdd, onUpdate and onDelete, the code to add these functions as an event handler would look as follows.
podInformer.AddEventHandler(
		&cache.ResourceEventHandlerFuncs{
			AddFunc:    onAdd,
			DeleteFunc: onDelete,
			UpdateFunc: onUpdate,
		})
Finally, we need to think about how we stop our controller again. At the end of our main function, we cannot simply exit, as this would stop the entire controller loop immediately. So we need to wait for something – most likely for a signal sent to us by the operating system, for instance because we have hit Ctrl-C. This can be achieved using the idea of a stop channel. This is a channel which is closed when we want to exit, for instance because a signal is received. To achieve this, we can create a dedicated goroutine which uses the os standard package to receive signals from the operating system and closes the channel accordingly. An example implementation is part of the sample controller.
Our event handlers are now very easy. They receive an object that we can convert to a Pod object using a type assertion. We can than use properties of the pod, for instance its name, print information or process that information further. A full working example can be found in my GitHub repository here.
This completes our post for today. In the next post in this mini-series on Go and Kubernetes, we will put everything that we have learned so far together and talk a short walk through the full source code of the sample controller to understand how a custom controller works. This will then finally put us in a position to start the implementation of our planned bitcoin controller.
