
In my previous posts on Kubernetes, I have used public cloud providers like AWS or DigitalOcean to spin up test clusters. This is nice and quite flexible – you can create clusters with an arbitrary numbers of nodes, can attach volumes, create load balancers and define networks. However, cloud providers will of course charge for that, and your freedom to adapt the configuration and play with the management nodes is limited. It would be nice to have a playground, maybe even on your own machine, which gives you a small environment to play with. This is exactly what the minikube project is about.
Basics and installation
Minikube is a set of tools that allows you to easily create a one-node Kubernetes cluster inside a virtual machine running on your PC. Thus there is only one node, which serves at the same time as a management node and a worker node. Minikube supports several virtualization toolsets, but the default (both on Linux and an Windows) is Virtualbox. So as a first step, let us install this.
$ sudo apt-get install virtualbox
Next, we can install minikube. We will use release 1.0 which has been published end of march. Minikube is one single, statically linked binary. I keep third-party binaries in a directory ~/Local/bin, so I applied the following commands to download and install minikube.
$ curl -Lo minikube https://storage.googleapis.com/minikube/releases/v1.0.0/minikube-linux-amd64
$ chmod 700 minikube
$ mv minikube ~/Local/bin
Running minikube
Running minikube is easy – just execute
$ minikube start
When you do this for the first time after installation, Minikube needs to download a couple of images. These images are cached in ~/minikube/cache and require a bit more than 2 Gb of disk space, so this will take some time.
Once the download is complete, minikube will bring up a virtual machine, install Kubernetes in it and adapt your kubectl configuration to point to this newly created cluster.
By default, minikube will create a virtual machine with two virtual CPUs (i.e. two hyperthreads) and 2 GB of RAM. This is the minimum for a reasonable setup. If you have a machine with sufficient memory, you can allocate more. To create a machine with 4 GB RAM and four CPUs, use
$ minikube start --memory 4096 --cpus 4
Let us see what this command does. If you print your kubectl config file using kubectl config view, you will see that minikube has added a new context to your configuration and set this context as the default context, while preserving any previous configuration that you had. Next, let us inspect our nodes.
$ kubectl get nodes
NAME       STATUS   ROLES    AGE     VERSION
minikube   Ready    master   3m24s   v1.14.0
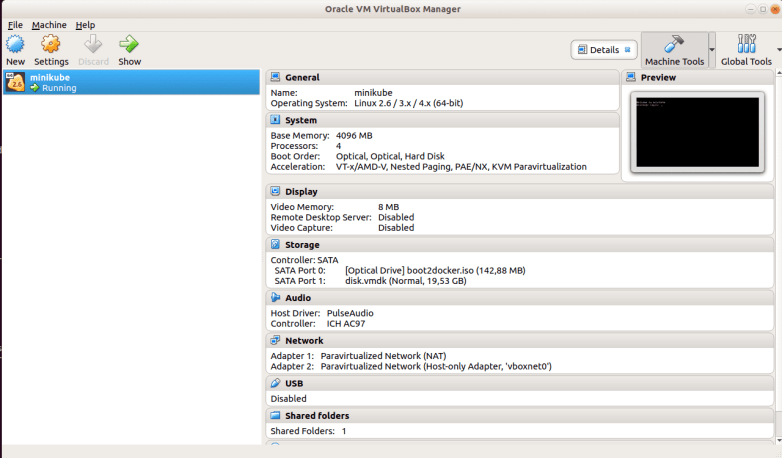
We see that there is one node, as expected. This node is a virtual machine – if you run virtualbox, you will be able to see that machine and its configuration.
When you run minikube stop, the virtual machine will be shut down, but will survive. When you restart minikube, this machine will again be used.
There are several ways to actually log into this machine. First, minikube has a command that will do that – minikube ssh. This will log you in as user docker, and you can do a sudo -s to become root.
Alternatively, you can stop minikube, then start the machine manually from the virtualbox management console, log into it (user “docker”, password “tcuser” – it took me some time to figure this out, if you want to verify this look at this file, read the minikube Makefile to confirm that the build uses buildroot and take a look at the description in this file) and then start minikube. In this case, minikube will detect that the machine is already running.
Networking in Minikube
Let us now inspect the networking configuration of the virtualbox instance that minikube has started for us. When minikube comes up, it will print a message like the following
“minikube” IP address is 192.168.99.100
In case you missed this message, you can use run minikube ip to obtain this IP address. How is that IP address reachable from the host?
If you run ifconfig and ip route on the host system, you will find that virtualbox has created an additional virtual network device vboxnet0 (use ls -l /sys/class/net to verify that this is a virtual device) and has added a route sending all the traffic to the CIDR range 192.168.99.0/24 to this device, using the source IP address 192.168.99.1 (the src field in the output of ip route). So this gives you yet another way to SSH into the virtual machine
ssh docker@$(minikube ip)
showing also that the connection works.
Inside the VM, however, the picture is a bit more complicated. As a starting point, let us print some details on the virtual machine that minikube has created.
$ vboxmanage showvminfo  minikube --details | grep "NIC" | grep -v "disabled"
NIC 1:           MAC: 080027AE1062, Attachment: NAT, Cable connected: on, Trace: off (file: none), Type: virtio, Reported speed: 0 Mbps, Boot priority: 0, Promisc Policy: deny, Bandwidth group: none
NIC 1 Settings:  MTU: 0, Socket (send: 64, receive: 64), TCP Window (send:64, receive: 64)
NIC 1 Rule(0):   name = ssh, protocol = tcp, host ip = 127.0.0.1, host port = 44359, guest ip = , guest port = 22
NIC 2:           MAC: 080027BDDBEC, Attachment: Host-only Interface 'vboxnet0', Cable connected: on, Trace: off (file: none), Type: virtio, Reported speed: 0 Mbps, Boot priority: 0, Promisc Policy: deny, Bandwidth group: none
So we find that virtualbox has equipped our machine with two virtual network interfaces, called NIC 1 and NIC 2. If you ssh into the machine, run ifconfig and compare the MAC address values, you fill find that these two devices appear as eth0 and eth1.
Let us first take a closer look at the first interface. This is a so-called NAT device. Basically, this device acts like a router – when a TCP/IP packet is sent to this device, the virtualbox engine extracts the data, opens a port on the host machine and sends the data to the target host. When the answer is received, another address translation is performed and the packet is fed again into the virtual device.
Much like an actual router, this mechanism makes it impossible to reach the virtual machine from the host – unless a port forwarding rule is set up. If you look at the output above, you will see that there is one port forwarding rule already in place, mapping the SSH port of the guest system to a port on the host, in our case 44359. When you run netstat on the host, you will find that minikube itself actually connects to this port to reach the SSH daemon inside the virtual machine – and, incidentally, this gives us yet another way to SSH into our machine.
ssh -p 44359 docker@127.0.0.1
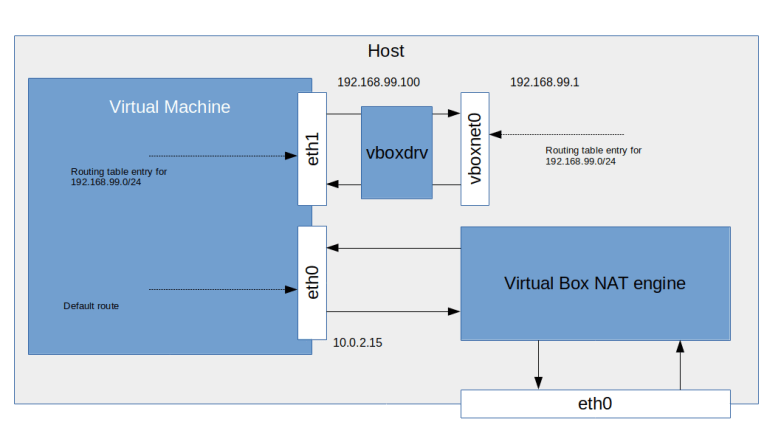
Now let us turn to the second interface – eth1. This is an interface type which the VirtualBox documentation refers to as host-only networking. In this mode, an additional virtual network device is created on the host system – this is the vboxnet0 device which we have already spotted. Traffic sent to the virtual device eth1 in the machine is forwarded to this device and vice versa (this is in fact handled by a special driver vboxnet as you can tell from the output of ethtool -i vboxnet0). In addition, VirtualBox has added routes on the host and the guest system to connect this device to the network 192.168.99.0/24. Note that this network is completely separated from the host network. So our picture looks as follows.
What does this mean for Kubernetes networking in Minikube? Well, the first obvious consequence is that we can use node ports to access services from our host system. Let us try this out, using the examples from a previous post.
$ kubectl apply -f https://raw.githubusercontent.com/christianb93/Kubernetes/master/pods/deployment.yaml
deployment.apps/alpine created
$ kubectl apply -f https://raw.githubusercontent.com/christianb93/Kubernetes/master/network/nodePortService.yaml
service/alpine-service created
$ kubectl get svc
NAME             TYPE        CLUSTER-IP      EXTERNAL-IP   PORT(S)          AGE
alpine-service   NodePort    10.99.112.157           8080:32197/TCP   26s
kubernetes       ClusterIP   10.96.0.1               443/TCP          4d17h
So our service has been created and is listening on the node port 32197. Let us see whether we can reach our service from the host. On the host, open a terminal window and enter
$ nodeIP=$(minikube ip)
$ curl $nodeIP:32197
<h1>It works!</h1>
So node port services work as expected. What about load balancer services? In a typical cloud environment, Kubernetes will create load balancers whenever we set up a load balancer service that is reachable from outside the cluster. Let us see what the corresponding behavior in a minikube environment is.
$ kubectl delete svc alpine-service
service "alpine-service" deleted
$ kubectl apply -f https://raw.githubusercontent.com/christianb93/Kubernetes/master/network/loadBalancerService.yaml
service/alpine-service created
$ kubectl get svc
NAME             TYPE           CLUSTER-IP       EXTERNAL-IP   PORT(S)          AGE
alpine-service   LoadBalancer   10.106.216.127        8080:31282/TCP   3s
kubernetes       ClusterIP      10.96.0.1                443/TCP          4d18h
$ curl $nodeIP:31282
<h1>It works!</h1>
You will find that even after a few minutes, the external IP remains pending. Of course, we can still reach our service via the node port, but this is not the idea of a load balancer service. This is not awfully surprising, as there is no load balancer infrastructure on your local machine.
However, minikube does offer a tool that allows you to emulate a load balancer – minikube tunnel. To see this in action, open a second terminal on your host and enter
minikube tunnel
After a few seconds, you will be asked for your root password, as minikube tunnel requires root privileges. After providing this, you should see some status message on the screen. In our first terminal, we can now inspect our service again.
$ kubectl get svc alpine-service
NAME             TYPE           CLUSTER-IP       EXTERNAL-IP      PORT(S)          AGE
alpine-service   LoadBalancer   10.106.216.127   10.106.216.127   8080:31282/TCP   17m
$ curl 10.106.216.127:8080
<h1>It works!</h1>
Suddenly, the field external IP is populated, and we can reach our service under this IP address and the port number that we have configured in our service description. What is going on here?
To find the answer, we can use ip route on the host. If you run this, you will find that minikube has added an additional route which looks as follows.
10.96.0.0/12 via 192.168.99.100 dev vboxnet0
Let us compare this with the CIDR range that minikube uses for services.
$ kubectl cluster-info dump | grep -m 1 range
                            "--service-cluster-ip-range=10.96.0.0/12",
So minikube has added a route that will forward all traffic directed towards the IP ranged used for Kubernetes services to the IP address of the VM in which minikube is running, using the virtual ethernet device created for this VM. Effectively, this sets up the VM as a gateway which makes it possible to reach this CIDR range (see also the minikube documentation for details). In addition, minikube will set the external IP of the service to the cluster IP address, so that the service can now be reached from the host (you can also verify the setup using ip route get 10.106.216.127 to display the result of the route resolution process for this destination).
Note that if you stop the separate tunnel process again, the additional route disappears again and the external IP address of the service switches back to “pending”.
Persistent storage in Minikube
We have seen in my previous posts on persistent storage that cloud platforms typically define a default storage class and offer a way to automatically create persistent volumes for a PVC. The same is true for minikube – there is a default storage class.
$ kubectl get storageclass
NAME                 PROVISIONER                AGE
standard (default)   k8s.io/minikube-hostpath   5d1h
In fact, minikube is by default starting a custom storage controller (as you can check by running kubectl get pods -n kube-system). To understand how this storage controller is operating, let us construct a PVC and analyse the resulting volume.
$ kubectl apply -f - << EOF
apiVersion: v1
kind: PersistentVolumeClaim
metadata:
  name: my-pvc
  namespace: default
spec:
  accessModes:
    - ReadWriteOnce
  resources:
    requests:
      storage: 512Mi
EOF
If you use kubectl get pv, you will see that the storage controller has created a new persistent volume. Let us attach this volume to a container to play with it.
$ kubectl apply -f - << EOF
apiVersion: v1
kind: Pod
metadata:
  name: pv-test
  namespace: default
spec:
  containers:
  - name: pv-test-ctr
    image: httpd:alpine
    volumeMounts:
      - mountPath: /test
        name: test-volume
  volumes:
  - name: test-volume
    persistentVolumeClaim:
      claimName: my-pvc
EOF
If you then use once more SSH into the VM, you should see our new container running. Using docker inspect, you will find that Docker has again created a bind mount, binding the mount point /test to a directory on the host named /tmp/hostpath-provisioner/pvc-*, where * indicates some randomly generated number. When you attach to the container and create a file /test/myfile, and then display the contents of this directory in the VM, you will in fact see that the file has been created.
So at the end of the day, a persistent volume in minikube is simply a host-path volume, pointing to a directory on the one and only node used by minikube. Also note that this storage is really persistent in the sense that it survives a restart of minikube.
Additional features
There are a view additional features of minikube that are worth being mentioned. First, it is very easy to install an NGINX ingress controller – the command
minikube addons enable ingress
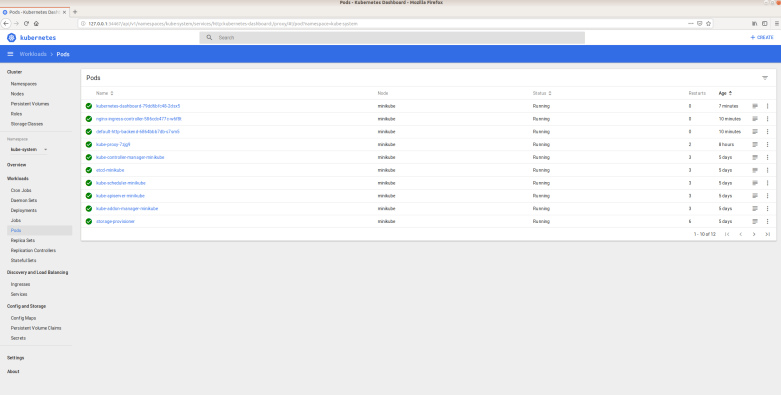
will do this for you. Second, minikube also allows you to install and enable the Kubernetes dashboard. In fact, running
minikube dashboard
will install the dashboard and open a browser pointing to it.
And there are many more addons- you can get a full list with minikube addons list or in the minikube documentation. I highly recommend to browse that list and play with one of them.

This was clear and very helpful. I really appreciated the networking picture; pretty abstract without that. Thank you!
LikeLike