Understanding Kubernetes controllers part IV – putting it all together

In the last few posts, we have looked in detail at the various parts of the machinery behind Kubernetes controllers – informers, queues, stores and so forth. In this final post, we will wrap up a bit and see how all this comes together in the Kubernetes sample controller.

The flow of control

The two main source code files that make up the sample controller are main.go and controller.go. The main function is actually rather simple. It creates a clientset, an informer factory for Foo objects and an informer factory for deployments and then uses those items to create a controller.

Once the controller exists, main starts the informers using the corresponding functions of the factory, which will bring up the goroutines of the two informers. Finally, the controllers main loop is started by calling its Run method.

The controller is more interesting. When it is created using NewController, it attaches event handlers to the informes for Deployments and Foo resources. As we have seen, both event handlers will eventually put Foo objects that require attention into a work queue.

The items in this work queue are processed by worker threads that are created in the controllers Run method. As the queue servers act as a synchronization point, we can run as many worker threads that we want and still make sure that each event is processed by only one worker thread. The main function of the worker thread is processNextWorkItem which retrieves elements from the queue, i.e. the keys of the Foo objects that need to be reconciled, and calls syncHandler for each of them. If that functions fails, the item is put back onto the work queue.

The syncHandler function contains the actual reconciliation logic. It first splits the key into namespace and name of the Foo resource. Then it tries to receive an existing deployment for this Foo resource and creates one if it does not yet exist. If a deployment is found, but deviates from the target state, it is replaced by a new deployment as returned by the function newDeployment. Finally, the status subresource of the Foo object is updated.

So this simple controller logic realizes some of the recommendations for building controllers.

  • It uses queues to decouple workers from event handlers and to allow for concurrent processing
  • Its logic is level based, not edge based, as a controller might be down for some time and miss updates
  • It uses shared informers and caches. The cached objects are never updated directly, but if updates are needed, deep copies are used and modified and updates are done via the API
  • It waits for all caches to sync before starting worker threads
  • It collapses all work to be done into a single queue

Package structure and generated code

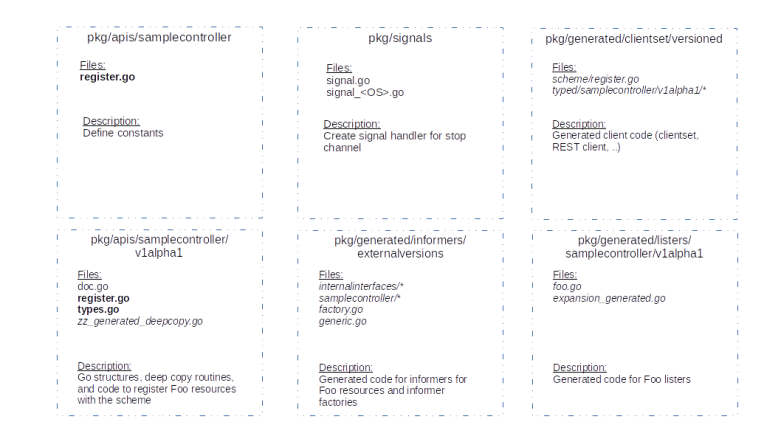
If you browse the sourcecode of the sample controller, you might at the first glance be overwhelmed by the number of files in the repository. However, there is good news – most of this code is actually generated! In fact, the diagram below shows the most important files and packages. Generated files are in italic font, and files that serve as input for the code generator or are referenced by the generated code are in bold face.

SampleControllerPackages

We see that the number of files that we need to provide is comparatively small. Apart from, of course, the files discussed above (main.go and controller.go), these are

  • register.go which adds our new types to the scheme and contains some lookup functions that the generated code will use
  • types.go which defines the Go structures that correspond to the Foo CRD
  • register.go in the top-level directory of the API package which defines the name of the API group as a constant

All the other files are created by the Kubernetes API code generator. This generator accepts a few switches (“generators”) to generate various types of code artifacts – deep-copy routines, clientsets, listers and informers. We will see the generator in action in a later post. Instead of using the code generator directly, we could of course as well use the sample controller as a starting point for our own code and make the necessary modifications manually, the previous posts should contain all the information that we need for this.

This post completes our short mini-series on the machinery behind custom controllers. In the next series, we will actually apply all this to implement a controller that operators a small bitcoin test network in a Kubernetes cluster.

Understanding Kubernetes controllers part III – informers

After understanding how an informer can be used to implement a custom controller, we will now learn more about the inner working of an informer.

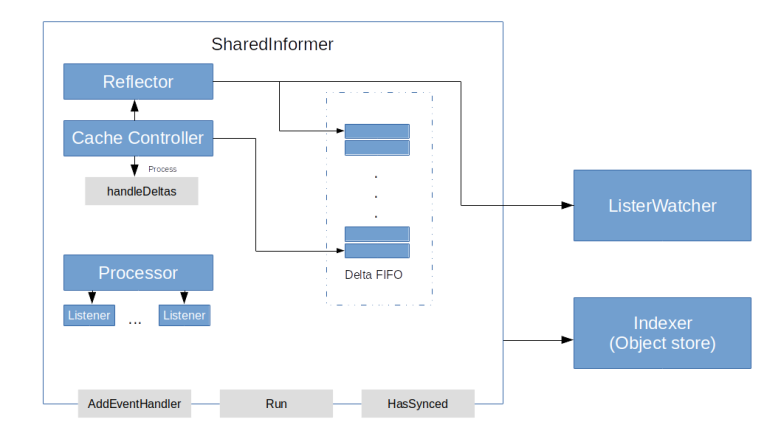
We have seen that essentially, informers use the Kubernetes API to learn about changes in the state of a Kubernetes cluster and use that information to maintain a cache (the indexer) of the current cluster state and to inform clients about the changes by calling handler functions. To achieve this, an informer (more specifically: a shared informer) is again a composition of several components.

  1. A reflector is the component which is actually talking to the Kubernetes API server
  2. The reflector stores the information on state changes in a special queue, a Delta FIFO
  3. A processor is used to distribute the information to all registered event handlers
  4. Finally, a cache controller is reading from the queue and orchestrating the overall process

SharedInformer

In the next few sections, we visit each of these components in turn.

Reflectors and the FIFO queue

In the last post, we have seen that the Kubernetes API offers mechanisms like resource versions and watches to allow a client to keep track of the cluster state. However, these mechanism require some logic – keeping track of the resource version, handling timeouts and so forth. Within the Kubernetes client package, this logic is built into an Reflector.

A reflector uses the API to keep track of changes for one specific type of resources and update an object store accordingly. To talk to the Kubernetes API, it uses an object implementing the ListWatch interface, which is simply a convenience interface with a default implementation

When a reflector is started by invoking its Run method, it will periodically run the ListAndWatch method, which contains the core logic. This function first lists all resources and retrieves the resource version. It then uses the retrieved list to rebuild the object store. It then creates a watch (which is an instance of the watch.Interface interface) and reads from the channel provided by this watch resource in a loop, while keeping the resource version up to date. Depending on the type of the event, it then calls either Add, Update or Delete on the store.

The store that is maintained by the reflector is not just an ordinary store, but a Delta FIFO. This is a special store that maintains deltas, i.e. instances of cache.Delta, which is a structure containing the changed object and the type of change. The store will, for each object that has been subject to at least one change, maintain a list of all changes that have been reported for this object, and perform a certain de-duplication. Thus a reader will get a complete list of all deltas for a specific resource.

The cache controller and the processor

So our reflector is feeding the delta FIFO queue, but who is reading from it? This is done by another component of the shared informer – the cache controller.

When the Run method of a cache controller is invoked, it creates a Reflector, starts the Reflectors Run method in a separate goroutine and starts its own main loop processLoop as a second goroutine. Within that loop, the controller will pop elements off the FIFO queue and invoke the handleDeltas method of the informer once for each element in the queue. This method represents the main loop of the informer that is executed once for each object in the delta store.

This function will do two things. First, it will update the indexer according to the detected change retrieved from the delta FIFO queue. Second, it will build notifications (using the indexer to get old versions of an object if needed) to create notifications and distribute them to all handler functions. This work is delegated to the processor.

Essentially, a processor is an object that maintains a list of listeners. A listeners has an add method to receive notifications. These notifications are then buffered and forwarded to a resource event handler which can be any object that has methods OnAdd, OnUpdate and OnDelete.

We now have a rather complete understanding of what happens in case the state of the Kubernetes cluster changes.

  • The reflector picks up the change via the Kubernetes API and enqueues it in the delta FIFO queue, where deduplication is performed and all changes for the same object are consolidated
  • The controller is eventually reading the change from the delta FIFO queue
  • The controller updates the indexer
  • The controller forwards the change to the processor, which in turns calls all handler functions
  • The handler functions are methods of the custom controller who can then inspect the delta, use the updated indexer to retrieve additional information and adjust the cluster state if needed

Note that the same informer object can serve many different handler functions, while maintaining only one, shared indexer – as the name suggests. Throughout the code, synchronisation primitives are used to protect the shared data structures to make all this thread-safe.

Creating and using shared informers

Let us now see how we can create and use a shared informer in practice. Suppose we wanted to write a controller that is taking care of pods and, for instance, trigger some action whenever a pod is created. We can do this by creating an informer which will listen for events on pods and call a handler function that we define. Again, the sample controller is guiding us how to do this.

The recommended way to create shared informers is to use an informer factory. This factory maintains a list of informers per resource type, and if a new informer is requested, it first performs a lookup in that list and returns an existing informer if possible (this happens in the function InformerFor). It is this mechanism which actually makes the informers and therefore their caches shared and reduces both memory footprint and the load on the API server.

We can create a factory and use it to get a shared informer listening for pod events as follows.

factory := informers.NewSharedInformerFactory(clientset, 30*time.Second)
podInformer := factory.Core().V1().Pods().Informer()

Here clientset is a Kubernetes clientset that we can create as in our previous examples, and the second argument is the resync period. In our example, we instruct the informer to rebuild its cache every 30 seconds.

Once our informer is created, we need to start its main loop. However, we cannot simply call its Run method, as this informer might be shared and we do not want to call this method twice. Instead, we can again use a convenience function of the factory class – its method Start will start all informers created by the factory and keep track of their status.

We can now register event handlers with the informer. An event handler is an object implementing the ResourceHandler interface. Instead of building a class implementing this interface ourselves, we can use the existing class ResourceHandlerFuncs. Assuming that our handler functions for adding, updating and deleting pods are called onAdd, onUpdate and onDelete, the code to add these functions as an event handler would look as follows.

podInformer.AddEventHandler(
		&cache.ResourceEventHandlerFuncs{
			AddFunc:    onAdd,
			DeleteFunc: onDelete,
			UpdateFunc: onUpdate,
		})

Finally, we need to think about how we stop our controller again. At the end of our main function, we cannot simply exit, as this would stop the entire controller loop immediately. So we need to wait for something – most likely for a signal sent to us by the operating system, for instance because we have hit Ctrl-C. This can be achieved using the idea of a stop channel. This is a channel which is closed when we want to exit, for instance because a signal is received. To achieve this, we can create a dedicated goroutine which uses the os standard package to receive signals from the operating system and closes the channel accordingly. An example implementation is part of the sample controller.

Our event handlers are now very easy. They receive an object that we can convert to a Pod object using a type assertion. We can than use properties of the pod, for instance its name, print information or process that information further. A full working example can be found in my GitHub repository here.

This completes our post for today. In the next post in this mini-series on Go and Kubernetes, we will put everything that we have learned so far together and talk a short walk through the full source code of the sample controller to understand how a custom controller works. This will then finally put us in a position to start the implementation of our planned bitcoin controller.

Understanding Kubernetes controllers part I – queues and the core controller loop

In previous posts in my series on Kubernetes, we have stumbled across the concept of a controller. Essentially, a controller is a daemon that monitors the to-be state of components of a Kubernetes cluster against the as-is state and takes action to reach the to-be state.

A classical example is the Replica set controller which monitors replica sets and pods and is responsible for creating new pods or deleting existing pods if the number of replicas is out-of-sync with the defined value.

In this series, we will perform a deep dive into controllers. Specifically, we will take a tour through the sample controller that is provided by the Kubernetes project and try to understand how this controller works. We will also explain how this relates to customer resource definitions (CRDs) and what steps are needed to implement a customer controller for a given CRD.

Testing the sample controller

Let us now start with our analysis of the sample controller. To follow this analysis, I advise to download a copy of the sample controller into your Go workspace using go get github.com/kubernetes/sample-controller and then using an editor like Atom that offers plugins to navigate Go code.

To test the client and to have a starting point for debugging and tracing, let us follow the instructions in the README file that is located at the root of the repository. Assuming that you have a working kubectl config in $HOME/.kube/config, build and start the controller as follows.

$ cd $GOPATH/src/k8s.io/sample-controller
$ go build
$ kubectl create -f artifacts/examples/crd.yaml
$ ./sample-controller --kubeconfig=$HOME/.kube/config

This will create a custom resource definition, specifically a new resource type named “Foo” that we can use as any other resource like Pods or Deployments. In a separate terminal, we can now create a Foo resource.

$ kubectl create -f artifacts/examples/example-foo.yaml 
$ kubectl get deployments
$ kubectl get pods

You will find that our controller has created one deployment which in turn brings up one pod running nginx. If you delete the custom resource again using kubectl delete foo example-foo, both, the deployment and the pods disappear again. However, if you manually delete the deployment, it is is recreated by the controller. So apparently, our controller is able to detect changes to deployments and foo resources and to match them accordingly. How does this work?

Basically, a controller will periodically match the state of the system to the to-be state. For that purpose, several functionalities are required.

  • We need to be able to keep track of the state of the system. This is done based on an event-driven processing and handled by informers that are able to subscribe to events and invoke specific handlers and listers that are able to list all resources in a given Kubernetes cluster
  • We need to be able to keep track of the state of the system. This is done using object stores and their indexed variants indexer
  • Ideally, we should be able to process larger volumes using multi-threading, coordinated by queues

In this and the next post, we will go through these elements one by one. We start with queues.

Queues and concurrency

Let us start by investigating threads and queues in the Kubernetes library. The ability to easily create threads (called go-routines) in Go and the support for managing concurrency and locking are one of the key differentiators of the Go programming language, and of course the Kubernetes client library makes use of these features.

Essentially, a queue in the Kubernetes client library is something that implements the interface k8s.io/client-go/util/workqueue/Interface. That interface contains (among others) the following methods.

  • Add adds an object to the queue
  • Get blocks until an item is available in the queue, and then returns the first item in the queue
  • Done marks an item as processed

Internally, the standard implementation of a queue in queue.go uses Go maps. The keys of these maps are arbitrary objects, the items in the map are actually just placeholders (empty structures). One of these maps is called the dirty set, this map contains all elements that make up the actual queue, i.e. need to be processed. The second map is called the processing set, these are all items which have been retrieved using Get, but for which Done has not yet been called. As maps are unordered, there is also an array which holds the elements in the queue and is used to define the order of processing. Note that each of the maps can hold a specific object only once, whereas the queue can hold several copies of the object.

Queue

If we add something to the queue, it is added to the dirty set and appended to the queue array. If we call Get, the first item is retrieved from the queue, removed from the dirty set and added to the processing set. Calling Done will remove the element from the processing set as well, unless someone else has called Add in the meantime again on the same object – in this case it will be removed from the processing set, but also be added to the queue again.

Let us implement a little test program that works with queues. For that purpose, we will establish two threads aka goroutines. The first thread will call Add five times to add something to the queue and then complete. The second thread will sleep for three seconds and then read from the queue in a loop to retrieve the elements. Here are the functions to send and receive.

func fillQueue(queue workqueue.Interface) {
	time.Sleep(time.Second)
	queue.Add("this")
	queue.Add("is")
	queue.Add("a")
	queue.Add("complete")
	queue.Add("sentence")
}

func readFromQueue(queue workqueue.Interface) {
	time.Sleep(3 * time.Second)
	for {
		item, _ := queue.Get()
		fmt.Printf("Got item: %s\n", item)
		queue.Done(item)
	}
}

With these two functions in place, we can now easily create two goroutines that use the same queue to communicate (goroutines, being threads, share the same address space and can therefore communicate using common data structures).

myQueue := workqueue.New()
go fillQueue(myQueue)
go readFromQueue(myQueue)

However, if you run this, you will find that there is a problem. Our main thread completes after creating both worker threads, and this will cause the program to exit and kill both worker threads before the reader has done anything. To avoid this, we need to wait for the reader thread (which, reading from the queue, will in turn wait for the writer thread). One way to do this with Go language primitives is to use channels. So we change our reader function to receive a channel of integer elements

func readFromQueue(queue workqueue.Interface, stop chan int)

and in the main function, we create a channel, pass it to the function and then read from it which will block until the reader thread sends a confirmation that it is done reading.

stop := make(chan int)
myQueue := workqueue.New()
go fillQueue(myQueue)
go readFromQueue(myQueue, stop)
<-stop

Now, however, there is another problem – how does the reader know that no further items will be written to the queue? Fortunately, queues offers a way to handle this. When a writer is done using the queue, it will call Shutdown on the queue. This will change the queues behavior – reads will no longer be blocking, and the second return value of a Get will be true if the queue is empty. If a reader recognizes this situation, it can stop its goroutine.

A full example can be found here – of course this is made up to demonstrate goroutines, queues and channels and not the most efficient solution for the problem at hand.

The core controller loop

Armed with our understanding of concurrency and queues, we can now take a first look at the code of the sample controller. The main entry points for are the function handleObject and enqueueFoo – these are the functions invoked by the Informer, which we will discuss in one of the next posts, whenever either a Foo object or a Deployment is created, updated or deleted.

The function enqueueFoo is called whenever a Foo object is changed (i.e. added, updated or deleted). It simply determines a key for the object and adds that key to the workqueue.

The workqueue is read by worker threads, which are created in the Run function of the controller. This function creates a certain number of goroutines and then listens on a channel called stopCh, as we have done it in our simplified example before. This channel is created by main.go and used to be able to stop all workers and the main thread if a signal is received.

Each worker thread executes the method processNextItem of the controller in a loop. For each item in the queue, this method calls another method – syncHandler – passing the item retrieved from the queue, i.e. the key of the Foo resource. This method then uses a Lister to retrieve the current state of the Foo resource. It then retrieves the deployment behind the Foo resource, creates it if it could not be found, and updates the number of replicas if needed.

The function handleObject is similar. It is invoked by the informer with the new, updated state of the Deployment object. It then determines the owning Foo resource and simply enqueues that Foo resource. The rest of the processing will then be the same.

At this point, two open ends remain. First, we will have to understand how an Informer works and how it invokes the functions handleObject and enqueueFoo. And we will need to understand what a Lister is doing and where the lister and the data is uses comes from. This will be the topic of our next post.

Learning Go with Kubernetes IV – life of a request

So far we have described how a client program utilizes the Kubernetes library to talk to a Kubernetes API server. In this post, we will actually look into the Kubernetes client code and try to understand how it works under the hood.

When we work with the Kubernetes API and try to understand the client code, we first have to take a look at how the API is versioned.

Versioning in the Kubernetes API

The Kubernetes API is a versioned API. Every resource that you address using requests like GET or POST has a version. For stable versions, the version name is of the form vX, where X is an integer. In addition, resources are grouped into API groups. The full relative path to a resource is of the form

/api/GROUP/VERSION/namespaces/NAMESPACE

Let us take the job resource as an example. This resource is in the API group batch. A GET request for a job called my-job in the default namespace using version v1 of the API would therefore be something like

GET /api/batch/v1/namespaces/default/jobs/my-job

An exception is made by the core API group, which is omitted in the URL path for historical reasons. In a manifest file, API group and version are both stored in the field apiVersion, which, in our example, would be batch/v1.

Within the Kubernetes Go client, the combination of a type of resource (a “kind”, like a Pod), a version and an API group is stored in a Go structure called GroupVersionKind. In fact, this structure is declared as follows

type GroupVersionKind struct {
	Group   string
	Version string
	Kind    string
}

in the file k8s.io/apimachinery/pkg/runtime/schema/group_version.go. In the source code, instances of this class are typically called gvk. We will later see that, roughly speaking, the client contains a machinery which allows us to map forth and back between possible combinations of group, version and kind and Go structures.

An overview of the Kubernetes client

At least as far as we are concerned with getting, updating and deleting resources, the Kubernetes client code consists of the following core components:

  • A clientset is the entry point into the package and typically created from a client configuration as stored in the file ~/.kube/config
  • For each combination of API group and version, there is a package that contains the corresponding clients. For each resource in that group, like a Node, there is a corresponding Interface that allows us to perform operations like get, list etc. on the resource, and a corresponding object like a node itself
  • The package k8s.io/client-go/rest contains the code to create, submit and process REST requests. There is a REST client, request and result structures, serializers and configuration objects
  • The package k8s.io/apimachinery/pkg/runtime contains the machinery to translate API requests and replies from and to Go structures. An Encoder is able to write objects to a stream. A Decoder transforms a stream of bytes into an object. A Scheme is able to map a group-version-kind combination into a Go type and vice versa.
  • The same package contains a CodecFactory that is able to create encoders and decoders, and some standard encoders and decoders, for instance for JSON and YAML

KubernetesGoClientOverview

Let us now dive into each of these building blocks in more detail.

Clientsets and clients

In our first example program, we have used the following lines to connect to the API.

clientset, err := kubernetes.NewForConfig(config)
coreClient := clientset.CoreV1()
nodeList, err := coreClient.Nodes().List(metav1.ListOptions{})

Let us walk through this and see how each of these lines is implemented behind the scenes. The first line creates an instance of the class ClientSet. Essentially, a clientset is a set of client objects, where each client object represents one version of an API group. When we access nodes, we will use the API group core, and correspondingly use the field coreV1 of this structure.

This core client is an instance of k8s.io/client-go/kubernetes/typed/core/v1/coreV1Client and implementing the interface CoreV1Interface. This interface declares for each resource in the core API a dedicated getter function which returns an interface to work with this resource. For a node, the getter function is called Nodes and returns a class implementing the interface NodeInterface, which defines all the functions we are looking for – get, update, delete, list and so forth.

An instance of the Nodes class also contains a reference to a RESTClient which is the working horse where the actual REST requests to the Kubernetes API will be assembled and processed – let us continue our analysis there.

RESTClient and requests

How do REST clients work? Going back to our example code, we invoke the REST client in the line

nodeList, err := coreClient.Nodes().List(metav1.ListOptions{})

Here we invoke the List method on the nodes object which is defined in the file k8s.io/client-go/kubernetes/typed/core/v1/node.go. The core of this method is the following code snippet.

err = c.client.Get().
	Resource("nodes").
	VersionedParams(&opts, scheme.ParameterCodec).
	Timeout(timeout).
	Do().
	Into(result)

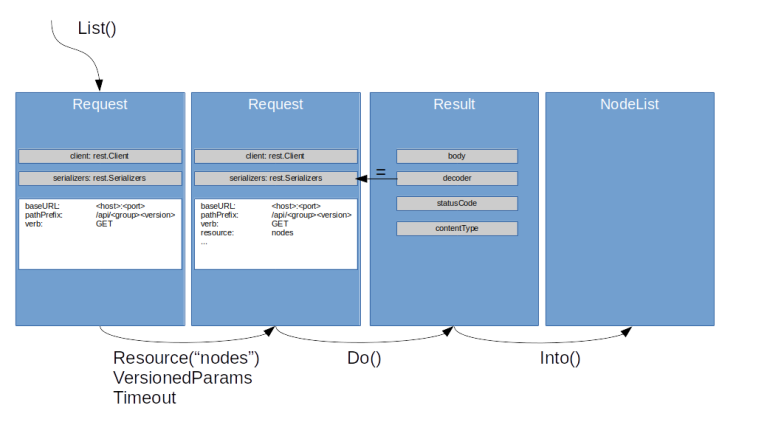
Let us go through this step by step to see what is going on. First, the attribute client referenced here is a RESTClient, defined in k8s.io/client-go/rest/client.go. Among other things, this class contains a set of methods to manipulate requests.

The first method that we call is Get, which returns an instance of the class rest.Request, defined in rest.go in the same directory. A request contains a reference to a HTTPClient, which typically is equal to the HTTPClient to which the RESTClient itself refers. The request created by the Get method will be pre-initialized with the verb “GET”.

Next, several parameters are added to the request. Each of the following methods is a method of the Request object and again returns a request, so that chaining becomes possible. First, the method Resource sets the name of the resource that we want to access, in this case “nodes”. This will become part of the URL. Then we use VersionedParams to add the options to the request and Timeout to set a timeout.

We then call Do() on the request. Here is the key section of this method

var result Result
err := r.request(func(req *http.Request, resp *http.Response) {
	result = r.transformResponse(resp, req)
})
return result

In the first line, we create an (empty) rest.Result object. In addition to the typical attributes that you would expect from a HTTP response, like a body, i.e a sequence of bytes, this object also contains a decoder, which will become important later on.

We then invoke the request method of the Request object. This function assembles a new HTTP request based on our request, invokes the Do() method on the HTTP client and then calls the provided function which is responsible for converting the HTTP response into a Result object. The default implementation of this is transformResponse, which also sets a decoder in the Result object respectively copies the decoder contained in the request object.

RESTClient

When all this completes, we have a Result object in our hands. This is still a generic object, we have a response body which is a stream of bytes, not a typed Go structure.

This conversion – the unmarshalling – is handled by the method Into. This method accepts as an argument an instance of the type runtime.Object and fills that object according to the response body. To understand how this work, we will have to take a look at schemes, codec factories and decoders.

Schemes and decoder

In the first section, we have seen that API resources are uniquely determined by the combination of API group, version and kind. For each valid combination, our client should contain a Go structure representing this resource, and conversely, for every valid resource in the Go world, we would expect to have a combination of group, version and kind. The translation between these two worlds is accomplished by a scheme. Among other things, a scheme implements the following methods.

  • A method ObjectKind which returns all known combinations of kind, API group and version for a given object
  • A method Recognizes which in turn determines whether a given combination of kind, API group and version is allowed
  • A method New which is able to create a new object for a given combination of API group, kind and version

Essentially, a scheme knows all combinations of API group, version and kind and the corresponding Go structures and is able to create and default the Go structures. For this to work, all resources handled by the API need to implement the interface runtime.Object.

This is nice, but what we need to transform the result of a call to the Kubernetes API into a Go structure is a decoder object. To create decoder (and encoder) objects, the API uses the class CodecFactory. A codec factory refers to a scheme and is able to create encoders and decoders. Some of the public methods of such an object are collected in the interface NegotiatedSerializer.

This interface provides the missing link between a REST client and the scheme and decoder / encoder machinery. In fact, a REST client has an attribute contentConfig which is an object of type ContentConfig. This object contains the HTTP content type, the API group and version the client is supposed to talk to and a NegotiatedSerializer which will be used to obtain decoders and encoders.

SchemesAndDecoders

Where are schemes and codec factories created and stored? Within the package k8s.io/client-go/kubernetes/scheme, there is a public variable Scheme and a public variable Codecs which is a CodecFactory. Both variables are declared in register.go. The scheme is initially empty, but in the init method of the package, the scheme is built up by calling (via a function list called a scheme builder) the function AddToScheme for each known API group.

Putting it all together

Armed with this understanding of the class structures, we can now again try to understand what happens when we submit our request to list all nodes.

During initialization of the package k8s.io/client-go/kubernetes/scheme, the initialization code in the file register.go is executed. This will initialize our scheme and a codec factory. As part of this, a standard decoder for the JSON format will be created (this happens in the function NewCodecFactory in codec_factory.go).

Then, we create our clientset using the function NewForConfig in the kubernetes package, which calls the method NewForConfig for each of the managed clients, including our CoreV1Client. Here, the following things happen:

  • We set group and version to the static values provided in the file register.go of the v1 package – the group will be empty, as we are in the special case for the core client, and the version will be “”v1”
  • We add a reference to the CodecFactory to our configuration
  • We create a REST client with a base URL constructed from the host name and port of the Kubernetes API server, the API group and the version as above
  • We then invoke the function createSerializers in the rest package. This function retrieves all supported media types from the codec factory and matches it against the media type in the kubectl config. Then a rest.Serializer is selected which matches group, version and media type
  • The REST client is added to the core client and the core client is returned
  • When we subsequently create a request using this REST client, we add this serializer to the request from which it is later copied to the result

At this point, we are ready to use this core client. We now navigate to a NodeInterface and call its list method. As explained above, this will eventually take us to the function Into defined in request.go. Here, we invoke the Decode method of our REST decoder. As this is the default JSON serializer, this method is the Decode function in json.go. This decode function first uses the scheme to determine if API group, version and kind of the response are valid and match the expected Go type. It then uses a standard JSON unmarshaller to perform the actual decoding.

This completes our short tour through the structure of the Go client source code. We have seen some central concepts of the client library – API groups, versions and kinds, schemes, encoder and decoder and the various client types – which we will need again in a later post when we discuss custom controllers.

Learning Go with Kubernetes III – slices and Kubernetes resources

In the last post, we have seen how structures, methods and interfaces in Go are used by the Kubernetes client API to model object oriented behavior. Today, we will continue our walk through to our first example program.

Arrays and slices

Recall that in the last point, we got to the point that we were able to get a list of all nodes in our cluster using

nodeList, err := coreClient.Nodes().List(metav1.ListOptions{})

Let us now try to better understand what nodeList actually is. If we look up the signature of the List method, we find that it is

List(opts metav1.ListOptions) (*v1.NodeList, error)

So we get a pointer to a NodeList. This in turns has a field Items which is defined as

Items []Node

We can access the field Items using either an explicit dereferencing of the pointer as items := (*nodeList).Items or the shorthand notation items := nodeList.Items.

Now looking at the definition above, it seems that Items is some sort of array whose elements are of type Node, but which does not have a fixed length. So time to learn more about arrays in Go

At the first glance, arrays in Go are very much like in many other languages. A declaration like

var a [5]int

declares an array called a of five integers. Arrays, like in C, cannot be resized. Other than in C, however, an assignment of arrays does not create two pointers that point to the same location in memory, but creates a copy. Thus if you do something like

b := a

you create a second array b which initially is identical to a, but if you modify b, a remains unchanged. This is especially important when you pass arrays to functions – you will pass a copy, and especially for large arrays, this is probably not what you want.

So why not passing pointers to arrays? Well, there is a little problem with that approach. In Go, the length of an array is part of an arrays type, so [5]int and [6]int are different types, which makes it difficult to write functions that accept an array of arbitrary length. For that purpose, Go offers slices which are essentially pointers to arrays.

Arrays are created either by declaring them or by using the new keyword. Slices are created either by slicing an existing array or by using the make keyword. As in Python, slices can refer to a part of an array and we can take slices of an existing slice. When slices are assigned, they refer to the same underlying array, and if a slice is passed as a parameter, no copy of the underlying array is created. So slices are effectively pointers to parts of arrays (with a bit more features, for instance the possibility to extend them by appending data).

How do you loop over a slice? For an array, you know its length and can build an ordinary loop. For a slice, you have two options. First, you can use the built-in function len to get the length of a slice and use that to construct a loop. Or you can use the for statement with range clause which also works for other data structures like strings, maps and channels. So we can iterate over the nodes in the list and print some basic information on them as follows.

items := nodeList.Items
for _, item := range items {
	fmt.Printf("%-20s  %-10s %s\n", item.Name,
		item.Status.NodeInfo.Architecture,
		item.Status.NodeInfo.OSImage)
}

Standard types in the Kubernetes API

The elements of the list we are cycling through above are instances of the struct Node, which is declared in the file k8s.io/api/core/v1/types.go. It is instructive to look at this definition for a moment.

type Node struct {
	metav1.TypeMeta `json:",inline"`
	metav1.ObjectMeta `json:"metadata,omitempty" protobuf:"bytes,1,opt,name=metadata"`
	Spec NodeSpec `json:"spec,omitempty" protobuf:"bytes,2,opt,name=spec"`
	Status NodeStatus `json:"status,omitempty" protobuf:"bytes,3,opt,name=status"`
}

First, we see that the first and second line are examples of embedded fields. It is worth noting that we can address these fields in two different ways. The second field, for instance, is ObjectMeta which has itself a field Name. To access this field when node is of type Node, we could either write node.ObjectMeta.Name or node.Name. This mechanism is called field promotion.

The second thing that is interesting in this definition are the strings like ‘json:”inline”‘ added after some field names. These string literals are called tags. They are mostly ignored, but can be inspected using the reflection API of Go and are, for instance, used by the json marshaller and unmarshaller.

When we take a further look at the file types.go in which these definitions are located and look at its location in our Go workspace and the layout of the various Kubernetes GitHub repositories, we see that (verify this in the output of go list -json k8s.io/client-go/kubernetes) this file is part of the Go package k8s.io/api/core/v1 which is part of the Kubernetes API GitHub repository. As explained here, the Swagger API specification is generated from this file. If you take a look at the resulting API specification, you will see that the comments in the source file appear in the documentation and that the json tags determine the field names that are used in the API.

To further practice navigating the source code and the API documentation, let us try to use the API to create a (naked) pod. The documentation tells us that a pod belongs to the API group core, so that the core client is probably again what we need. So the first few lines of our code will be as before.

home := homedir.HomeDir()
kubeconfig := filepath.Join(home, ".kube", "config")
config, err := clientcmd.BuildConfigFromFlags("", kubeconfig)

if err != nil {
	panic(err)
}
clientset, err := kubernetes.NewForConfig(config)
if err != nil {
	panic(err)
}
coreClient := clientset.CoreV1()

Next we have to create a Pod. To understand what we need to do, we can again look at the definition of a Pod in types.go which looks as follows.

type Pod struct {
	metav1.TypeMeta `json:",inline"`
	metav1.ObjectMeta `json:"metadata,omitempty" protobuf:"bytes,1,opt,name=metadata"`
	Spec PodSpec `json:"spec,omitempty" protobuf:"bytes,2,opt,name=spec"`
	Status PodStatus `json:"status,omitempty" protobuf:"bytes,3,opt,name=status"`

As in a YAML manifest file, we will not provide the Status field. The first field that we need is the TypeMeta field. If we locate its definition in the source code, we see that this is again a structure. To create an instance, we can use the following code

metav1.TypeMeta{
			Kind:       "Pod",
			APIVersion: "v1",
		}

This will create an unnamed instance of this structure with the specified fields – if you have trouble reading this code, you might want to consult the corresponding section of a Tour in Go. Similarly, we can create an instance of the ObjectMeta structure.

The PodSpec structure is a bit more interesting. The key field that we need to provide is the field Containers which is a slice. To create a slice consisting of one container only, we can use the following syntax

[]v1.Container{
	v1.Container{
		Name:  "my-ctr",
		Image: "httpd:alpine",
	}

Here the code starting in the second line creates a single instance of the Container structure. Surrounding this by braces gives us an array with one element. We then use this array to initialize our slice.

We could use temporary variables to store all these fields and then assemble our Pod structure step by step. However, in most examples, you will see a coding style avoiding this which heavily uses anonymous structures. So our final result could be

pod := &v1.Pod{
	TypeMeta: metav1.TypeMeta{
		Kind:       "Pod",
		APIVersion: "v1",
	},	
	ObjectMeta: metav1.ObjectMeta{
		Name: "my-pod",
	},
	Spec: v1.PodSpec{
		Containers: []v1.Container{
			v1.Container{
				Name:  "my-ctr",
				Image: "httpd:alpine",
			},
		},
	},
}

It takes some time to get used to expressions like this one, but once you have seen and understood a few of them, they start to be surprisingly readable, as all declarations are in one place. Also note that this gives us a pointer to a Pod, as we use the deferencing & in front of our structure. This pointer can then be used as input for the Create() method of a PodInterface, which finally creates the actual Pod. You can find the full source code here, including all the boilerplate code.

At this point, you should be able to read and (at least roughly) understand most of the source code in the Kubernetes client package. In the next post, we will be digging deeper into this code and trace an API request through the library, starting in your Go program and ending at the communication with the Kubernetes API server.

Learning Go with Kubernetes II – navigating structs, methods and interfaces

In the last post, we have set up our Go development environment and downloaded the Kubernetes Go client package. In this post, we will start to work on our first Go program which will retrieve and display a list of all nodes in a cluster.

You can download the full program here from my GitHub account. Copy this file to a subdirectory of the src directory in your Go workspace. You can build the program with

go build

which will create an executable called example1. If you run this (and have a working kubectl configuration pointing to a cluster with some nodes), you should see an output similar to the following.

$ ./example1 
NAME                  ARCH       OS
my-pool-7t62          amd64      Debian GNU/Linux 9 (stretch)
my-pool-7t6p          amd64      Debian GNU/Linux 9 (stretch)

Let us now go through the code step by step. In the first few lines, I declare my source code as part of the package main (which Go will search for the main entry point) and import a few packages that we will need later.

package main

import (
	"fmt"
	"path/filepath"
	metav1 "k8s.io/apimachinery/pkg/apis/meta/v1"
	"k8s.io/client-go/kubernetes"
	"k8s.io/client-go/tools/clientcmd"
	"k8s.io/client-go/util/homedir"
)

Note that the first two packages are Go standard packages, whereas the other four are Kubernetes packages. Also note that we import the package k8s.io/apimachinery/pkg/apis/meta/v1 using metav1 as an alias, so that an element foo in this package will be accessible as metav1.foo.

Next, we declare a function called main. As in many other program languages, the linker will use this function (in the package main) as an entry point for the executable.

func main() {
....
}

This function does not take any arguments and has no return values. Note that in Go, the return value is declared after the function name, not in front of the function name as in C or Java. Let us now take a look at the first three lines in the program

home := homedir.HomeDir()
kubeconfig := filepath.Join(home, ".kube", "config")
fmt.Printf("%-20s  %-10s %s\n", "NAME", "ARCH", "OS")

In the first line, we declare and initialize (using the := syntax) a variable called home. Variables in Go are strongly typed, but with this short variable declaration syntax, we ask the compiler to derive the type of the variable automatically from the assigned value.

Let us try to figure out this value. homedir is one of the packages that we have imported above. Using go list -json k8s.io/client-go/util/homedir, you can easily find the file in which this package is described. Let us look for a function HomeDir.

$ grep HomeDir $GOPATH/src/k8s.io/client-go/util/homedir/homedir.go 
// HomeDir returns the home directory for the current user
func HomeDir() string {

We see that there is a function HomeDir which returns a string, so our variable home will be a string. Note that the name of the function starts with an uppercase character so that it is exported by Go (in Go, elements starting with an uppercase character are exported, elements that start with a lowercase character not – you have to get used to this if you have worked with C or Java before). Applying the same exercise to the second line, you will find that kubeconfig is a string that is built from the three arguments to the function Join in the package filepath and path separators, i.e. this will be the path to the kubectl config file. Finally, the third line prints the header of the table of nodes we want to generate, in a printf-like syntax.

The next few lines in our code use the name of the kubectl config file to apply the configuration.

config, err := clientcmd.BuildConfigFromFlags("", kubeconfig)
if err != nil {
     panic(err)
}

This is again relatively straightforward, with one exception. The function BuildConfigFromFlags does actually return two values, as we can also see in its function declaration.

$ (cd  $GOPATH/src/k8s.io/client-go/tools/clientcmd ; grep "BuildConfigFromFlags" *.go)
client_config.go:// BuildConfigFromFlags is a helper function that builds configs from a master
client_config.go:func BuildConfigFromFlags(masterUrl, kubeconfigPath string) (*restclient.Config, error) {
client_config_test.go:	config, err := BuildConfigFromFlags("", tmpfile.Name())

The first argument is the actual configuration, the second is an error. We store both return values and check the error value – if everything went well, this should be nil which is the null value in Go.

Structures and methods

As a next step, we create a reference to the API client that we will use – a clientset.

clientset, err := kubernetes.NewForConfig(config)
if err != nil {
	panic(err)
}

Again, we can easily locate the function that we actually call here and try to determine its return type. By now, you should know how to figure out the directory in which we have to search for the answer.

$ (cd $GOPATH/src/k8s.io/client-go/kubernetes ; grep "func NewForConfig(" *.go)
clientset.go:func NewForConfig(c *rest.Config) (*Clientset, error) {

Now this is interesting for a couple of reasons. First, the first return value is of type *Clientset. This, like in C, is a pointer (yes, there are pointers in Go, but there is no pointer arithmetic), refering to the area in memory where an object is stored. The type of this object Clientset is not an elementary type, but seems to be a custom data type. If you search the file clientset.go in which the function is defined for the string Clientset, you will easy locate its definition.

// Clientset contains the clients for groups. Each group has exactly one
// version included in a Clientset.
type Clientset struct {
	*discovery.DiscoveryClient
	admissionregistrationV1beta1 *admissionregistrationv1beta1.AdmissionregistrationV1beta1Client
	appsV1                       *appsv1.AppsV1Client
	appsV1beta1                  *appsv1beta1.AppsV1beta1Client
...
	coreV1                       *corev1.CoreV1Client
...
}

where I have removed some lines for better readibility. So this is a structure. Similar to C, a structure is a sequence of named elements (field) which are bundled into one data structure. In the third line, for instance, we declare a field called appsV1 which is a pointer to an object of type appsv1.AppsV1Client (note that appsv1 is a package imported at the start of the file). The first line is a bit different – there is a field type, but not field name. This is called an embedded field, and its name is derived from the type name as the unqualified part of this name (in this case, this would be DiscoveryClient).

The field that we need from this structure is the field coreV1. However, there is a problem. Recall that only fields whose names start with an uppercase character are exported. So from outside the package, we cannot simply access this field using something like

clientset.coreV1

Instead, we need a function that returns this value which is located inside the package, something like a getter function. If you inspect the file clientset.go, you will easily locate the following function

// CoreV1 retrieves the CoreV1Client
func (c *Clientset) CoreV1() corev1.CoreV1Interface {
	return c.coreV1
}

This seems to be doing what we need, but its declaration is a bit unusual. There is a function name (CoreV1()), a return type (corev1.CoreV1Interface) and an empty parameter list. But there is also a declaration preceding the function name ((c *Clientset)).

This is called a receiver argument in Go. This binds our function to the type Clientset and at the same time acts as a parameter. When you invoke this function, you do it in the context of an instance of the type Clientset. In our example, we invoke this function as follows.

coreClient := clientset.CoreV1()

Here we call the function CoreV1 that we have just seen in clientset.go, passing a pointer to our instance clientset as the argument c. The function will then get the field coreV1 from this instance (which it can do, as it is located in the same package), and returns its value. Such a function could also accept additional parameters which are passed as usual. Note that the type of the receiver argument and the function need to be defined in the same package, otherwise the compiler would not know in which package it should look for the function CoreV1(). The presence of a receiver field turns a function into a method.

This looks a bit complicated, but is in fact rather intuitive (and those of you who have seen object oriented Perl know the drill). This construction links the structure Clientset containing data and the function CoreV1() with each other, under the umbrella of the package in which data type and function are defined. This comes close to a class in object-oriented programming languages.

Interfaces and inheritance

At this point, we hold the variable coreClient in our hands, and we know that it contains a (pointer to) an instance of the type k8s.io/client-go/kubernetes/typed/core/v1/CoreV1Interface. Resolving packages as before, we can now locate the file in which this type is declared.

$ (cd $GOPATH/src/k8s.io/client-go/kubernetes/typed/core/v1 ; grep "type CoreV1Interface" *.go)
core_client.go:type CoreV1Interface interface {

Hmm..this does not look like a structure. In fact, this is an interface. An interface defines a collection of methods (not just ordinary functions!). The value of an interface can be an instance of any type which implements all these methods, i.e. a type to which methods with the same names and signatures as those contained in the interface are linked using receiver arguments.

This sounds complicated, so let us look at a simple example from the corresponding section of “Tour in Go”.

type I interface {
	M()
}

type T struct {
	S string
}

// This method means type T implements the interface I,
// but we don't need to explicitly declare that it does so.
func (t T) M() {
	fmt.Println(t.S)
}

Here T is a structure containing a field S. The function M() has a receiver argument of type T and is therefore a method linked to the structure T. The interface I can be “anything on which we can call a method M“. Hence any variable to type T would be an admissible value for a variable of type I. In this sense, T implements I. Note that the “implements” relation is purely implicit, there is no declaration of implementation like in Java.

Let us now try to understand what this means in our case. If you locate the definition of the interface CoreV1Interface in core_client.go, you will see something like

type CoreV1Interface interface {
	RESTClient() rest.Interface
	ComponentStatusesGetter
	ConfigMapsGetter
...
	NodesGetter
...
}

The first line looks as expected – the interface contains a method RESTClient() returning a k8s.io/client-go/rest/Interface. However, the following lines do not look like method definitions. In fact, if you search the source code for these names, you will find that these are again interfaces! ConfigMapsGetter, for instance, is an interface declared in configmap.go which belongs to the same package and is defined as follows.

// ConfigMapsGetter has a method to return a ConfigMapInterface.
// A group's client should implement this interface.
type ConfigMapsGetter interface {
	ConfigMaps(namespace string) ConfigMapInterface
}

So this is a “real” interface. Its occurence in CoreV1Interface is an example of an embedded interface. This simply means that the interface CoreV1Interface contains all methods declared in ConfigMapsGetter plus all the other methods declared directly. This relation corresponds to interface inheritance in Java.

Among other interfaces, we find that CoreV1Interface embeds (think: inherits) the interface NodesGetter. Surprisingly, this is defined in node.go.

type NodesGetter interface {
	Nodes() NodeInterface
}

So we find that our variable coreClient contains something that – among other interfaces – implements the NodeGetter interface and therefore has a method called Nodes(). Thus we could do something like

coreClient.Nodes()

which would return an instance of the interface type NodeInterface. This in turn is declared in the same file, and we find that it has a method List()

type NodeInterface interface {
	Create(*v1.Node) (*v1.Node, error)
...	List(opts metav1.ListOptions) (*v1.NodeList, error)
...
}

This will return two things – an instance of NodeList and an error. NodeList is part of the package k8s.io/api/core/v1 and declared in types.go. To get this node list, we therefore need the following code.

nodeList, err := coreClient.Nodes().List(metav1.ListOptions{})

Note the argument to List – this is an anonymous instance of the type ListOptions which is just a structure, here we create an instance of this structure with all fields being nil and pass that instance as a parameter.

This completes our post for today. We have learned to navigate through structures, interfaces, methods and inheritance and how to locate type definitions and method signatures in the source code. In the next post, we will learn how to work with the node list, i.e. how to walk the list and prints its contents.
Learning Go with Kubernetes I – basics

When you work with Kubernetes and want to learn more about its internal workings and how to use the API, you will sooner or later reach the point at which the documentation can no longer answer all your questions and you need to consult the one and only source of truth – the source code of Kubernetes and a plethora of examples. Of course all of this is not written in my beloved Python (nor in C or Java) but in Go. So I decided to come up with a short series of posts that documents my own efforts to learn Go, using the Kubernetes source code as an example.

Note that this is not a stand-alone introduction into Go – there are many other sites doing this, like the Tour of Go on the official Golang home page, the free Golang book or many many blogs like Yourbasic. Rather, it is meant as an illustration of Go concepts for programmers with a background in a language like C (preferred), Java or Python which will help you to read and understand the Kubernetes server and client code.

What is Go(lang)?

Go – sometimes called Golang – is a programming language that was developed by Google engineers in an effort to create an easy to learn programming language well suited for programming fast, multithreaded servers and web applications. Some of its syntax and ideas actually remind me of C – there are pointers and structs – other of things I have seen in Python like slices. If you know any of these languages, you will find your way through the Go syntax quickly.

Go compiles code into native statically linked executables, which makes them easy to deploy. And Go comes with built-in support for multithreading, which makes it comparatively easy to build server-like applications. This blog lists some of the features of the Go language and compares them to concepts known from other languages.

Installation

The first thing, of course, is to install the Go environment. As Go is evolving rapidly, the packages offered by your distribution will most likely be outdated. To install the (fairly recent) version 1.10 on my Linux system, I have therefore downloaded the binary distribution using

wget https://dl.google.com/go/go1.10.8.linux-amd64.tar.gz
gzip -d go1.10.8.linux-amd64.tar.gz
tar xvf go1.10.8.linux-amd64.tar

in the directory where I wanted Go to be installed (I have used a subdirectory $HOME/Local for that purpose, but you might want to use /usr/local for a system-wide installation).

To resolve dependencies at compile time, Go uses a couple of standard directories – more on this below. These directories are stored in environment variables. To set these variables, add the following to your shell configuration script (.bashrc or .profile, depending on your system). Here GOROOT needs to point to the sub-directory go which the commands above will generate.

export GOROOT=directory-in-which-you-did-install-go/go
export GOPATH=$HOME/go
export PATH=$GOPATH/bin:$GOROOT/bin:$PATH

The most important executable in $GOROOT/bin is the go utility itself. This program can operate in various modes – go build will build a program, go get will install a package and so forth. You can run go help for a full list of available commands.

Packages and imports

A Go program is built from a collection of packages. Each source code file is part of a package, defined via the package declaration at the start of the file. Packages can be imported by other packages, which is the basis for reusable libraries. To resolve package names, Go has two different mechanisms – the GOPATH mode and the newer module mode available since Go 1.11. Here we will only discuss and use the old GOPATH mode.

In this mode, the essential idea is that your entire Go code is organized in a workspace, i.e. in one top-level directory, typically located in your home directory. In my case, my workspace is $HOME/go. To tell the Go build system about your workspace, you have to export the GOPATH environment variable.

export GOPATH=$HOME/go

The workspace directory follows a standard layout and typically contains the following subdirectories.

  • src – this is where all the source files live
  • pkg – here compiled versions of packages will be installed
  • bin – this is were executables resulting out of a build process will be moved

Let us try this out. Run the following commands to download the Kubernetes Go client package and some standard libraries.

go get k8s.io/client-go/...
go get golang.org/x/tools/...

When this has completed, let us take a look at our GOPATH directory to see what has happened.

$ ls $GOPATH/src
github.com  golang.org  gopkg.in  k8s.io

So the Go utility has actually put the source code of the downloaded package into our workspace. As GOPATH points to this workspace, the Go build process can resolve package names and map them into this workspace. If, for instance, we refer to the package k8s.io/client-go/kubernetes in our source code (as we will do it in the example later on), the Go compiler will look for this package in

GOPATH/src/k8s.io/client-go/kubernetes

To get information on a package, we can use the list command of the Go utility. Let us try this out.

$ go list -json k8s.io/client-go/kubernetes
{
	"Dir": "[REDACTED - this is $GOPATH]/src/k8s.io/client-go/kubernetes",
	"ImportPath": "k8s.io/client-go/kubernetes",
	"ImportComment": "k8s.io/client-go/kubernetes",
        [REDACTED - SOME MORE LINES]
	"Root": "[REDACTED - THIS SHOULD BE $GOROOT]",
	"GoFiles": [
		"clientset.go",
		"doc.go",
		"import.go"
	],
[... REDACTED - MORE OUTPUT ...]

Here I have removed a few lines and redacted the output a bit. We see that the Dir field is the directory in which the compiler will look for the code constituting the package. The top-level directory is the directory to which GOPATH points. The import path is the path that an import statement in a program using this package would be. The list GoFiles is a list of all files that are parts of this package. If you inspect these files, you will in fact find that the first statement they contain is

package kubernetes

indicating that they belong to the Kubernetes package. You will see that the package name (defined in the source code) equals the last part of the full import path (part of the filesystem structure) by convention (which, as far as I understand, is not enforced technically).

I recommend to spend some time reading more on typical layouts of Go packages here ore here.

We have reached the end of our first post in this series. In the next post, we will write our first example program which will list nodes in a Kubernetes cluster.