Shor’s quantum factoring algorithm

Until the nineties of the last century, quantum computing seemed to be an interesting theoretical possibility, but it was far from clear whether it could be useful to tackle computationally hard problems with high relevance for actual complications. This changed dramatically in 1994, when the mathematician P. Shor announced a quantum algorithm that could efficiently solve one of the most intriguing problems in applied mathematics – factoring large numbers into their constituent primes, which, for instance, can be used to break commonly used public key cryptography schemes like RSA.

Shor’s algorithm is significantly more complicated than the quantum algorithms that we have studied so far, so we start with a short overview and then look at the individual pieces in more detail.

Given a number M that we want to factorize, the first part of Shor’s algorithm is to find a number x which has no common divisor with M so that it is a unit modulo M. In practice, we can just guess some x and compute the greatest common divisor gcd(x,M) – if this is not one, we have found a factor of M and are done, if this is one, we have the number x that we need. This step can still be done efficiently on a classical computer and does not require a quantum computer.

The next part of the algorithm now uses a quantum algorithm to determine the period of x. The period is the smallest non-zero number r such that

x^r \equiv 1 \mod M

The core of this step is the quantum algorithm that we will study below. However, the quantum algorithm does not exactly return the number r, but it returns a number s which is close to a multiple of \frac{N}{r}, where N is a power of two. Getting r out of this information is again a classical step that uses the theory of continued fractions. The number N that appears here is N = 2n where n is the number of qubits that the quantum part requires, and needs to be chosen such that M2 can be represented with n bits.

Finally, the third part of the algorithm uses the period r to find a factor of M, which is again done classically using elementary number theory. Thus the overall layout of the algorithm is as follows.

  • Find the smallest number n (the number of qubits that we will need) such that M^2  \leq N = 2^n and a number x < M such that gcd(x,M) = 1
  • Use the quantum part of the algorithm to find a number s which is approximately an integer multiple of N / r
  • Use the theory of continued fractions to extract the period r from this information
  • Use the period to find a factor of M

We will know look at each of these steps in turn (yes, this is going to be a bit of a lengthy post). To make this more tangible, we use a real example and assume that we wanted to factor the number M = 21. This is of course a toy example, but it allows us to simulate and visualize the procedure efficiently on a classical computer.

Determine n and x

The first step is easy. First, we need to determine the number n of qubits that we need. As mentioned above, this is simply the bit length of M2. In our case, M2 = 441, and the next power of two is 512 = 29, so we need n = 9 qubits.

The next step is to find the number x. This can easily be done by just randomly picking some x and checking that is has no common prime factor with M. In our example, let us choose x = 11 (which is a prime number, but this is just by accident and not needed). It is important to choose this rather randomly, as the algorithm might fail in some rare instances and we need to start over, but this only makes sense if we do not pick the same choice again for our second trial.

The quantum part of the algorithm

Now the quantum part of the algorithm starts. We want to calculate the period of x = 11, i.e. the smallest number r such that xr – 1 is a multiple of M = 21.

Of course, as our numbers are small, we could easily calculate the period classically by taking successive powers of 11 and reducing modulo 21, and this would quickly tell us that the period is 6. This, however, is no longer feasible with larger numbers, and this is where our quantum algorithm comes into play.

The algorithm uses two quantum registers. The first register has n qubits, the second can have less, in fact any number of qubits will do as long as we can store all numbers up to M in it, i.e. the bit length of M will suffice. Initially, we bring the system into the superposition

\frac{1}{\sqrt{N}} \sum_k |k \rangle |0 \rangle

which we can for instance do by starting with the state with all qubits being zero and then applying the Hadamard-Walsh transformation to the first register.

Next, we consider the function f that maps a number k to xk modulo M. As for every classical function, we can again find a quantum circuit Uf that represents this function on the level of qubits and apply it to our state to obtain the state

\frac{1}{\sqrt{N}} \sum_k |k \rangle |x^k \mod M \rangle

In his original paper [2], Shor calls this part the modular exponentiation and shows that this is actually the part of the quantum algorithm where most gates are needed (not the quantum Fourier transform).

This state has already some periodicity built into it, as xk modulo M is periodic with period r. If we could measure all the amplitudes, we could easily determine r. However, every such measurement destroys the quantum state and we have to start again, so this algorithm will not be very efficient. So again, the measurement is an issue.

Now, Shor’s idea is to solve the measurement issue by first applying (the inverse of) a quantum Fourier transform to the first register and then measure the first register (we apply the inverse of the quantum Fourier transform while other sources will state that the algorithm uses the quantum Fourier transform itself, but this is just a matter of convention as to which transformation you call the Fourier transform). The outcome s of this measurement will then give us the period!

To get an idea why this is true, let us look at a simpler case. Assume that, before applying the quantum Fourier transform, we measure the value of the second register. Let us call this value y. Then, we can write y as a power of x modulo M. Let k0 be the smallest exponent such that

x^{k_0} = y

Then, due to the periodicity, all values of k such that xk = y modulo M are given by

k = k_0 + jr

Here the index j needs to be chosen such that k0 + jr is still smaller than M. Let A denote the number of possible choices for j. Then, after the measurement, our state will have collapsed to

\frac{1}{\sqrt{A}} \sum_{j=0}^{A-1} |k_0 + jr \rangle  |y \rangle

Let us now apply the inverse of the quantum Fourier transform to this state. The result will be the state

\frac{1}{\sqrt{AN}} \sum_{j=0}^{A-1} \sum_{s=0}^{N-1} \eta^{(x_0 + jr)s} |s \rangle

Now let us measure the first register. From the expression above, we can read off the probability P(s) to measure a certain value of s – we just have to add up the squares of all amplitudes with this value of s. This gives us

P(s) = \frac{1}{AN} \big| \sum_{j=0}^{A-1}  \eta^{jrs} \big|^2

This looks complicated, but in fact this is again a geometric series with coefficient q = \eta^{rs} . To see how the value of the series depends on s, let us assume for a moment that the period divides N (which is very unlikely in practice as N is a power of two, but let us assume this anyway just for the sake of argument), i.e. that N = r u with the frequency u being an integer. Thus, if s is a multiple of u, the coefficient q is equal to one (as \eta^N = 1 ) and the geometric series sums up to A, giving probability 1 / N to measure this value. If, however, s is not a multiple of u, the value of the geometric series is

\frac{1 - q^A}{1 - q}

But in our case, A is of course simply equal to u, and therefore qA is equal to one. Thus the amplitude is zero! We find – note the similarity to our analysis of the Fourier transform of a periodic sequence – that P(s) is sharply peaked at multiples of u = \frac{N}{r} !

We were able to derive this result using a few simplifications – an additional measurement and the assumption that the frequency is an integer. However, as carried out by Shor in [2], a careful analysis shows that these assumptions are not needed. In fact, one can show (if you want to see all the nitty-gritty details, you could look at Shor’s paper or at my notes on GitHub that are based on an argument that I have seen first in Preskill’s lecture notes) that with reasonably high probability, the result s of the measurement will be such that

\big| \{sr\}_N \big| \leq \frac{r}{2}

where \{sr\}_N denotes the residual of sr modulo N. Intuitively, this means that with high probability, the residual is very small, i.e. rs is close to a multiple of N, i.e. s is close to a multiple of N / r. In other words, it shows that in fact, P(s) has peaks at multiples of N / r.

The diagram below plots the probability distribution P(s) for our example, i.e. N = 512 and r = 6 (this plot has been generated using the demo Shor.py available in my GitHub account which uses the numpy package to simulate a run of Shor’s algorithm on a classical computer)

ShorSampleOutput

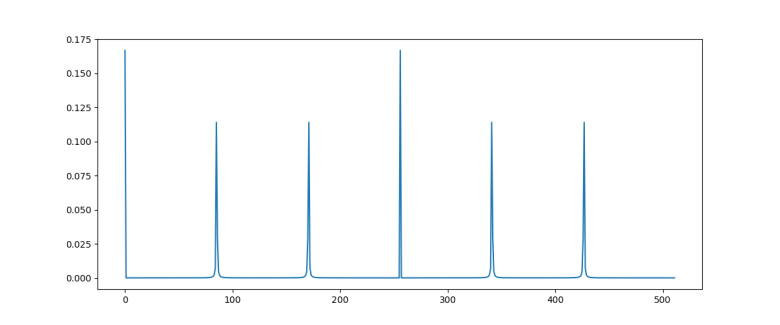
As expected, we see sharp peaks, located roughly at multiples of 512 / 6 = 85.33. So when we measure the first register, the value s will be close to a multiple of 512 / 6 with a very high probability.

So the quantum algorithm can be summarized as follows.

  • Prepare a superposition \frac{1}{\sqrt{N}} \sum_k |k \rangle |x^k \mod M \rangle
  • Apply the (inverse of the) quantum Fourier transform to this state
  • Measure the value of the first register and call the result s

When running the simulation during which the diagram above was created, I did in fact get a measurement at s = 427 which is very close to 5*512 / 6.

Extracting the period

So having our measurement s = 427 in our hands, how can we use this to determine the period r? We know from the considerations above that s is close to a multiple of N / r, i.e. we know that there is an integer d such that

\big| sr - dN \big| \leq \frac{r}{2}

which we can rewrite as

\big| \frac{s}{N} - \frac{d}{r} \big| \leq \frac{1}{2N} < \frac{1}{M^2}

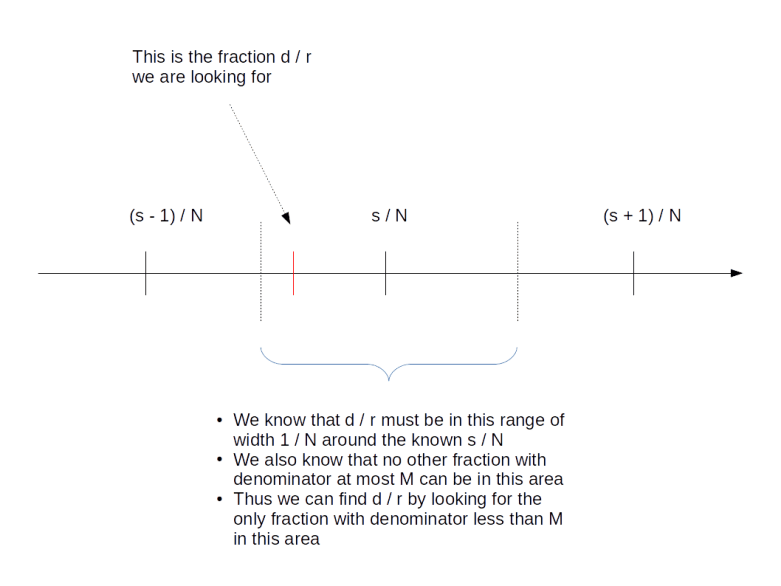
Thus we are given two rational numbers – s / N and d / r – which we know to be very close to each other. We have the first number s / N in our hands and want to determine the second number. We also know that the denominator r of the second number is smaller than M. Is this sufficient to determine d and r?

Surprisingly, the answer is “yes”. We will not go into details at this point and gloss over some of the number theory, but refer the reader to the classical reference [1] or to my notes for more details). The first good news is that two different fractions with denominators less than M need to be at least by 1 / M2 apart, so the number d / r is unique. The situation is indicated in the diagram below.

ShorContinuedFraction

But how to find it? Luckily, the theory of continued fractions comes to the rescue. If you are not familiar with continued fractions, you can find out more in the appendix of my notes or on the very good Wikipedia page on this. Here, we will just go through the general procedure using our example at hand.
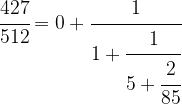
First, we write

\cfrac{427}{512} = 0 + \cfrac{1}{\cfrac{512}{427}}  = 0 + \cfrac{1}{1 + \cfrac{85}{427}}

We can do the same with 85 / 427, i.e. we can write

\cfrac{85}{427} = \cfrac{1}{\cfrac{427}{85}} =  \cfrac{1}{5 + \cfrac{2}{85}}

which will give us the decomposition

\cfrac{427}{512} = 0 + \cfrac{1}{1 + \cfrac{1}{5 + \cfrac{2}{85}}}

Driving this one step further, we finally obtain

\cfrac{427}{512} = 0 + \cfrac{1}{1 + \cfrac{1}{5 + \cfrac{1}{42 + \cfrac{1}{2}}}}

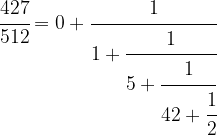
This is called the continued fraction expansion of the rational number 427 / 512. More generally, for every sequence [a_0 ; a_1, a_2, \dots ], we can form the continued fraction

a_0 + \cfrac{1}{a_1 + \cfrac{1}{a_2 + \dots}}

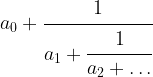
given by that sequence of coefficients, which is obviously a rational number. One can show that in fact every rational number has a representation as a continued fraction, and our calculation has shown that

\cfrac{427}{512} = [0; 1,5,42,2]

This sequence has five coefficients. Now given a number m, we can of course look at the sequence that we obtain by looking at the cofficients up to index m only. For instance, for m = 3, this would give us the sequence

[0; 1,5,42]

The rational number represented by this sequence is

0 + \cfrac{1}{1 + \cfrac{1}{5 + \cfrac{1}{42}}}  = \cfrac{211}{253}

and is called the m-th convergent of the original continued fraction. We have such a convergent for every m, and thus get a (finite) series of rational numbers with the last one being the original number.

One can now show that given any rational number x, the series of m-th convergents of its continued fraction expansion has the following properties.

  • The convergents are in their lowest terms
  • With increasing m, the difference between x and the m-th convergent gets smaller and smaller, i.e. the convergents form an approximation of x that gets better and better
  • The denominators of the convergents are increasing

So the convergents can be used to approximate the rational number x by fractions with smaller denominator – and this is exactly what we need: we wish to approximate the rational number s / N by a ratio d / r with smaller denominator which we then know to be the period. Thus we need to look at the convergents of 427 / 512. These can be easily calculated and turn out to be

0, 1, \cfrac{5}{6}, \cfrac{211}{253}, \cfrac{427}{512}

The last convergent whose denominator is still smaller than M = 21 is 5 / 6, and thus we obtain r = 6. This is the period that we are looking for!

So in general, the recipe to get from the measured value s to r is to calculate the convergents of the rational number s / N and pick the denominator of the last convergent that has a denominator less than M. Again, if you want to see the exact algorithm, you can take a look at my script Shor.py.

Find the factor

We are almost done. We have run the quantum algorithm to obtain an approximate multiple of N / r. We have then applied the theory of continued fractions to derive the period r of x from this measurement. The last step – which is again a purely classical step – is now to use this to find a factor of M. This is in fact comparatively easy.

Recall that – by definition of the period – we get one if we raise x to the power of r and than reduce module M. In other words, xr minus one is a multiple of M. Now assume that we are lucky and the period r is even. Then

(x^{\frac{r}{2}} - 1)(x^{\frac{r}{2}} + 1) = (x^r - 1) \equiv 0 \mod M

With a bit of elementary number theory, one can now show that this implies that the greatest common divisor gcd(xr/2-1, M) is a factor of M (unless, in fact, xr/2 is minus one modulo M, in which case the argument fails). So to get from the period to a potential factor of M, we simply calculate this greatest common divisor and check whether it divides M!

Let us do this for our case. Our period is r = 6. With x = 11, we have x3 = 1331, which is 8 module M. Thus

\text{gcd}(x^{\frac{r}{2}} - 1 \mod M, M) =  \text{gcd}(7,21) = 7

which is the factor of M = 21 that we were looking for.

Performance of the algorithm

In our derivation, we have ignored a few special cases which can make the algorithm fail. For instance, suppose we had not measured s = 427, but s = 341 after applying the Fourier transform. Then the corresponding approximation to 341 / 512 would have been 4 / 6. However, the continued fraction algorithm always produces a result that is in its lowest terms, i.e. it would give us not 4 / 6, but 2 / 3. Looking at this, we would infer that r = 3, which is not the correct result.

There are a few other things that can go wrong. For instance, we could find a period r which is odd, so that our step to derive a factor of M from r does not work, or we might measure an unlikely value of s.

In all these cases, we need to start over and repeat the algorithm. Fortunately, Shor could show that the probability that any of this happens is bounded from below. This bound is decreasing with larger values of M, but it is decreasing so slowly that the expected number of trials that we need grows at most logarithmically and does not destroy the overall performance of the algorithm.

Taking all these considerations into account and deriving bounds for the number of gates required to perform the quantum part of the algorithm, Shor was able to show that the number of steps to obtain a result grows at most polynomially with the number of bits that the number M has. This is obviously much better than the best classical algorithm that requires a bit less than exponential time to factor M. Thus, assuming that we are able to build a working quantum computer with the required number of gates and qubits, this algorithm would be able to factorize large numbers exponentially faster than any known classical algorithm.

Shor’s algorithm provides an example for a problem that is believed to be in the class NP (but not in P) on a classical computer, but in the class BQP on a quantum computer – this is the class of all problems that can be solved in polynomial time with a finite probability of success. However, even though factorization is generally believed not to be in P, i.e. not doable in polynomial time on classical hardware, there is not proof for that. And, even more important, it is not proved that factorization is NP-complete. Thus, Shor’s algorithm does not render every problem in NP solvable in polynomial time on a quantum computer. It does, however, still imply that all public key cryptography systems like RSA that rely on the assumption that large numbers are difficult to factor become inherently insecure once a large scale reliable quantum computer becomes available.

References

1. G.H. Hardy, E.M. Wright, An introduction to the theory of numbers, Oxford University Press, Oxford, 1975
2. P. Shor, Polynomial-Time Algorithms for Prime Factorization and Discrete Logarithms on a Quantum Computer, SIAM J.Sci.Statist.Comput. Vol. 26 Issue 5 (1997), pp 1484–1509, available as arXiv:quant-ph/9508027v2

Signing and verifying bitcoin transactions

If you have followed my blockchain posts so far, you know how to create bitcoin transactions by assembling transaction inputs and transaction outputs into a transaction data structure and serializing it. However, there is one subtlety that we have ignored so far – what exactly do you sign?

You cannot sign the entire bitcoin transaction, simply because the signature is part of it! So there is a sort of chicken-or-egg problem. Instead, you need to build a transaction without the signature, serialize it, create a hash value, sign this hash value, then add the signature to the transaction and publish this transaction.

This is essentially how signing actually works. However, there are a few details that we still miss. So let us look at the source code of the reference client once more to make sure that we really understand how this works.

As a starting point, remember that there is a script opcode called OP_CHECKSIG that verifies a signature. So let us look at the corresponding method which we find in script/interpreter.cpp. When this opcode is executed, the function EvalScript delegates to the method TransactionSignatureChecker::CheckSig. This method removes the last byte of the signature script (which is the hash type) and then calls the function SignatureHash. This function receives the following parameters (you might have to trace back a bit starting at EvalScript to verify this):

  • the script code of the public key script
  • the transaction that is to be signed
  • the index of the transaction input within that transaction to which the signature refers
  • the hash type
  • the amount
  • a version number which is zero in our case and indicates whether the segregated witness feature is in effect
  • a data structure that serves as a cache

We have not yet talked about the hash type. Essentially the hash type controls which parts of a transaction are included in the signature and therefore protected against being changed. The most common case is SIGHASH_ALL = 1, and this is the value for this field that we assume in this post (if you understand this case, it will not be difficult to figure out the other cases as well).

In any case, the function SignatureHash is what we are searching for. It serializes the transaction and creates a hash value which is then passed to the crytographic subroutines to actually verify the signature. This function again delegates the actual work to an instance of the helper class CTransactionSignatureSerializer, more precisely to its method Serialize. This method is in fact not very surprising.

template
void Serialize(S &s) const {
    // Serialize nVersion
    ::Serialize(s, txTo.nVersion);
    // Serialize vin
    unsigned int nInputs = fAnyoneCanPay ? 1 : txTo.vin.size();
    ::WriteCompactSize(s, nInputs);
    for (unsigned int nInput = 0; nInput < nInputs; nInput++)
         SerializeInput(s, nInput);
    // Serialize vout
    unsigned int nOutputs = fHashNone ? 0 : (fHashSingle ? nIn+1 : txTo.vout.size());
    ::WriteCompactSize(s, nOutputs);
    for (unsigned int nOutput = 0; nOutput < nOutputs; nOutput++)
         SerializeOutput(s, nOutput);
    // Serialize nLockTime
    ::Serialize(s, txTo.nLockTime);
}

Ignoring the flag fAnyoneCanPay, this method behaves similar to ordinary serialization – first the version number is written, then the number of inputs, followed by the actual inputs, then the number of outputs, the actual outputs and finally the lock time.

The actual difference to an ordinary transaction serialization is hidden in the method SerializeInput.

template
void SerializeInput(S &s, unsigned int nInput) const {
    // In case of SIGHASH_ANYONECANPAY, only the input being signed is serialized
    if (fAnyoneCanPay)
        nInput = nIn;
    // Serialize the prevout
    ::Serialize(s, txTo.vin[nInput].prevout);
    // Serialize the script
    if (nInput != nIn)
        // Blank out other inputs' signatures
        ::Serialize(s, CScript());
    else
        SerializeScriptCode(s);
    // Serialize the nSequence
    if (nInput != nIn && (fHashSingle || fHashNone))
        // let the others update at will
        ::Serialize(s, (int)0);
    else
        ::Serialize(s, txTo.vin[nInput].nSequence);
}

Again, this starts out as usual by serializing the reference to the spent transaction output (transaction ID and index). However, we soon find the first difference – if the index of the transaction input to be signed differs from the input that is currently serialized, an empty script is serialized instead of the signature script – which translates into a single byte 0x0 which is the length of the empty script.

The second difference is located in the method SerializeScriptCode. Here, instead of serializing the not yet existing signature, the content of the variable scriptCode is serialized. Going back a bit, we see that this is the public key script of the corresponding transaction output! So basically, this script takes the position of the signature script in this serialization step.

But we are not yet done – let us return to the function SignatureHash and see what it does close to the end.

CTransactionSignatureSerializer txTmp(txTo, scriptCode, nIn, nHashType);

// Serialize and hash
CHashWriter ss(SER_GETHASH, 0);
ss << txTmp << nHashType;
return ss.GetHash();

Using the operator <<, we see that the method Serialize that we have just studied is invoked. However, we see that in addition, the hash type – which was stripped off at the beginning – is now added again at the end. All this is routed into a CHashWriter which is defined in hash.h and is essentially a wrapper around a 256 bit hashing routine. This hash is then returned to TransactionSignatureChecker::CheckSig which then tries to verify the signature with that message.

After that tour through the reference client, let us try to verify the signature of a real transaction from the bitcoin network. In the library btc/script.py, I have implemented a function signatureHash which does – for the special case discussed – the same as the function that we have just looked at. Using that function, it is now not difficult to verify a signature, given a transaction input and the corresponding spent output. Here is what we need to do in an ipython session, again assuming that you have downloaded my btc package.

First, we get our sample transaction that we have already used before and the transaction output spent by the first transaction input.

In [1]: import btc.utils
In [2]: import btc.txn
In [3]: raw = btc.utils.getRawTransaction("ed70b8c66a4b064cfe992a097b3406fa81ff09641fe55a709e4266167ef47891")
In [4]: txn = btc.txn.txn()
In [5]: txn.deserialize(raw)
In [6]: txin = txn.getInputs()[0]
In [7]: raw = btc.utils.getRawTransaction(txin.prevTxid)
In [8]: prev = btc.txn.txn()
In [9]: prev.deserialize(raw)
In [10]: spentTxo = prev.getOutputs()[txin.getVout()]

Next, we determine the signature hash and interpret it as a big endian encoded integer.

In [11]: h = int.from_bytes(btc.script.signatureHash(txn, 0, spentTxo), "big")

Next we need to determine the other ingredients of the signature – the r and s values.

In [12]: r = txin.getScriptSig().getSignatureR()
In [13]: s = txin.getScriptSig().getSignatureS()

Now we need the ECDSA cryptography library. We get the SECP256K1 curve and its parameters from there and determine the point on the curve that corresponds to the public key.

In [14]: import ecdsa
In [15]: curve = ecdsa.curves.SECP256k1
In [16]: G = curve.generator
In [17]: p = curve.curve.p()
In [18]: txin.getScriptSig().getScriptType()
Out[18]: 'P2PKH'
In [19]: pubKey = txin.getScriptSig().getPubKeyHex()
In [20]: pubKey
Out[20]: '038c2d1cbe4d731c69e67d16c52682e01cb70b046ead63e90bf793f52f541dafbd'

We see that the first byte of the public key is 0x03. If you remember what we have learned about the public key encoding, this means that y is odd. We can therefore determine the x and y coordinate as follows.

In [21]: x = int.from_bytes(bytes.fromhex(pubKey[2:66]), 'big')
In [22]: y = ecdsa.numbertheory.square_root_mod_prime((x**3 +7) % p , p)
In [23]: y
Out[23]: 91238655223056717466178782248030327689649326505413694215614940048183357985838
In [24]: y = (p - y) % p
In [25]: y
Out[25]: 24553434014259477957392202760657580163620658160226869823842643959725476685825
In [26]: assert(curve.curve.contains_point(x, y))

Now we are almost done.

In [27]: Q = ecdsa.ellipticcurve.Point(curve.curve, x, y)
In [28]: pKey = ecdsa.ecdsa.Public_key(G, Q)
In [29]: signature = ecdsa.ecdsa.Signature(r,s)
In [30]: pKey.verifies(h, signature)
Out[30]: True

So our signature is valid, as expected – after all this is a real transaction from the bitcoin network. The full source code for this exercise is also contained in btc/script.py in the function verifySignature.

Of course we could now revert this process – given a transaction, we could use the function signatureHash to create a hash value which we then sign using the ECDSA library. This now puts us in a position to actually create a transaction that we can then push into the bitcoin network. Now, this is clearly something you do not want to try in the real bitcoin network. Therefore I will show you in my next post how you can set up a small test network at home to be able to play with this without the risk of losing actual bitcoins.

Scripts in the bitcoin protocol

There is a point that we have touched upon several times but not yet properly explained – the role of scripts in the bitcoin protocol. We have seen that the public key and the signature are stored inside a bitcoin transaction in container data structures that were called scriptPubKey and scriptSig in the source code. But scripts are more than just container for data, they are in fact executable and do not only store keys and signatures but also instruct the bitcoin server what to do with this data in order to validate a signature.

So what is a script?

In fact, a script is a combination of instructions, called opcodes, and data. During execution, the data is placed on a stack. Instructions can remove (“pop”) data from the top of the stack, operate on them and then place a result on the stack (“push”). If you have ever seen Forth, that might sound familiar.

Let me guide you through the relevant source code in the reference implementation to give you an idea what role scripts play in the bitcoin protocol. The key location in the code is the function VerifyScript in script/interpreter.cpp. This function is called when the bitcoin server needs to validate a transaction input, for instance before adding it to a block so that it becomes part of the blockchain or upon receiving it from a peer in the network. In this case, this function will be called, passing it – among other parameters – the signature script that is part of the transaction input, the public key script that is part of the transaction output referenced by that input and – via an instance of the class BaseSignatureChecker – a reference to the transaction of which the transaction input is a part.

The key sequence in this function is the following code snippet.

std::vector stack, stackCopy;
if (!EvalScript(stack, scriptSig, flags, checker, SIGVERSION_BASE, serror))
    // serror is set
    return false;
if (flags & SCRIPT_VERIFY_P2SH)
    stackCopy = stack;
if (!EvalScript(stack, scriptPubKey, flags, checker, SIGVERSION_BASE, serror))
    // serror is set
    return false;
if (stack.empty())
    return set_error(serror, SCRIPT_ERR_EVAL_FALSE);
if (CastToBool(stack.back()) == false)
    return set_error(serror, SCRIPT_ERR_EVAL_FALSE);

So basically the following things happen. First, a clean stack – implemented as a vector – is created. Then, the signature script is evaluated and operates on this stack. Next, the public key script of the spent transaction output is executed, using the same stack. If, after executing both scripts, the stack is either empty or the element at the top is not the boolean value True, the verification has failed.

Now, in most cases, both the signature script and the public key script are not arbitrary, but follow a small number of defined patterns that, when executed, are effectively equivalent to validating the signature of the transaction (these patterns are defined in the function Solver in script/standard.cpp. The most commonly used of these patterns is called Pay to public key hash (P2PKH). In this case, the signature script does in fact not contain any real opcodes, but consists of two pieces of data that are pushed on the stack. Here and in the sequel, we will use capital letters to denote a script instruction and data in brackets to denote data. The first piece of data that is pushed on the stack is the signature of the transaction. The second piece is a hash of the public key that belongs to the private key which was used to make the signature. If, for instance, Alice is building a transaction to transfer bitcoin to Bob, this will be the public key of Alice. Thus a P2PKH signature script looks as follows.

[signature] [public key]

After that script has executed, we will therefore find two items on the stack. At the top of the stack, there will be the public key, and below, at the bottom of the stack, there will be the signature.

[public key]
[signature]

The next script that the engine will evaluate is the public key script. In the case of a standard P2PKH script, this is a bit more complicated and looks as follows.

OP_DUP OP_HASH160 [public key hash] OP_EQUALVERIFY OP_CHECKSIG

Let us go through the instructions one by one. To understand how each of the opcodes is processed, you will have to look at the code in EvalScript in script/interpreter.cpp. The first opcode that is executed is OP_DUP. This command will simply duplicate the item at the top of the stack. As we are still working with the stack left over after executing the signature script, our stack will look as follows after the OP_DUP has been executed.

[public key]
[public key]
[signature]

The next command is OP_HASH160. This instruction will pop one item off the stack, will calculate its 160 bit hash value (SHA2560 followed by RIPEMD160) and push the result back onto the stack. Thus our stack now is

[public key hash]
[public key]
[signature]

The next command is again not really a command, but just pushes the value on the stack. Thus after executing this part of the script, the stack now contains four items.

[public key hash]
[public key hash]
[public key]
[signature]

The next instruction is the instruction OP_EQUALVERIFY. This operation removes the two top items from the stack, compares them and raises an error if the two values are not equal. Now remember where these two items came from. One of them originates from the transaction input – it was the result of taking the hash value of the public key that Alice added to the transaction input along with the signature, i.e. the public key matching her private key. The other one was part of the spent transaction output. Thus this check fails unless – as it should be – the transaction output has been paid to Alice’s public key hash, so that these two items are equal.

If that is the case and we survive this verification step, two of the four stack items will have been gone and our stack is

[public key]
[signature]

Now the last instruction is executed. This instruction – OP_CHECKSIG – removes the two items left (the public key and the signature) from the stack and actually validates the signature, similar to what we have done in my post on elliptic curve cryptography. If the signature could be successfully validated, a boolean “True” is pushed on the stack, and the verification of the script completes successfully, otherwise “False” is pushed and the script verification returns an error.

Thus, effectively, executing this script amounts to comparing the public key in the transaction input with the public key hash in the spent transaction output and verifying the signature contained in the transaction input.

An example

Of course, in a bitcoin transaction, the scripts are not included in a nice, readable way as we have presented them here. Instead, a script is simply a sequence of bytes. Time to take a look at an example in depth. In one of the last posts, we looked at the transaction ed70b8c66a4b064cfe992a097b3406fa81ff09641fe55a709e4266167ef47891. Let us now analyse this transaction in detail. The following ipython session assumes that you have downloaded my btc library.

In [1]: import btc.utils
In [2]: raw = btc.utils.getRawTransaction(txid="ed70b8c66a4b064cfe992a097b3406fa81ff09641fe55a709e4266167ef47891")
In [3]: import btc.txn
In [4]: txn = btc.txn.txn()
In [5]: txn.deserialize(raw)
In [6]: txin = txn.getInputs()[0]
In [7]: script = txin.getScriptSigHex()
In [8]: script
Out[8]: '47304402207f5dfc2f7f7329b7cc731df605c83aa6f48ec2218495324bb4ab43376f313b840220020c769655e4bfcc54e55104f6adc723867d9d819266d27e755e098f646f689d0121038c2d1cbe4d731c69e67d16c52682e01cb70b046ead63e90bf793f52f541dafbd'

To understand how this script is translated into opcodes, we need to look at CScript::GetOpcode() in script/script.h. Here we find that any number x smaller than OP_PUSHDATA1, i.e. 0x4c, is interpreted as an instruction to push the following x bytes onto the stack – this is called an immediate push. If we match this with the general description of a signature script in the P2PKH standard above, we find that the next 0x47 = 71 bytes are the private key.

In [9]: sig = txin.getScriptSigHex()[2:2*71+2]
In [10]: sig
Out[10]: '304402207f5dfc2f7f7329b7cc731df605c83aa6f48ec2218495324bb4ab43376f313b840220020c769655e4bfcc54e55104f6adc723867d9d819266d27e755e098f646f689d01'
In [11]: script = txin.getScriptSigHex()[2*71+2:]
In [12]: script
Out[12]: '21038c2d1cbe4d731c69e67d16c52682e01cb70b046ead63e90bf793f52f541dafbd'

Looking at the remaining part of the script, we see that the next opcode is again an immediate push, pushing the remaining part of the script onto the stack. So we can conclude that this remaining part must be the public key.

In [13]: pub = script[2:]
In [14]: pub
Out[14]: '038c2d1cbe4d731c69e67d16c52682e01cb70b046ead63e90bf793f52f541dafbd'

We see that the public key starts with 0x03, so it is a compressed key, and we could encode it using our findings from my previous post on this.

The signature, however, looks a bit more mysterious, so let us try to understand the content of the variable sig. This is a so called DER encoded signature, with an additional byte appended at the end.

The DER standard is an ASN.1 encoding standard which is part of the X.690 specification. In the source code, the format is described in IsValidSignatureEncoding in script/interpreter.cpp. Essentially a DER encoded signature is mixture of structural information like data types and lengths, and the actual data, i.e. the integers r and s that make up an ECDSA signature. If you need the details, you will find a Python implementation of a decoding routine here.

Let us now take a look at the spent transaction where we find the second part of the script.

In [15]: prev_raw = btc.utils.getRawTransaction(txid=txin.getPrevTxId())
In [16]: prev = btc.txn.txn()
In [17]: prev.deserialize(prev_raw)
In [18]: index = txin.getVout()
In [19]: spentTxo = prev.getOutputs()[index]
In [20]: script = spentTxo.getScriptPubKeyHex()
In [21]: script
Out[21]: '76a914140268d5d1c4e1792db22e4776edf3c168fd59f588ac'

Let us again try to translate this script into transactions and data. In script.h, we find that the first byte is the opcode OP_DUP = 0x76. The second byte is the opcode OP_HASH160 = 0xa9. The third byte is again an immediate push and will push 0x14 = 20 bytes onto the stack, which is the public key hash.

In [22]: script = script[6:]
In [23]: pubKeyHash = script[:40]
In [24]: script = script[40:]
In [25]: script
Out[25]: '88ac'

Thus we are left with the two bytes 0x88 and 0xac. These bytes are again opcodes, namely OP_EQUALVERIFY and OP_CHECKSIG. So we find that our public key script has exactly the form that we expect.

We have now dissected a serialized transaction down to the last byte and have looked at how the process of verifying the signature is decoded as a combination of a signature script and a public key script (which are sometimes called the unlocking and locking script). In one of the next posts, we will look at the process of creating a signature in more detail and we will assemble a full bitcoin transaction which we can push into our local test network.

Keys in the bitcoin network: the public key

In my last post, we have looked in some detail at the private key – how it is generated and how it can be decoded and stored. Let us now do the same with the public key.

Recall that a public key is simply a point on the elliptic curve SECP256K1 that is used by the underlying ECDSA algorithm – in fact it is obtained by multiplying the generator point on the curve by our private key. As any point on the curve, it therefore has an x-coordinate and a y-coordinate, both being 32 bytes unsigned integers.  So one way to encode the public key would be as follows.

  • take the x-coordinate as a point, represented by an integer smaller than p
  • convert this into a 32 byte hexadecimal string, using for instance big endian encoding
  • do the same for the y-coordinate
  • and concatenate these two strings to obtain a single 64 byte hexadecimal string

This encoding is simple, but it has a drawback. Remember that we encode not just a random pair of integers, but a point on the curve, so the x-coordinate and y-coordinate are related by the curve equation

y^2 = x^3 + ax + b

Thus given x, we almost know y – we know the square of y modulo p, and there can be at most two different roots of this equation. So we could reconstruct y if we have x and an additional bit that tells us which of the two solutions we need.

Let us now assume that p is odd. If y is a solution of the equation for a given value of x, then p – y (which is -y modulo p) is the second solution. As p is odd, exactly one of the two numbers y and p – y is even. We can therefore use an additional bit that is equal to y modulo 2 to distinguish the two solutions. It is convention to store this bit in a full additional byte, using the value 2 if y is even and the value 3 if y is odd, so that we obtain a representation of the public key (and in fact any other point on the curve) in at most 33 bytes: at most 32 bytes for the value of the x-coordinate and the additional byte containing the value of y modulo 2. This representation is called the compressed representation (see for instance the publication of the SECG, section 2.3).

If there is a compressed representation, you might expect that there is also an uncompressed representation. This is simply the representation that we have described above, i.e. storing both x and y, with an additional twist: to be able to distinguish this from a compressed representation that always starts with 0x02 or 0x03, a leading byte with value 0x04 is added so that the total length of an uncompressed representation is at most 65 bytes. Since version 0.6.0, the bitcoin reference implementation defaults to using compressed keys (see the function CWallet::GenerateNewKey).

Let us summarize what we have learned so far in a short Python code snippet that will take a private key (stored as integer in the variable d), calculate the corresponding point on the elliptic curve SECP256K1 using the ECDSA library and create a compressed representation of the result.

#
# Determine the public key from the
# secret d
#
import ecdsa
curve = ecdsa.curves.SECP256k1
Q = d * curve.generator
#
# and assemble the compressed representation
#
x = Q.x()
y = Q.y()
pubKey = x.to_bytes(length=32, byteorder="big")
pubKey = binascii.hexlify(pubKey).decode('ascii')
if 1 == (y % 2):
    pubKey = "03" + pubKey
else:
    pubKey = "02" + pubKey
print("Compressed key:  ", pubKey)

This way of encoding a public key is in fact not specific to the bitcoin network, but a standard that is used whenever a point on an elliptic curve needs to be encoded – see for instance RFC5480 by the IETF which is part of the X.509 standard for certificates.

However, this is still a bit confusing. If you known the nuts and bolts of the bitcoin protocol a bit, you will have seen that participants publish something that is called an address which is a string similar to

mx5zVKcjohqsu4G8KJ83esVxN52XiMvGTY

That does not look at all like a compressed or uncompressed public key. We are missing something.

The answer is that an address is in fact not a public key, but it is derived from a public key. More precisely, it is an encoded version of a hash value of the public key. So given the address, it is easy to verify that this address belongs to a certain public key, but it is very hard to reconstruct the public key given the address.

To understand the relation between a public key and an address better, it is again time to take a look at the source code of the reference client. A good starting point is the RPC method getnewaddress. This method is defined in the file wallet/rpcwallet.cpp and creates an instance of the class CBitcoinAddress which in turn is – surprise – derived from our old friend CBase58Data. The comments are quite helpful, and it is not difficult to figure out that a bitcoin address is obtained as follows from a public key.

  • create a hexadecimal compressed representation of the public key
  • apply a double hash to turn this into a sequence of 20 bytes – first apply the hash algorithm SHA256, then RIPEMD160 (this is called a Hash160 in the bitcoin terminology as the output will have 160 bits)
  • add a prefix to mark this as a public key address – the prefix is again defined in chainparams.cpp and and is zero for the main network and 111 for the test networks
  • take the hash256 checksum and append the first four bytes
  • apply Base58 decoding to the result

This is already very similar to what we have seen before and can be done in a few lines of Python code.

def hash160(s):
    _sha256 = hashlib.sha256(s).digest()
    return hashlib.new("ripemd160", _sha256).digest()
#
# Apply hash160
#
keyId = hash160(bytes.fromhex(pubKey))
#
# Append prefix for regtest network
#
address = bytes([111]) + keyId
#
# Add checksum
#
chk = hash256(address)[:4]
#
# and encode
#
address = btc.utils.base58Encode(address + chk)
print("Address:         ", address)

Heureka! If we run this, we get exactly the address mx5zVKcjohqsu4G8KJ83esVxN52XiMvGTY that the bitcoin client returned when we started our little journey at the beginning of the post on private keys.

As always, the full source code is also available on GitHub repository. If you want to run the code, simply enter

$ git clone https://github.com/christianb93/bitcoin.git
$ cd bitcoin
$ python Keys.py

That was it for today. We have now covered the basics of what constitutes participants in the bitcoin network. In the next few posts in this series. we will look at the second main object in the bitcoin world – transactions. We will learn how to interpret transactions, and will eventually be able to manually create a transaction to instruct a payment, sign it, hand it over to our test network and see how it is processed.

A primer on elliptic curve cryptography: practice

In the last post, we have looked a bit at the theory behind elliptic curves. In this post, we will now see how all this works down to earth and use Python to actually run some calculations.

The first thing that we need is an explicit formula for the addition of two points on an elliptic curve. We will not derive this here, but simply give you the result – see for instance [1] for more details. Given two points (x_1, y_1) and (x_2, y_2), the coordinates of their sum (x_3, y_3) can be determined as follows.


inv = inv_mod_p(x2 - x1, p)
x3 = ((y2 - y1)*inv)**2 - x1 - x2
y3 = (y2 - y1)*inv*(x1 - x3) - y1

Here we assume that we have a function inv_mod that will give us the inverse modulo some prime number p which is the number of elements of our base field. Typically, this can be done using the so-called extended euclidian algorithm.

However, there are a few special cases we need to consider. This is apparent if we look at this formula in more detail – what happens if the inverse does not exist because the points x_1 and x_2 are equal?

This happens if we want to add two points that have the same x-coordinate. There are two cases we need to consider. First, the y-coordinates could be equal as well. Then we are trying to add a point to itself, and we need to apply the formula provided in  [1]  for that special case. Or the y-coordinate of the second point is minus the y-coordinate of the first point. Then we try to add a point to its own inverse. The result will be the neutral element of the group which is usually called the point at infinity (there is a reason for this: if we embedd the curve into a projective plane, this point will in fact be the intersection of its completion with the line at infinity in the projective plane…).

To describe points on an elliptic curve, we need both coordinates, the x and the y-coordinate. Thus it makes sense to implement a class for this purpose. Instances of this class need to store the x- and y-coordinates and – for convenience – a boolean that tells us whether a point is the point at infinity. So our full code for this class looks as follows.


class CurvePoint:

    def __init__(self, x, y, infinity = False):
        self.x = x
        self.y = y
        self.infinity = infinity

    def __add__(self, other):
        #
        # Capture trivial cases - one of the points is infinity
        #
        if self.infinity:
            return other
        if other.infinity:
            return self
        #
        # First check whether we are adding or doubling
        #
        x1 = self.x
        x2 = other.x
        y1 = self.y
        y2 = other.y
        infinity = False
        if (x1 - x2) % p == 0:
            #
            # Are we talking about doubling or addition
            # of the inverse?
            #
            if (y1 + y2) % p == 0:
                infinity = True
                x3 = 0
                y3 = 0
            else:
                inv = inv_mod_p(2*y1, p)
                x3 = (inv*(3*x1**2 + a))**2 - 2*x1
                y3 = (inv*(3*x1**2 + a))*(x1 - x3) - y1
        else:
            #
            # Standard case
            #
            inv = inv_mod_p(x2 - x1, p)
            x3 = ((y2 - y1)*inv)**2 - x1 - x2
            y3 = (y2 - y1)*inv*(x1 - x3) - y1

        return CurvePoint(x3 % p, y3 % p, infinity)

As already mentioned, that assumes that you have a function inv_mod_p in your namespace to compute the inverse modulo p. It also assumes that the variables p, a and b that describe the curve parameters are somewhere in your global namespace (of course you could introduce a class to represent a curve that stores all this, but let us keep it quick and dirty at this point).

Now having these routines, we can actually do a few example and verify that the outcome is as expected. We use a few examples with low values of p from [1] .

#
# Define curve parameters
#

p = 29
a = 4
b = 20
#
# and add a few points
#
A = CurvePoint(5,22)
B = CurvePoint(16, 27)
O = CurvePoint(0,0,infinity=True)
C = A + B
assert(C.x == 13)
assert(C.y == 6)
assert(C.infinity == False)
C = A + A
assert(C.x == 14)
assert(C.y == 6)
assert(C.infinity == False)
A = CurvePoint(17,19)
B = CurvePoint(17,10)
C = A + B
assert(C.infinity == True)
A = B + O
assert(A.x == B.x)
assert(A.y == B.y)
assert(A.infinity == B.infinity)
A = O + B
assert(A.x == B.x)
assert(A.y == B.y)
assert(A.infinity == B.infinity)

For the sake of demonstration, we have shown how to build elliptic curve arithmetic from scratch. We could now proceed to implement multiplication and the ECDS algorithm ourselves, but as so often, there is a Python library that will do this for us. Well, there is probably more than one, but I like the Python ECDSA library maintained by Brian Warner.

The most basic classes in this library are – you might have guessed that- curves and points. Curves are initialized providing the basic parameters p, a and b. Then points are created by specifying a curve and the x and y coordinates of the points. Thanks to operator overloading, points can then be added and multiplied with integers using standard syntax. Here is a code snippet that reproduces the first of our examples from above using the ECDSA library.


import ecdsa

#
# Create a curve with parameters p,a and b
# with the ECDSA library
#
curve = ecdsa.ellipticcurve.CurveFp(p,a,b)
#
# Define two points and add them
#
A = ecdsa.ellipticcurve.Point(curve, 5, 22)
B = ecdsa.ellipticcurve.Point(curve, 16, 27)
C = A + B
assert(C.x() == 13)
assert(C.y() == 6)
assert(C != ecdsa.ellipticcurve.INFINITY)

Very easy – and very useful. And of course reassuring to see that we get the same result than our hand-crafted code for the arithmetic above gave us.

But this is not yet all, the library can of course do much more. Let us use it to create a signature. For that purpose, we obviously need a reasonable large value for the prime p, otherwise we could easily use a brute-force attack to determine our private key from the public key. In my previous post on the theoretical foundations, I have already mentioned the papers published by the SECG, the Standards for efficient cryptography group. This group has published some standard curves that we can use. One of them is the curve SECP256K1 which is a curve over a prime field F_p with

p = 2^{256} - 2^{32} - 2^{9} - 2^{8} - 2^{7}-2^{6} - 2^{4} - 1 = 115792089237316195423570985008687907853269984665640564039457584007908834671663

This curve is the curve which is used by the bitcoin protocol. As many other standardized curves, it is hard-coded in the ECDSA library.  To get it, use the following code.


#
# Get the standard curve SECP256K1
# and its parameters
#
curve = ecdsa.curves.SECP256k1
G = curve.generator
p = curve.curve.p()
a = curve.curve.a()
b = curve.curve.b()
n = G.order()

Let us now apply what we have learned about signatures. First, we need a private key and a public key determined from it. Thus we pick a random number that will be our secret and multiply the generator of the curve by it to get our public key.

#
# Determine a private key and a public key
#
d = ecdsa.util.randrange(n-1)
Q = d*G
pKey = ecdsa.ecdsa.Public_key(G, Q)
sKey = ecdsa.ecdsa.Private_key(pKey, d)

Next we need a hash value that we will sign. Usually, we would derive this value from a message using some cryptographic hash function like SHA256, but we will simply simulate this by drawing a random number h. We can then use the method sign of the ECDSA private key object to create a signature. This will return a signature object from which we can retrieve the values r and s.

h = ecdsa.util.randrange(n-1)
k = ecdsa.util.randrange(n-1)
signature = sKey.sign(h, k)
r = signature.r
s = signature.s

Let us verify that the algorithm really works as described  the previous post. So we first need to multiply our randomly chosen integer k with the generator of the curve, the number r should then be the x-coordinate of this point. We then invert k modulo n and multiply the result by h + dr. This should give us s.

_r = (k*G).x() % n
assert(_r == r)

w = inv_mod_p(k, n)
_s = ((h+d*r)*w) % n
assert(_s == s)

If you run this code, you will hopefully see that the assertions pass. Our code works, and produces the same result as the ECDSA library. That is already reassuring. Having gone so far, we can now of course also verify the signature – again we do this once using the ECDSA library and once using our own code.

#
# Now we manually verify the signature
#
w = inv_mod_p(s, n)
assert(1 == (w*s % n))
u1 = w * h % n
u2 = w * r % n
X = u1*G + u2*Q
assert(X.x() == r)

#
# Finally we verify the signature using the
# lib
#
assert(pKey.verifies(h, signature) == True)

That is it for today. We have seen how elliptic curves can be used in practice to create and verify digital signatures and have looked at the ECDSA library that offers ready made functions for that purpose. The full source code can by downloaded from GitHub.

In my next post, I will look at the way how private and public ECDSA keys appear in the bitcoin protocol. If you want to learn more and play around a bit with elliptic curves in the meantime, I recommend the online tool [2]. You might also want to take a look at Andrea Corbellinis excellent post on elliptic curve cryptography.

1. D. Hankerson, A. Menezes, S. Vanstone,
Guide to elliptic curve cryptography, Springer, New York 2004
2. Elliptic curve point addition online tool at https://cdn.rawgit.com/andreacorbellini/ecc/920b29a/interactive/modk-add.html

A primer on elliptic curve cryptography: theory

Strong cryptography is at the heart of the blockchain and many other modern technologies, so it does not hurt to get familiar with the basics. In this post I will explain the foundations of one very commonly used algorithm called elliptic curve digital signature. This post will be a bit lengthy and theoretical but do not worry – we will see how all this works in practice in the next post.

First we need to understand what private and public keys are. At the end of the day, cryptography is about encoding and decoding messages. Suppose, for instance, that two parties (which we will call Alice and Bob to follow the usual naming conventions) want to exchange information, but expect that a third party is able to obtain a copy of every message that they send forth and back, for instance because Alice and Bob communicate over the internet and a third party could control some of the routers sitting between them (yes, we all know this is not just theory…).

One approach that Alice and Bob could use is as follows. In a first step, they both agree on a key. This could be a key phrase or some other sequence of bytes, depending on the exact algorithm they use. To send a message to Bob, Alice would then take the message m and encrypt it, i.e. apply a function f_k that depends on the key k to obtain an encrypted message e = f_k(m).

Alice would then send the encrypted message to Bob. Bob would apply a second function g_k to the received message to decrypt it again. If f and g are chosen properly, then they will be inverses of each other, i.e.

 m=g_k(f_k(m))

Therefore Bob will be able to obtain the original message from the key and the encrypted message. The algorithm is secure if it is virtually impossible to derive the original message from the encrypted message without knowing the key.

This class of algorithms is called symmetric because both parties, Alice and Bob, use the same key, i.e. the same key is used to encrypt a message and to decrypt it again. Unfortunately, there is an obvious challenge when using this in practice: Alice and Bob need to exchange the key and therefore need a separate secure communication channel. In a peer-to-peer network like the blockchain where the nodes can only communicate via the unsecure public internet, this is virtually impossible, and a different approach is needed.

Asymmetric algorithms and public key cryptography are designed to overcome exactly this difficulty. These algorithms uses keys that come in pairs. Every key pair consists of a public key and a private key. As the naming suggests, the public key is intended to be shared, while the private key needs to be kept secret at all times. When Alice wants to send a message to Bob, she will first need to retrieve Bobs public key. Bob could for instance publish his key on a webpage or add it to the signature of an e-mail. Alice would then encrypt the message using the public key. When Bob receives the encrypted message, he uses his private key to decrypt the message again.Knowing the public key and the encrypted message is not sufficient to perform the encryption step, the private key is needed to do this. As only Bob has access to his private key, only he can read a message that has been encrypted with his public key, even though his public key is freely available and known to an attacker.

PublicKeyCryptography

Public key cryptography relies on a mathematical operation that is easy to perform in one direction, but virtually impossible in the other direction. A classical example is the factorization of large numbers. Whereas it is easy to multiply two large prime numbers p and q to obtain their product n=pq, it requires a lot of computing power to execute the reverse operation, i.e. to determine p and q from n. The well known RSA algorithm is based on this.

Other algorithms with this property are certain operations in properly chosen finite groups. Recall that a group is a mathematical structure in which elements can be added and subtracted such that the usual rules like associativity that we are used to from the addition of ordinary numbers apply. In particular, given a group g \in G as well as an integer k, we can form the product kg which is obtained by adding performing k additions.

kg = g + \cdots + g

In some groups, the result of this operation can easily be calculated, but given kg  and  g, it is very difficult to determine k. This property can be exploited to design cryptographic algorithms, as we will see in a few minutes.

One large class of finite groups with this property are elliptic curves over finite fields. Suppose that we are given some finite field K (most of the time, K is the prime field F_p for some prime number p). Let us also assume that the characteristic of K is odd. For our purposes, an elliptic curve over K is the set of points (x,y) that obeys an equation of the form

y^2 = x^3 + ax + b

with constants a,b.

Finite fields are a bit difficult to visualize. To get an idea how an elliptic curve looks like, let us take a look at an example over the reals.

SECP256K1

The curve displayed here has the parameters a=0 and b=7 and features a prominent role in the bitcoin protocol (this curve over a certain finite field is known as SECP256K1, more on this in a later post). The blue line visualizes all pairs (x,y) on the curve. This picture also demonstrates the reason why elliptic curves are so useful for our purposes – points on the curve can be added, and in fact the set of points on a curve forms an abelian group.

To see how the addition works, look at the points marked as A and B in the picture above. To add these points, draw a line through A and B. This line will (ignoring a few special cases and multiplicities for the time being) intersect the curve in exactly one other point, called C in this example. Then reflect on the x-axis to arrive at the point which has the same x-coordinate as C, but minus its y-coordinate. This point is, by definition, the sum of A and B.

If you have a bit of a background in algebraic geometry and that rings a bell, you are right – it has to do with divisors. In fact, the set of points on an elliptic curve is in a one-to-one correspondence with a subgroup of the divisor class group, and the group structure inherited by this relation is the one that I have just described. See [1] for more details.

So now we have a finite abelian group (remember that in reality, we do not do this over the reals but over some finite field) – what can we do with it? To illustrate this, let us describe one application to cryptography called elliptic curve digital signature algorithm (ECDSA). A digital signature is like a watermark that you add to a message to allow others to verify that you have seen and approved the message and that the message has not been altered in transit. Again, most digital signatures involve public and private key pairs. When Alice wants to sign a message m, she uses her private key to encode her message and obtains a signature s. She then sends that signature along with the original message and her public key to Bob. Using that information, Bob can verify the signature to confirm that it has been created using the private key that belongs to the public key and that the message that he has received is identical to the message that Alice has signed. Assuming that only Alice has access to the private key, he can then deduce that Alice has actually composed and approved the message. In practice, it is not the actual message that is signed, but a hash value of the message to keep the signature short.

Let us see how this works (in addition, [2] is a readable and valuable resource for some of the details). Suppose Alice wants to sign a message m. The first thing she will do is to agree with Bob on some set of elliptic curve parameters, i.e. a finite field, the parameters a and b and some point G on the curve called the generator. In [2], a few standard sets have been defined and published, among them the standard SECP256K1, on which Alice and Bob could agree. That information is public and does not need to be protected.

Next, Alice will pick a secret or private key. In our case, this is simply a number d between zero and the order n of the point G. Alice will then determine a public key

Q = dG

which is simply a point on the curve. That key can be freely published – as we have mentioned before, it is computationally very hard to determine the secret d from that information.

All this only needs to be done once. Now comes the part that is specific to the message. First, Alice create a hash value of the message by applying a hash function:

h = H(m)

The hash function needs to be chosen such that the resulting hash value can be interpreted as a number between zero and n - 1. Next Alice picks a random number k between one and n - 1 and determines the coordinates of the point kG. Let r denote the x-coordinate of this point. Then Alice determines

s = k^{-1}(h + dr) \mod n

where the inverse is taken modulo n. The signature that Alice will publish along with the original message is then the pair (r,s).

When Bob wants to verify the signature, he would then again compute h = H(m) and determine the point

X = s^{-1} hG + s^{-1} rQ

on the curve. Let us do a short calculation to see what the expected outcome is. First,

X = s^{-1}(h + rd) G

Now by the choice of s, we also have

s^{-1} = k(h+dr)^{-1} \mod n

Therefore

s^{-1}(h+dr) = k \mod n

As n is the order of G, this implies that

X = kG

Thus we expect that the x-coordinate of the newly computed point X is equal to the x-coordinate of kG which Alice has published as r. If Bob makes this comparison and arrives at this result, he can be almost sure that someone who has access to the private key has signed the message and that the message has not been altered since then.

Note that, if we knew the signature and k, we could compute h + dr and therefore the secret d. It is therefore extremely important to treat the number k with care – use a strong random number generator to obtain it, do not reuse it for further messages and delete it immediately after using it.

We have now seen how arithmetic on an elliptic curve can be used to design a secure and reliable digital signature. I admit that this was a bit theoretical, but now comes the fun part – in the next post we will see how this can be done in Python and code a few examples. Stay tuned…

1. R.Hartshorne, Algebraic Geometry, Springer, New York 1997, example 6.10.2
2. Standards for efficient cryptography 1 and 2 (SEC1, SEC2), SECG Group, available online at http://www.secg.org